24
VIRTUALIZER PRO DSP2024P
If you make changes in a preset and press the STORE key twice, all of the preset’s original
settings are overwritten and your new parameters are stored. If you want to retain the old
preset, you must select another preset (using the JOG WHEEL) before pressing the STORE key
for the second time.
3.5 Comparing an edited preset with the corresponding factory preset (COMPARE
function)
When you have made changes in a preset but have not yet stored your changes, the COMPARE Function
allows you to load the original factory preset and compare it with your changes. To do so, press the
COMPARE key while in edit mode. As long as the COMPARE key’s LED blinks, further editing is (temporarily)
not possible. Press the COMPARE key again to return to your edited preset. Here, you have the choice to
either store your changes (see chapter 3.4), or continue editing (see chapter 3.3).
3.6 SETUP mode
In SETUP mode, you can make global adjustments to the VIRTUALIZER PRO as described in the sub-
sections below. Among these are MIDI, INPUT mode, OUTPUT mode and dual engine configuration
(CONFIG). To enter SETUP mode, press the SETUP key. The red LED below the EDIT CONTROLs lights up.
The four EDIT CONTROLs can now be used to adjust the SETUP parameters. To exit this mode, press the
SETUP key again.
3.6.1 MIDI control
The DSP2024P’s MIDI editing options are shown on seven pages. Enter SETUP mode (see chapter 3.6). With
the help of the 1st EDIT CONTROL, you can select seven different MIDI functions. Data input is always carried
out with the JOG WHEEL. the following pages can be selected:
V CHAN: You can set the MIDI channel on the first page. With the JOG WHEEL, the channel can be set
from 01 to 16. If you select “OFF”, the MIDI function is switched off.
V OMNI: The second page gives access to omni mode. In this case, the unit receives MIDI data on all 16
MIDI channels. “ON” appears in the DISPLAY. With the JOG WHEEL, select “OFF” to deactivate omni
mode.
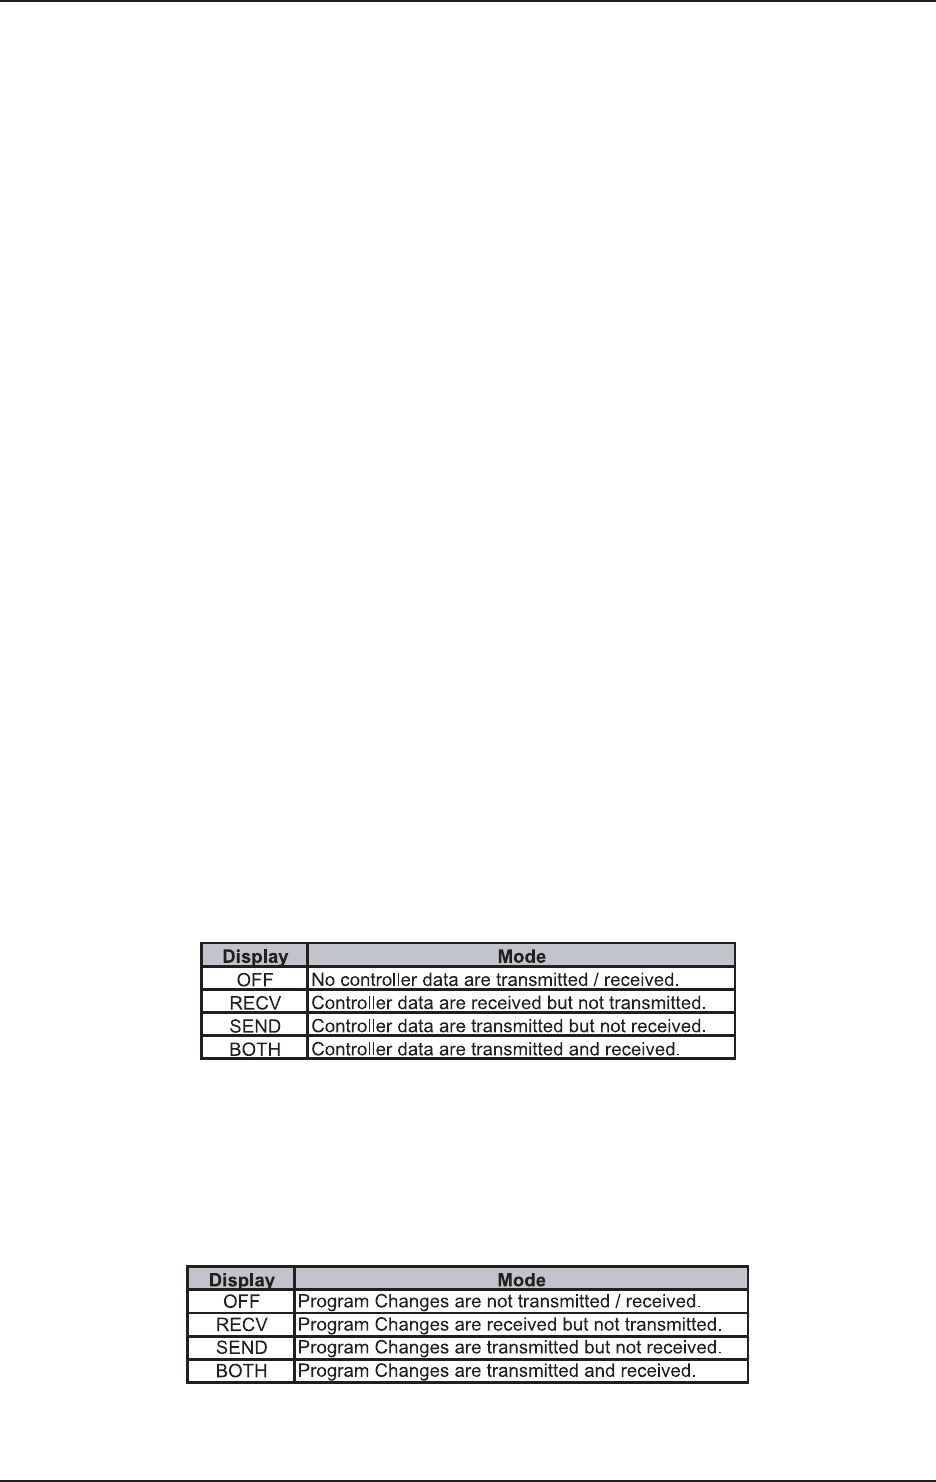
V CONT: On the third page, you can configure the controller commands. You can choose between four
controller modes:
Tab. 3.1: Controller settings
For controller functions see table 7.4 in chapter 7 “APPENDIX”.
V PRGM: Page four will bring you to the setup for the program changes. Once again, you have four modes
to select from:
Tab. 3.2: Program change settings
3. OPERATION
