


14
EURORACK MX2004A
5.5 Multitrack initialization
Set up the multitrack so that any track in “record ready” condition has its input monitored when the tape is
stationary. Place all tracks to be recorded into “record ready” status. (Once a recording has been made, these
tracks should automatically switch to tape playback. Check that the input levels to each track are optimized
before recording commences).
5.6 Recording levels
When recording to digital, it’s a good idea to keep the recorder’s peak meters below 0 dB. Most (not all, esp.
samplers) read 0 dB with some headroom left. This is because, unlike with analog, the onset of digital distor-
tion is as sudden as it is horrible. If you really want to take your recording level to the limit (and fully exploit for
instance 16-bit digital’s 96 dB dynamic range), you’ll have to do some calibrating. How to do it? Well, you could
run a tone at 0 dB from the mixer and use that as your DAT reference. But your DAT may be way under its
maximum input limit. Probably a better way to work out just how hard you can drive your recorder is to
incrementally increase the record level until the onset of digital distortion, subtract, say, 5 or 10 dB, and never
exceed that level. Engage “peak hold” on your recorder before recording if you want to confirm that you haven’t.
When recording to analog, the tape machine’s VU meters should show around +3 dB on bass, but only around
-10 dB for hi hat. Although analogue distortion is more like compression at modest overload levels (often
desirable on bottom end), higher frequencies cause saturation even at modest levels (resulting in an unpleas-
ant “crunchiness”). Also, VU meters tend to progressively under-read above 1 kHz, due to their sluggish
response time. Hi-hats should read about -10 dB on a VU meter, as against 0 dB for a typical snare drum, and
+3 dB or more for a kick drum.
Peak meters read more-or-less independent of frequency. Aim for 0 dB recording level for all signals.
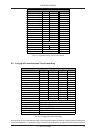
5.7 Track sheet
When laying out channels for recording or mixing, try to be sensible. Keep toms together, etc. Work out a
scheme that suits you and stick to it. A common order is: kick drum, snare, hi-hat, tom-toms (as the audience
sees the kit), cymbals (ditto), bass, guitars, keyboards, other instruments, vocals. From session to session
and gig to gig you will soon know where you are without hardly ever having to look at your track sheet.
6. APPLICATIONS
Experience tells us that the cables in a studio environment get tangled very quickly (inviting mistakes). A
patchbay will facilitate patching and repatching considerably. The BEHRINGER ULTRAPATCH PRO PX2000
makes patching easier and trouble free, increasing both ergonomics and productivity.
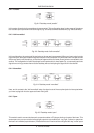
6.1 Keyboard mixing, live or in the studio
This is relatively simple to achieve. Simply use the line inputs to mix stereo or mono outputs from your
keyboards. It may be useful to use the Alt 3-4 outs e.g. to control the level of drums versus music. Aux sends
may be used either to feed on-stage monitors, artists headphones or effects units. The main mix output should
feed the FOH or studio mixer. A typical comprehensive live setup is shown below.
6. APPLICATIONS