


10
V-AMPIRE/V-AMP PRO/V-AMP 2
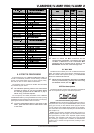
Tab. 3.1: Configurations
4. PRESETS
4. PRESETS
Your device features 125 overwritable presets divided into 25
banks. In other words, there are five presets available per bank.
Each preset consists of a maximum of five ingredients:
s amp simulation (including GAIN, EQ and VOLUME settings)
s cabinet simulation
s pre-amp effect, such as noise gate, compressor, auto wah
and wah-wah
s post-amp multi-effect, such as delay, modulation effect, or
a combination of both
s reverb effect
The enclosed sheet shows an overview of all the presets.
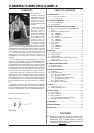
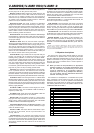
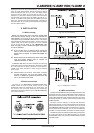
4.1 Calling up presets
When the unit is switched on, it automatically loads the last
used preset. In the following example, the last preset selected
was preset D in bank 25:
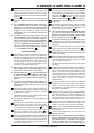
Fig. 4.1: Calling up presets on the V-AMP 2
(similar to V-AMPIRE and V-AMP PRO)
In this case, by pressing button A, B, C or E you can immediately
call up another preset of the same bank. The two arrow keys
(BANK UP and BANK DOWN) enable you to switch banks. The
display always shows which bank has been selected. When
you switch banks, the preset has to be called up by pressing
one of the buttons A - E. One LED lights up to show you which
preset in the respective bank has been activated.
Amp simulation, dry effects Amp simulation effects
Live 1 (L1)
Live 3 (L3)
Amp simulation with
3-band EQ and effects but
speaker simulations
Amp-, speaker simulation
and effects but
3-band EQ
with analog ULTRA-G speaker simulation
: Speaker and amp simulation,
3-band EQ + effects
speaker simulation
but with 3-band EQ, amp simulations + effects
with effects, amp and speaker simulation
Amp and speaker simulation, dry
effects
Amp and speaker simulation
effects
Live 2 (L2)
speaker simulation but
with 3-band EQ, amp simulation and effects
: Speaker and amp simulation,
3-band EQ + effects
Studio 3 (S3)
Studio 2 (S2)
Studio 1 (S1)
with effects, amp and speaker simulation
with analog ULTRA-G speaker simulation
Amp and speaker simulation, dry
effects
Amp and speaker simulation
effects
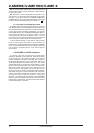
4.2 Editing presets
Editing presets is fast and simple. One option is to call up a
preset you like and then start editing it. Select an amp model by
means of the AMPS encoder. The LED on the preset button
flashes (e.g. D) and signals that you have made a change to the
preset.
Now change the settings of the VOLUME, BASS, MID, TREBLE
and GAIN controls as you like. If you select an effect, you can
adjust its ratio in the overall sound using the EFFECTS control.
You then switch to EDIT mode by pressing the arrow keys
simultaneously. If you use buttons B - E to activate the DRIVE,
CABINETS, REVERB and NOISE GATE functions respectively
and then edit using the arrow keys, the value of the respective
parameter is shown in the display. To quit EDIT mode, briefly
press the TUNER button.
If you hold the TAP button down while using the TREBLE control,
you can raise or lower an additional high-frequency filter
(PRESENCE). This simulates the frequency-sensitive coupling of
tube amps.
+ Apart from compressor and auto wah, all the multi-
effects have a speed-based parameter. Say you
want to set the effect youve selected to the tempo
of your playback: just tap the TAP button twice in
time to the music and the effect tempo will match
the tempo of your piece.
4.3 Storing presets
To store your edited preset, hold down the preset button
required for approx. 2 seconds for the preset to be overwritten
(the corresponding LED lights up throughout).
+ You do not necessarily have to store your edited
preset in place of the original preset selected. If
you choose a different storage position, select the
preset bank you want using the arrow keys (BANK
UP and BANK DOWN). You can store your changes by
holding down the preset button for approx. two
seconds. For example, you can edit a preset
originally stored in bank 5, position D, and then store
it in bank 6, position A.