


8
V-AMPIRE/V-AMP PRO/V-AMP 2
3. OPERATING MODES AND APPLICATIONS
internal speaker. Two speakers with 8 W/50 Watts
each can be connected to the outputs (the internal
speaker automatically shuts off). Our ULTRASTACK
BG412 series suits this application ideally.
3. OPERATING MODES AND
APPLICATIONS
One outstanding feature of our V-AMP products is that you
can choose yourself which parts of the signal you want to route
to the outputs. To adapt your device perfectly to the various
studio and live applications you can choose between 5 different
operating modes (CONFIGURATIONS). Independent of the
settings stored in the presets, these operating modes determine
where the signal for the line outs and headphones comes from
so that both left and right output signal can be used for different
purposes.
The choice of your most suitable operating mode depends on
where you use it. We have described some typical applications,
distinguishing between particular features of the V-AMPIRE,
V-AMP PRO and V-AMP 2 (see view sheet for details).
+ With the headphones plugged, the device auto-
matically switches into studio 1 (S1) operating
mode.
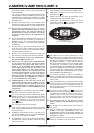
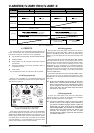
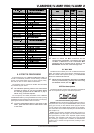
3.1 Selecting an operating mode in
CONFIGURATION mode
The settings of the configurations are made in the configuration
menu by pressing the buttons D and E (B and D for the V-AMP 2).
The display shows the current configuration. Use the arrow
keys to select another configuration. Please refer to table 3.1 for
information on the corresponding output signals.
+ By pressing the TAP key and adjusting the GAIN
control you can additionally adapt the input
amplification to particularly loud pick ups.
In the configuration menu you can adapt the input gain to
different pick up types. To do this, keep the TAP key pressed
and the surrounding GAIN control LEDs show the current setting.
Turning the GAIN control from its center position to the left you
will reduce the input amplification which probably is
recommendable with very loud pick up types. GAIN settings in
clockwise direction are only recommended with very weak pick
up types.
Quit the configuration menu by pressing TUNER/EXIT.
3.2 Rehearsal or recording at home
When using headphones, all three V-AMP models will switch
into studio mode 1 (S1). This mode is particularly suitable for
rehearsals or when recording/monitoring a stereo signal. You
could also use live mode 1 (L1) which applies an additional
3-band EQ.
One advantage of rehearsing at home is that there is often a
computer available which allows you to design, edit, send, receive
and archive new presets comfortably and effectively. Download
our V-AMP DESIGN software free of charge at www.v-amp.com.
You can create your own presets even with minimum system
requirements (Windows PC with MIDI interface or gameport MIDI
adapter). On the V-AMP homepage you also find an online preset
database (ULI, user library interface) with plenty of presets created
by other V-AMP users and famous artists. Here, you can upload
your own favourite presets and make them accessable for other
users.
Using studio mode 2 (S2) at home can be a good idea when it
comes to recording an amp sound without effects (dry) but
monitoring it with effects (wet). Working this way, you are
able to choose the effects you want later during mixdown. In
this case you would route the left output to the soundcard of
your computer and monitor the right output via your mixing console.
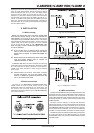
3.2.1 V-AMPIRE
Figure 1.3 on the view sheet shows a typical home application.
We recommend modes S1, L1 or L2.
S1 comprises all amp, speaker and effects simulations. The same
applies to mode L1 which also includes the 3-band EQ for additional
sound adaption. Mode L2 works similarily but here the digital speaker
simulation is switched off and our analog ULTRA-G simulation is
enabled on the XLR or phones outputs.
+ When connecting headphones, the amp signal is
automatically muted. Thus, if you unplug the
headphones we strongly recommmend to turn the
MASTER control to the very left. The XLR output is
independent of the MASTER control setting. This
allows to take out a line signal for recording
purposes while the MASTER control is set to
minimum.
As with the V-AMP 2 the stereo AUX input enables you to play
back line signals like CDs, drum computer etc.
3.2.2 V-AMP PRO
In the studio, monitoring will be performed at the mixing console,
and for this reason there is no need for an aux input on the
V-AMP PRO.
Figure 2.4 of the view sheet shows how to connect the
V-AMP PRO to the digital input of a PC in a recording application.
Possible digital inputs on the PC are balanced AES/EBU or coax-
type S/PDIF inputs. When the V-AMP PROs digital output is set to
44.1, 48 or 96 kHz, the PC has to synchronize with the
V-AMP PRO, i.e. in clock slave mode. If the PC or any other
device is intended to work as clock master, the V-AMP PRO has
to be synchronized externally via the wordclock input. The sample
rate depends on the wordclock signal but must range between
32 to 96 kHz.
In addition, figure 2.4 shows an effects device connected to
the Pre DSP INSERT in order to edit the input signal before any
digital simulations. To do this, the LINE IN button has to be pressed.
Depending on your application, we recommend studio mode
S1 or S2. Mode S1 includes all amp and speaker simulations with
effects in stereo while S2 has the effects at the right output only
allowing you to record this track dry and add effects later at
mixdown.
3.2.3 V-AMP 2
While rehearsing with your V-AMP 2, you are able to connect
any kind of playback or a metronome in the AUX stereo input and
adjust its level with the AUX LEVEL control (see fig. 3.3 on the
view sheet). For monitoring you can take the line outputs to an
amplifier, like our EUROPOWER series, or to a stereo, or you can
use headphones connected to the phones output.
Fig. 3.4 on the view sheet shows the previously mentioned
arrangement for S2.
3.3 Live on stage or in a rehearsal room
Since neither the V-AMP PRO nor the V-AMP 2 are fitted with
speakers, some additional gear will be needed to hear the sound.
If you are using a sound reinforcement system, it is a good idea
to make sure that either the analog ULTRA-G or one of the
programmable digital speaker simulations is active.