


15
V-AMPIRE/V-AMP PRO/V-AMP 2
pressing the two arrow keys simultaneously. The display will
show 40, which means 440 Hz. Use the arrow keys to raise or
lower the reference pitch by up to 15 Hz. The display always
shows the last two digits as the first digit is always 4. For
example, if you start with a reference pitch of 440 Hz and press
the right-hand arrow three times, the display will read 43, i.e.
443 Hz. To quit EDIT mode, press either the TUNER or the TAP
button. Any changes will be stored automatically. The tones for
the other strings on your guitar will automatically be adjusted to
the new reference pitch.
8. INSTALLATION
8.1 Mains voltage
Before you connect the unit to the mains, please make
sure that the voltage setting on the unit matches the
local voltage! The fuse holder at the AC power connector has
3 triangular markings (V-AMPIRE/V-AMP PRO only). Two of these
three triangles are aligned with one another. The unit is set to the
voltage shown next to these markings and can be switched
over by turning the fuse holder by 180°. IMPORTANT: This
does not apply to export models designed exclusively
for 120 V operation!
+ If you set the unit to a different mains voltage, be
sure to use a fuse of the correct type and rating.
Please refer to chapter 10 SPECIFICATIONS for
details.
+ Blown fuses must be replaced by fuses of the same
type and rating! Please refer to chapter 10
SPECIFICATIONS for details.
V-AMPIRE/V-AMP PRO: The mains connection is made using
the enclosed power cord and a standard IEC receptacle. It meets
all of the international safety certification requirements.
V-AMP 2: the mains connection is made using the enclosed
power supply.
+ Please make sure that all units have a proper
ground connection. For your own safety, never
remove or disable the ground conductor from the
unit or of the AC power cord.
8.2 Audio connections
The inputs of your BEHRINGER V-AMPIRE/V-AMP PRO/
V-AMP 2 come as mono 1/4" jacks. All line out, line in and
headphones outputs are configured as 1/4" stereo jacks. The
line outputs work with both balanced and unbalanced
connections. The DI OUT outputs of your V-AMPIRE/V-AMP PRO
are on XLR connectors.
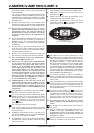
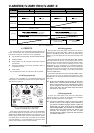
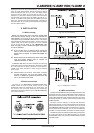
Fig. 8.1: XLR connectors
Fig. 8.2: 1/4" TS connector
Fig. 8.3: 1/4" TRS connector
Fig. 8.4: Headphones connector
8.3 MIDI connections
The MIDI standard (Musical Instruments Digital Interface) was
developed in the early 80s to enable different makes of electronic
instruments to communicate with each other. Over the years the
range of MIDI applications has constantly expanded, and today it
is standard practice to network entire recording studios using
the MIDI standard.
The heart of such a network is a computer with sequencer
software that controls not only all the keyboards but also effects
other peripheral devices. In such a studio set-up you can control
the V-AMPIRE/V-AMP PRO/V-AMP 2 in real time from a computer.
For live performances in particular, you can also use a MIDI foot
controller to control both effect parameters and preset changes.
The MIDI connectors are international-standard 5-pin DIN jacks.
To connect your device to other MIDI equipment you will need
dedicated MIDI cables. They are commercially available in various
standard lengths.
8. INSTALLATION