


5
V-AMPIRE/V-AMP PRO/V-AMP 2
2. CONTROL ELEMENTS
On the added view sheet you will find the corresponding
illustrations for all control elements. The numbering of most of
the control elements is the same for all three products. Because
of the different design and some varying elements, the numbering
is not always consistent. We therefore marked those differences
adding a V-AMPIRE only, V-AMP PRO only or V-AMP 2 only.
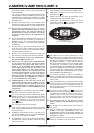
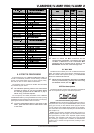
2.1 Front panel/surface
Use the POWER switch to put the V-AMPIRE (rear) and
the V-AMP PRO (front) into operation. The POWER switch
should be in the off position (not pressed) if you want to
connect the device to the mains.
+ Attention: The POWER switch does not fully
disconnect the unit from the mains. Unplug the
power cord completely when the unit is not used
for prolonged periods of time.
The GAIN control determines the distortion level of an
amp simulation.
The VOLUME control determines the volume of the se-
lected preset.
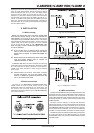
The BASS control in the EQ section is for boosting or
cutting the low-frequency range.
The MID control is for boosting or cutting the mid-range
frequencies.
TREBLE controls the high-frequency range of the selected
preset.
+ The LED rings around the VOLUME, BASS, MID,
TREBLE, GAIN, EFFECTS MIX and REVERB controls
each have nine LEDs. On each ring either one LED or
two neighboring LEDs (in between positon) will light
up at a time, indicating a total of 17 different
positions.
+ If the TAP key is down, the TREBLE control
functions as a PRESENCE control. This enables you
to boost/cut a high-frequency filter tuned to
whatever amp model is active, thus simulating the
frequency-dependent coupling of tube amps.
The AMPS control is for selecting one of 32 different
amplifier simulation models. The control is surrounded by a
ring of 16 LEDs. Each LED corresponds to two types of
amplifier. The first 16 simulations can be selected by turning
the AMPS control (V-AMP PRO/V-AMP 2: white, V-AMPIRE:
black).
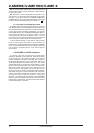
To select the simulation models 17 - 32 (V-AMP PRO/
V-AMP 2: gray, V-AMPIRE: white), press down the TAP
key while making your selection by turning the AMPS
control.
+ The LED 17 - 32 in the bottom left-hand corner of
the DISPLAY indicates that one of the simulation
models 17 - 32 has been selected.
In addition, you can activate a PREAMP BYPASS by
pressing the key combination TUNER and TAP . If
PREAMP BYPASS has been selected, none of the LEDs
on the AMPS control lights up. To disable PREAMP
BYPASS, simply select a different amp model or press
both keys again.
These five keys are for selecting a preset (A - E) within
one bank.
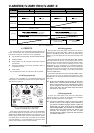
In EDIT mode (activated by simultaneously pressing the
arrow keys described in ), the keys perform the
function printed directly above them:
2. CONTROL ELEMENTS
1. INTRODUCTION
Congratulations! With the V-AMPIRE, V-AMP PRO and V-AMP 2
you have acquired an up-to-date guitar amp of the newest
generation. Each one offers you a range of sonic posibilities as
wide as your own imagination.
With the V-AMPIRE you own the new combo version of our
famous V-AMP 2. Its an allrounder with so many features that
you hardly need any other equipment.
The V-AMP PRO is the big brother of the V-AMP 2. Besides
the V-AMP 2 features, the PRO version offers digital output
signals and you can even select the output format. External
synchronization of your V-AMP PRO is possible via wordclock.
The V-AMP 2 is the revised and furtherly developed well-
known V-AMP model. With this modern virtual guitar amp we
have set a new standard. The V-AMP 2 offers 32 authentic amp
and even special loudspeaker cabinet sounds without the usual
transportation problems.
But enough of this talk: Nothing will convince you more than
what you hear and feel when you test your virtual amp for the
first time.
But ...
1.1 ... before you get started
The unit was carefully packed at the factory and the packaging
is designed to protect the unit from rough handling. Nevertheless,
we recommend that you carefully examine the packaging and its
contents for any signs of physical damage which may have
occurred during transit.
+ If the unit is damaged, please do NOT return it to
BEHRINGER, but notify your dealer and the shipping
company immediately. Otherwise, claims for
damage or replacement may not be granted.
Be sure that there is enough space around the unit for cooling
and, to avoid overheating, please do not place the device near
radiators etc.
+ Before you connect the unit to the mains, please
make sure that the voltage setting on the unit
matches the local voltage!
The mains connection of the V-AMP 2 is made by using the
enclosed power supply, which meets all of the international
safety certification requirements. As soon as the V-AMP 2 is
connected to the mains via its power supply, the unit is switched
on automatically.
+ Please make sure that all units have a proper
ground connection. For your own safety, never
remove or disable the ground conductor from the
unit or of the AC power cord.
The MIDI connections (IN, OUT/THRU) are for standard DIN
connectors. Data is transferred via ground-free opto-couplers.
Further information can be found in chapter 8 INSTALLATION.
1.1.1 Serial number
The serial number is located on the rear panel of your
V-AMPIRE/V-AMP PRO/V-AMP 2. Please take the time to fill in
and return the warranty card within 14 days after the date of
purchase, so as to benefit from our extended warranty. Or
register online at www.behringer.com.