


9
V-AMPIRE/V-AMP PRO/V-AMP 2
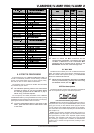
3.3.1 V-AMPIRE
Not only does the V-AMPIRE has its own built-in speaker,
which means you can plug in and play without further equipment,
the V-AMPIRE also allows to connect a second external
loudspeaker. Using the left speaker output mutes the internal
speaker, diverting the full 100 W to the external 4 Ω speaker (see
fig. 1.4). This makes sense particularly if the external speaker
has a specific sound which cannot be recreated using the
internal speaker.
You can also connect to an external stereo speaker
arrangement, e.g. our BG412S. In this configuration the V-AMPIRE
developes 2 x 50 W into 8 Ω per side. This lets you take full
advantage of the V-AMPIREs stereo effects (fig. 1.5).
Alternatively, an external 8 Ω speaker may be connected to
the right speaker output. This also represents a stereo
configuration, because the internal speaker is not muted, as
shown in fig. 1.6.
The starting configuration for this application would be L2, i.e.,
a stereo signal with all effects, amp simulation and live EQ but no
speaker simulation. The ULTRA-G speaker simulation is available
at the XLR output and thus connectable to a sound reinforcement
system. Here, the MASTER control only influences the stage
volume but not the XLR output. If you want to listen to a digital
speaker simulation using an amplifier, select L1.
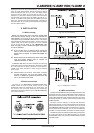
3.3.2 V-AMP PRO
Because of its additional outputs and the analog ULTRA-G
speaker simulation the V-AMP PRO is even more flexible on
stage. Figure 2.5 shows a stereo application with active stage
monitors which are connected to the unbalanced line outs. Use
the MASTER control to set the volume of the monitor speakers
while the XLR output signal is sent at full volume to a sound
reinforcement system. The appropriate modes are S1 or L1
depending on whether the 3-band EQ is needed or not.
Since the receiver of the wireless system is connected to the
rear line input, the line input switch on the front has to be pressed.
Use this switch also to mute the signal while you change your
guitar.
Figure 2.6 displays a very similar application: The monitor amp
in this case is a guitar amp so that mode L2 (no speaker simulation)
is recommendable.
3.3.3 V-AMP 2
Figure 3.5 on the view sheet shows the V-AMP 2 connected
from its line out to the line input of the guitar amp or head. Using
the instrument input would not be the best idea since the signal
is passed through the whole pre amplifier stage. BEHRINGER
offers a wide range of guitar amps which are equipped with an
aux input and thus are perfect for this application. Since a guitar
amp already has its own sound, a digital speaker simulation is
not needed. We therefore recommend mode L2.
Figure 3.6 describes another speciality of the V-AMP 2 in
mode L3: A guitar amp is used as monitor speaker on stage
while simultaneously a second signal is sent to a sound
reinforcement system. By doing so, you can completely eliminate
the need for miking the amp.
A special feature of the L3 mode is that the signal to the guitar
amp has no speaker simulation, instead it has an additional
3-band EQ which allows you to tailor your on-stage sound. The
signal for the sound reinforcement system remains unaffected
by the 3-band EQ, but it does include the speaker simulation. This
simulation is necessary to reproduce the character of a guitar
cabinet sound using the speakers of the sound reinforcement
system.
3.4 Recording
For this applications we assume that at least a mixing console
and a recording device is available.
3. OPERATING MODES AND APPLICATIONS
3.4.1 V-AMPIRE
As with rehearsals at home or anywhere else, the V-AMPIRE
can be connected directly to a mixing console or recording device
via its XLR outputs. In addition, you can use the pre DSP insert
send to record the same direct guitar signal without needing
another DI-box for impedance adaption.
Since the usual volume problem does not exist in studio
environments, the V-AMPIRE has more to offer than those features
described in chapter 3.2.1. In the studio you can raise the volume
to take full advantage of the V-AMPIREs own sound. If you have
a particular speaker cabinet with its own sonic character you can
drive it via the speaker output. You will need to use a microphone
to capture this special sound. If you want to create intentional
feebacks from the speaker, you can still feed the XLR output into
the console to be recorded. We recommend mode L2, with 3-band
EQ but without digital speaker simulation (see fig. 1.4).
3.4.2 V-AMP PRO
For studio applications we recommend modes S1, S2 or S3.
S1 reproduces all amp and speaker simulations with effects in
stereo (as with the V-AMP 2) while with S2, the effects are
applied to the right channel only. In mode S3, the digital speaker
simulation is shut off for the case that the speaker sound is to be
determined later during mixdown. Therefore, in S3 mode the
proven ULTRA-G speaker simulation is switched to the XLR and
headphones outputs. When recording in S3 mode, the monitoring
should thus be done at the analog XLR and headphones outputs
and not at the digital outs. If you want to record the original guitar
signal you could use the setup shown in fig. 2.3. Press the LINE
INPUT switch if you want to monitor the recorded signal via the
V-AMP PRO. We recommend to use modes S1 or L1. Mode S2 is
an alternative if you want to adjust the effect ratio on the mixing
console.
+ Please note that the ULTRA-G speaker simulation
in modes S3 and L2 only affects the XLR and
headphones outputs and does not have any
influence on the digital outputs.
3.4.3 V-AMP 2
To record a stereo signal with all effects, amp and speaker
simulations, select modes S1 or L1 (with 3-band EQ) and connect
the balanced line outs with the mixing console or recording device.
This advantage is a disadvantage at the same time:
You hear the sound exactly the way you record it. So if you
decide to make a change, you will need to record the whole
track again.
With studio mode S2 all effects are therefore put out through
the right channel only, while on the left channel you will find the
amp and speaker simulations. This enables you to record the dry
amp signal and determine the effects later on during mixdown
(see fig. 3.4).
If you want to go the safe way, we recommend to split up the
input signal with a high-quality active DI-box, e.g. the BEHRINGER
GI100. To do this, connect the guitar to the GI100 input, the direct
link to the input of your V-AMP 2 and the XLR output to the
recording device. In that manner, you can record the direct guitar
signal with the amp simulation on one channel each and listen to
the complete signal with all effects on your headphones (see
fig. 3.4).