


6
V-AMPIRE/V-AMP PRO/V-AMP 2
s A: Accesses the MIDI functions. Use the arrow keys to
set the MIDI channels (1 through 16) for transmitting and
receiving MIDI data.
If you use key A in EDIT mode to select the MIDI function
and then press the TAP key, the MIDI OUT jack is set to act
as a MIDI THRU. In this setting (the TAP LED is lit) no MIDI
data is sent, but the device passes on the signal received
at the MIDI IN jack.
s B: Selects the DRIVE function. This noticeably raises
distortion and volume. Use the arrow keys to switch DRIVE
on and off. The DRIVE function is wired pre GAIN control.
+ While editing the DRIVE function, you can also
activate and adjust the Wah-Wah effect by turning
the EFFECTS control. The LEDs surrounding the
EFFECTS control indicate the position of the pedal.
If none of the LEDs lights up, the Wah-Wah is not
acitvated.
s C: This key activates the CABINETS mode. Use the arrow
keys to select the type of speaker or combination of
speakers you want. You can also switch off the speaker
simulation completely (-). For further details, please refer
to chapter 5.2.
s D: Use this key to select the REVERB function. The
arrow keys can be used to select one of nine different
types of reverb in addition to the multi-effects processor.
For further details see chapter 6.3.
s E: Here you can activate the NOISE GATE function. Use
the arrow keys to adjust the noise reduction threshold.
+ After preset editing, please press TUNER/EXIT to
quit (the EDIT MODE LED dies out).
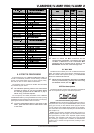
+ DIGITAL OUT: The digital output (V-AMP PRO only)
can be configured if keys A and B are pressed
simultaneously. The display reads either SP for
S/PDIF or AE for AES/EBU. Switch between these
two formats using the TAP key. The LEDs in the
display show whether you have chosen internal
synchronization (with 44.1, 48 or 96 kHz sample rate)
or external synchronization via word clock (see tab.
2.1 in this users manual). Use the arrow keys to
select the appropriate sample rate with respect to
the receiving device. The TUNER/EXIT key allows you
to quit the DIGITAL OUT configuration.
+ CONFIGURATION: If you press the D and E keys
simultaneously (B and D on the V-AMP 2), you can
select the general operating mode of your device
allowing adjustments to different studio and live
situations (see chapter 3). Press TUNER/EXIT to quit
configuration.
The TUNER button is for switching on the tuner. In addition,
this button can be used to quit EDIT mode (Exit).
Use the two arrow keys to select a different bank (BANK
DOWN and BANK UP). You can skip banks by holding
each of the keys down. To activate the EDIT mode, press
both keys simultaneously. If you press one of the keys
A - E ( ) in that mode, the arrow keys can be used for
setting parameters.
The TAP button performs seven functions:
s Tap: Tap the rhythm of a piece of music on the TAP
button and the selected effect automatically adapts to the
tempo of the music.
s Presence: While holding down the TAP button, you
can use the TREBLE control to change the PRESENCE
setting of the amp model youve selected.
s 2
nd
parameter: You also can access the second effects
parameter set by using the EFFECT control while holding
down the TAP button.
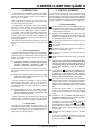
2. CONTROL ELEMENTS
s Amp models 17 - 32: Keep the TAP button pressed
down and select an amp model using the AMPS control.
s MIDI Thru: The MIDI OUT jack can be set to act as
MIDI THRU (see A).
s Drive: Using the TAP button and the EFFECT control
changes the sound of the Wah-Wah effect.
s Input Gain: By pressing the TAP button in the
configuration menu (see ) you change the value (please
refer to chapter 3.1 for further information).
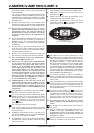
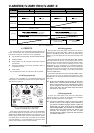
Fig. 2.1: V-AMP PRO display
Tab. 2.1: Output formats and display LED assignments
The DISPLAY shows you which preset bank you have
selected and gives you information on parameter changes
when you are editing. In TUNER mode the DISPLAY shows
the pitch of the instrument connected to the unit. If one of
the amplifier simulations 17 - 32 has been selected, the
LED in the bottom left-hand corner of the DISPLAY lights
up. Additionally, the DISPLAY reads the digital format
output and the sample rate (V-AMP PRO only) and illustrates
whenever the V-AMP PRO is synchronized by an external
word clock signal (EXT.). Applied signals are indicated by
the green SIGNAL LED, overload signals by the red CLIP
LED (V-AMPIRE and V-AMP PRO only).
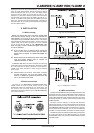
This control is for selecting an effect or a combination of
effects. This encoder-type rotary control is also surrounded
by a ring of 16 LEDs. Each LED corresonds to one specific
effects preset.
Using the REVERB control, you can add the reverb content
of your choice to your overall sound. By turning it to the left
until all the LEDs are off, you deactivate the reverb. To
fade out the original signal, turn the control to the right until
only the last LED lights up.
If an effect has been selected via , its part of the
overall sound can be set using this EFFECTS control. If
you select the Compressor effect, you can use the
EFFECTS control to adjust the compression intensity.
Turning the control to the left until all the LEDs are off
disables the effect. This is known as an effects bypass.
+ By pressing the TAP key, you can set a second
effects parameter using the EFFECTS control (see
tab 6.1).
The MASTER control determines the overall volume of
your device.
+ This is, besides the AUX LEVEL control of the
V-AMP 2, the only conventional and non-
programmable control. All the other controls are
encoder-type rotary controls whose settings can
be stored in a preset.
The INPUT socket is the 1/4" jack socket for your guitar.
Please use a standard 1/4" mono jack cable.