


CONTROLS AND DISPLAYS
21
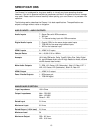
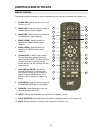
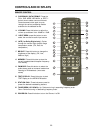
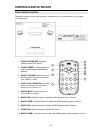
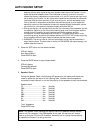
REMOTE CONTROL
1
2
3
4
5
6
7
8
9
10
11
12
13
14
15
16
17
18
19
20
21
22
23
AUTO SETUP
HDAM
HDFM
FM
AM
FM
MODE
TEXT
DISPLAY
POWER
OFF
POWER
ON
TUNER SEEK
TUNER
SCAN
MEMORY
BRIGHT
EQ
ENTER
SETUP
LATE
INPUT SELECTOR
7.1 IN HDMI 1 HDMI 2
INPUT
SEEK
MUTE
VOLUME
PLIIx
SUR.
MODE
NEO:96/24
CES 7.1
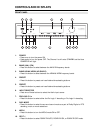
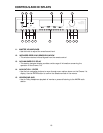
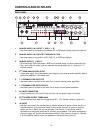
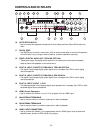
This section explains how best to use the remote control to set up and operate the Cinema 11a.
1. POWER OFF: Press this button to turn the
Cinema 11a OFF.
2. BAND (AM): Press this button to switch to
the AM frequency band reception.
3. BAND (FM): Press this button to switch to
the FM frequency band reception.
4. BAND (HDAM): Press this button to
switch to the HDAM frequency band
reception.
5. BAND (HDFM): Press this button to
switch to the HDFM frequency band
reception.
6. TUNER SCAN: If INPUT is set to AM or
FM, use this button to scan frequencies
that have been PRESET. The scan will cycle
through the stations, starting with the
current station, one after another with five-
second delays.
7. NAVIGATION/ENTER: Use the four
NAVIGATION buttons to move through
menu options shown on the Cinema 11a
display. Press the ENTER button in the
center to confirm selections made in the
menus.
8. AUTO SETUP: Press this button to start an
AUTO SOUND SETUP test on your system.
9. ROOM EQ: Press this button to turn the
Room Equalization ON or OFF.
10. SETUP: Calls up the Setup Menu on the Cinema 11a display, if active.
11. INPUT SELECTOR: Use these buttons to select the desired source for your Cinema 11a.
12. MUTE: Press this button to mute the main volume of the Cinema 11a.