


SETUP MENU
38
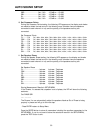
ASSIGNED INPUTS
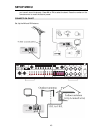
Assign input sources to input Connectors. The following selected menus appear on the Cinema
11a display:
Assigned Inputs
Input 1 XLR Digital
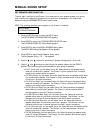
To assign inputs:
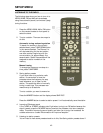
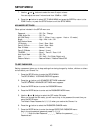
1. Press the SETUP button to enter the SETUP MENU.
The SETUP MENU / LISTENING PROFILES appears.
2. Press the
button until INPUTS is selected.
The SETUP MENU/INPUTS menu appears.
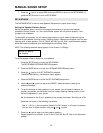
3. Press the ENTER button to enter the inputs setup menu.
The INPUTS/Assigned Inputs menu appears.
4. Press the ENTER button to enter the Assigned Inputs setup menu.
The Assigned Inputs / Input 1 XLR Digital menu appears.
5. Use the
andbuttons to select XLR Digital or XLR Analog.
6. Press the
button when you have made a selection.
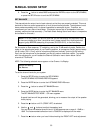
Repeat steps for Input 1, Input 2, Input 3, Input 4, Input 5, Input 6, Input 7 & Input 8.
Input 1 XLR digital / XLR Analog
Input 2 Toslink 2 / Coaxial 2 / Analog 2
Input 3 Toslink 3 / Coaxial 3 / Analog 3
Input 4 Toslink 4 / Coaxial 4 / Analog 4
Input 5 Toslink 5 / Coaxial 5 / Analog 5
Input 6 Toslink 6 / Coaxial 6 / Analog 6
Input 7 Toslink 7 / Coaxial 7 / Analog 7
Input 8 Toslink 8 / Coaxial 8 / Analog 8
7. Press the
button to select BACK and press the ENTER to return to the SETUP MENU, or
press the SETUP button to exit the SETUP MENU.
CHANGE INPUT NAMES
You can customize the name of the selected input. Custom Input Names can include up to twelve
characters. For example: DVD 7 or DVD 8 for Input 2.
NOTE: The following selected menus appear on the Cinema 11a Display.
SETUP MENU
INPUTS