


E-51
To record an accompaniment pattern
PREPARATION
• Select the accompaniment pattern (rhythm) that you want to use as a
base.
• Use the procedure under “To play back elements of the accompaniment
pattern in the work area” on page E-50 to play back the pattern and
become familiar with its elements and parts. During playback, you can
practice playing the notes you plan to record.
• Determine the number (120 to 129) you will assign to the new pattern.
• If you want to use the metronome, use the procedure under “Metro-
nome Setting” on page E-53 to select the metronome setting you want.
IMPORTANT!
You cannot record accompaniment patterns converted using the
Pattern Conversion Disk. See “Using the Utillities” on page E-71 for
details.
❚
NOTE
❚
If you playback the base pattern before recording, skip step 1 in the follow-
ing procedure.
1.
While the Pattern Sequencer is turned off, press the
PATTERN button once to enter the Pattern Create
Mode.
2.
Select the element you want to record.
• Use the same procedures as those described for step 2 under
“To play back elements of the accompaniment pattern in the
work area” on page E-50.
3.
Press the RECORD button to enter record standby.
• This causes the REC indicator to appear on the display.
• If the accompaniment pattern is once converted using the
Pattern Conversion Disk, the message “NotCASIO” appears
on the display, indicating that it cannot be recorded (WK-
1800 only).
4.
Select the parts you want to record.
• The Rhythm part (CH10) is selected initially whenever you
turn on the Pattern Sequencer. Use CHANNEL buttons CH6
through CH10 to select parts.
• The frames around the channel numbers that conform to the
currently selected parts flash to show they are selected.
• Note that you cannot select parts once recording starts. Be
sure to select the parts you want before you start recording.
5.
Press the START/STOP button.
• At this time the REC indicator stops flashing.
• All parts of the selected element play back in an endless loop.
You can record notes in the currently selected parts.
• Measure and beat numbers are shown on the display during
recording.
• Pressing any keyboard key starts actual recording.
6.
Record in part in sequence.
• You can perform the following operations during element
recording.
• Turn parts (channels) to be recorded on and off
• Tempo changes
• Tone operations*
1
• See “Recording Parts” on this page for details on recording
to each part.
7.
After you finish recording, press the START/STOP but-
ton again.
• This stops recording, which causes the REC indicator to dis-
appear from the display.
8.
Repeat steps 2 through 7 for each of the elements of
the accompaniment pattern.
9.
See “To exit the Pattern Sequencer Mode and save
work area contents” on page E-56 for details on how
to save patterns.
• If you want to turn off the Pattern Sequencer without saving
anything, perform the procedure under “To exit the Pattern
Sequencer Mode without saving work area contents” on page
E-57.
*1 You can change the tone setting by pressing TONE button, and
then using the number keys to specify a tone number. The tone
number input display clears automatically if you do not perform
any operation for about five seconds.
❚
NOTES
❚
• You cannot change the selected parts and element while recording is in
progress.
• If you are having problems getting the timing right when trying to input
notes starting from the first beat of the first measure, skip step 5 (pres-
sing the START/STOP button) of the above sequence. As soon as you
play something on the keyboard, recording starts right at the first beat
of the first measure.
Recording Parts
The following describes how to record each part. Perform these op-
erations when you reach step 6 of the procedure under “To record an
accompaniment pattern” on this page.
❚
NOTES
❚
• See “To delete specific notes” on page E-52 for details on deleting spe-
cific notes.
• See “To delete a part” on page E-52 for details on deleting an entire
part.
• Bass, Chord 1, Chord 2, and Chord 3 are all normally recorded with a
root note of C. Use the procedure under “Setting the Original Key for
Each Element” on page E-55 for information about recording with a dif-
ferent root note.
To record the Rhythm part
1.
Press CHANNEL button CH10 to select the rhythm
part.
2.
Select a drum sound (tone number 192 through 199).
3.
Use the keyboard to play the rhythm part. Use the
measure and beat values that appear on the display
for timing.
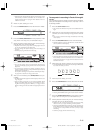
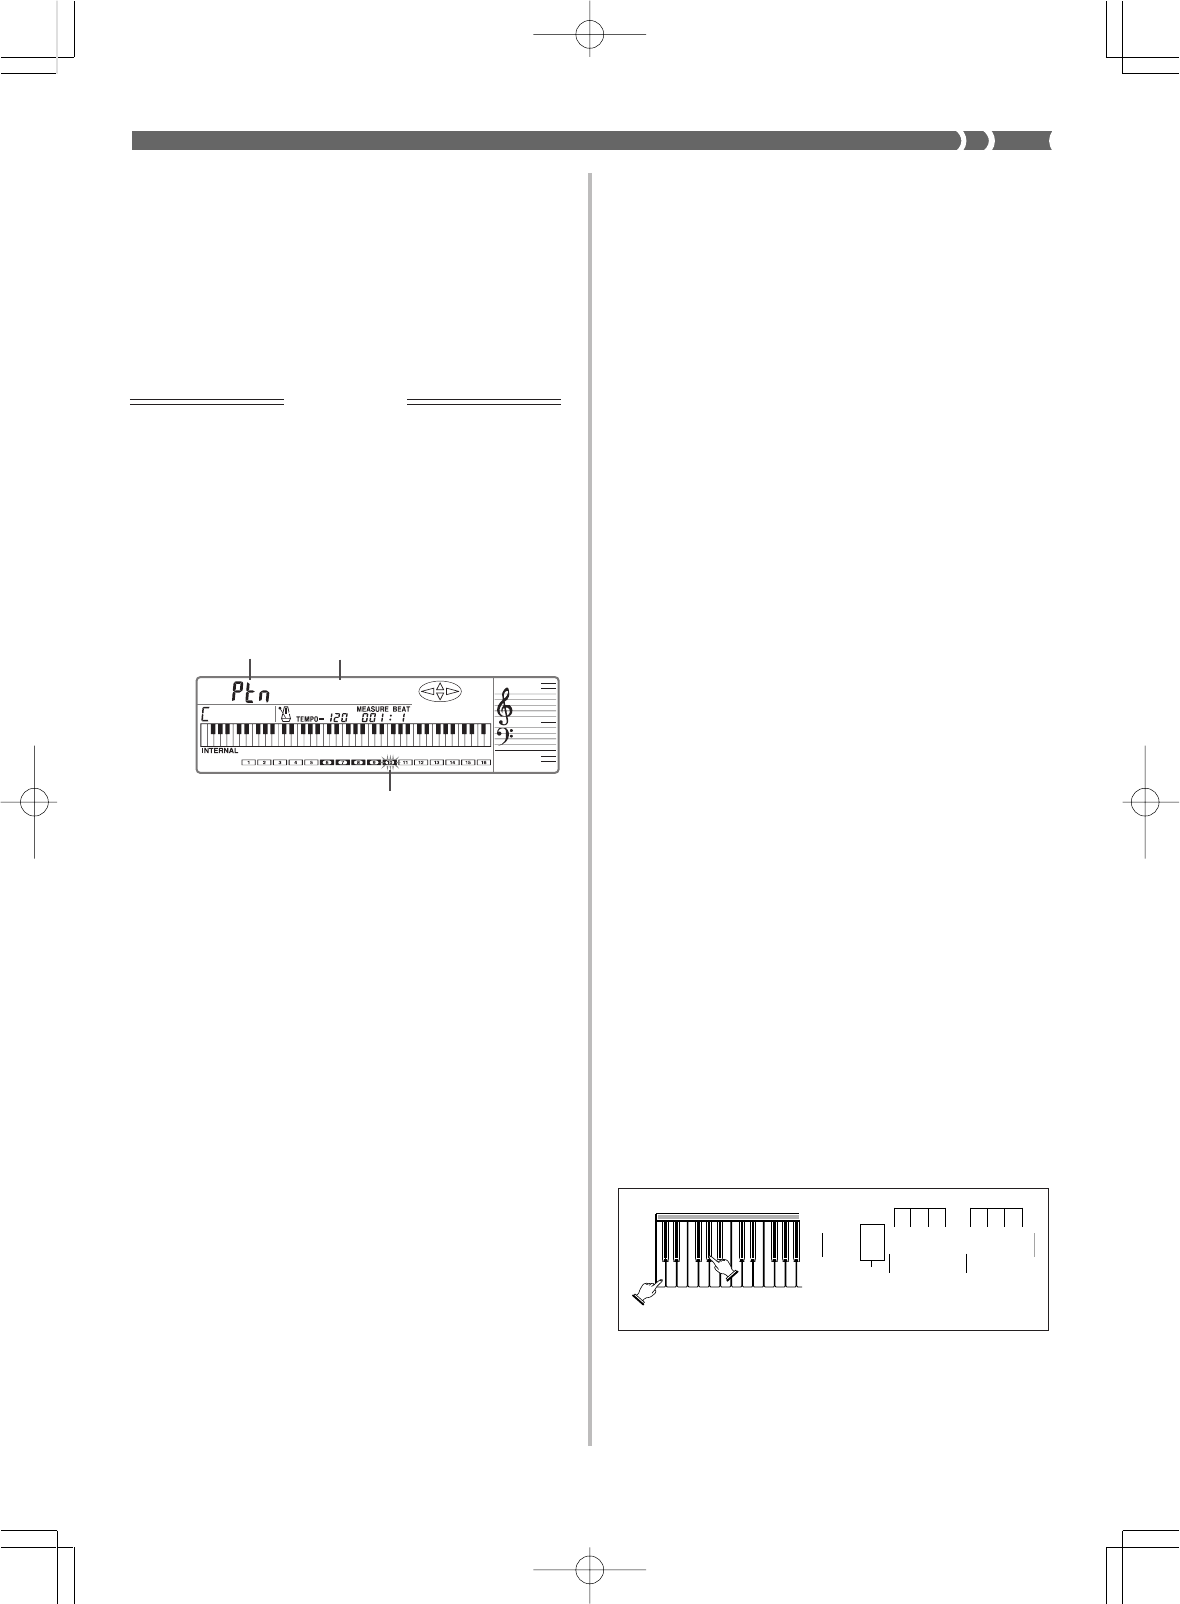
733A-E-053A
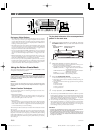
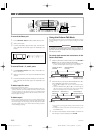
Frames around the channel numbers that correspond
to the currently selected parts flash.
Indicates the Pattern
Create Mode.
Indicates the currently
selected element.
4
4
HH
BD
SD
WK-1800/1600(E)-48~57 03.7.31, 5:21 PMPage 51 Adobe PageMaker 6.5J/PPC