iDR-8 User Guide 23
Connecting the iDR-8 Direct to the PC
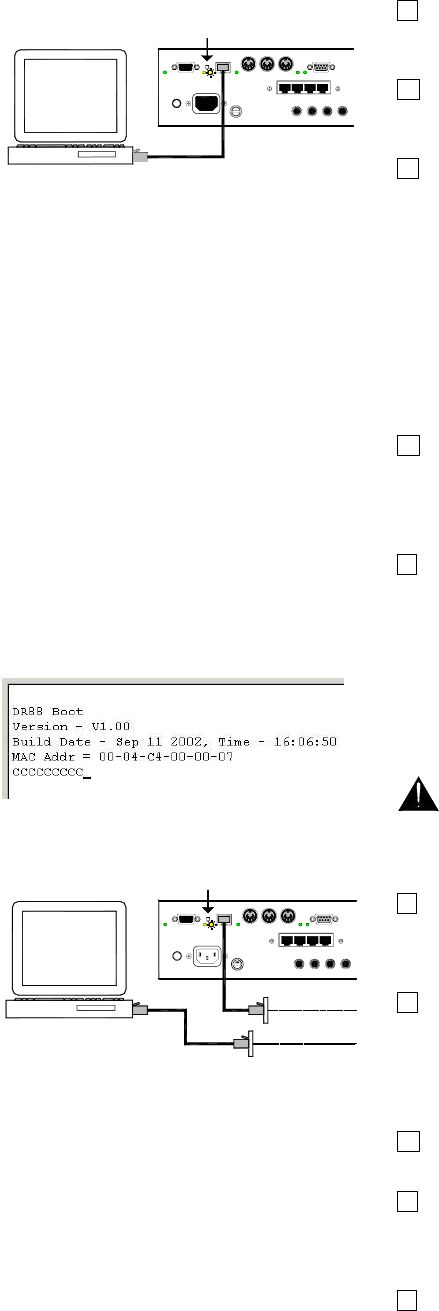
1 Connect the PC to the iDR-8 Plug the PC Ethernet port
into the iDR-8 rear panel NETWORK port using the CAT5 UTP
cable provided. Power up the PC and iDR unit.
2 Set the MDI/X switch in This is located next to the
NETWORK socket. Press the switch in for direct connection.
The LINK indicator lights once communication is recognised.
3 Decide the IP addresses Both should have manually
assigned IP addresses. DHCP should be turned off (see
below). If an address change is needed, consider whether you
want to change it on the iDR-8 unit or your PC. To make this
decision you may need to consult with the network
administrator if the unit or the PC is also used with a network,
or the site engineer if other PCs are to be used with the unit.
You may use the internationally agreed ‘private network’ block
of addresses, which is 192.168.0.nnn, where nnn is any
number from 0 to 255. Set the Subnet Mask to 255.255.255.0 to
allow communication between all devices with addresses in the
range from 192.168.0.1 to 192.168.0.255.
4 Check the iDR-8 IP settings Access the front panel
menu system. Go to menu *5 Network Setup. Under menu
*5.1 set DHCP to NO. Then go to menu *5.2 and set the IP
Address. Finally, go to menu *5.3 and set the Subnet Mask.
Exit and reboot the iDR-8 for the changes to take effect.
5 Check the PC IP settings Under the appropriate Network
Settings item find the Local Area Network TCP/IP properties.
Set the required IP address and Subnet Mask. Note that the
Subnet Mask must be the same for both the iDR-8 and the PC,
but the IP address must be different. Refer to your Windows™
Help file for further information on setting up your PC.
Connecting the iDR-8 to a Network
Before starting it is important that you refer to the
network administrator for the required DHCP settings and
IP addresses. Failure to do this may result in address
conflicts and service disruption.
1 Decide the network settings Power up the iDR-8 but do
not plug it into the network until you have configured its
settings. Refer to the network administrator for the required
DHCP setting and IP addresses.
2 Set the iDR-8 IP settings Access the front panel menu
system. Go to menu *5 Network Setup. Under menu *5.1 set
DHCP to YES or NO as required. If set to NO then go to menu
*5.2 and set the IP Address. Then go to menu *5.3 and set the
Subnet Mask. Exit and reboot the iDR-8 for the changes to
take effect.
3 Set the MDI/X switch out This is located next to the
NETWORK socket. Release the switch for network connection.
4 Plug the iDR-8 into the network Use a CAT5 UTP cable
such as the one provided. Plug the iDR-8 NETWORK port into
an available network socket. The rear panel LINK indicator
lights once communication is recognised.
4 Set your PC network settings If you are using your PC to
configure the iDR-8 over the network make sure it is correctly
set to avoid address conflict and to communicate on the same
Subnet. Refer to the network administrator for advice.
LAN PORT
SWITCH PRESSED
CAT5 UTP RJ45 CABLE
iDR
LAN PORT
CAT5 UTP RJ45 CABLE
NETWORK SOCKETS
iDR
SWITCH OUT
How to get the MAC address
If you need to obtain the unit hardware MAC
address for network IP address administration
then proceed as follows:
With the face plate removed, connect your PC
to the iDR-8 front panel RS232 port. Run the
Allen & Heath Update iDR Unit Software
HyperTerminal application using your
preferred COM port. Press the front panel
CODE UPDATE switch. The MAC address is
displayed within the information on the
HyperTerminal screen. To exit, release the
CODE UPDATE switch. The unit takes a short
while to time out of update mode and reboot.
Note that no code is changed or loaded during
this process.


