24 IDR-8 User Guide
Communicating Using a Dial Up Connection
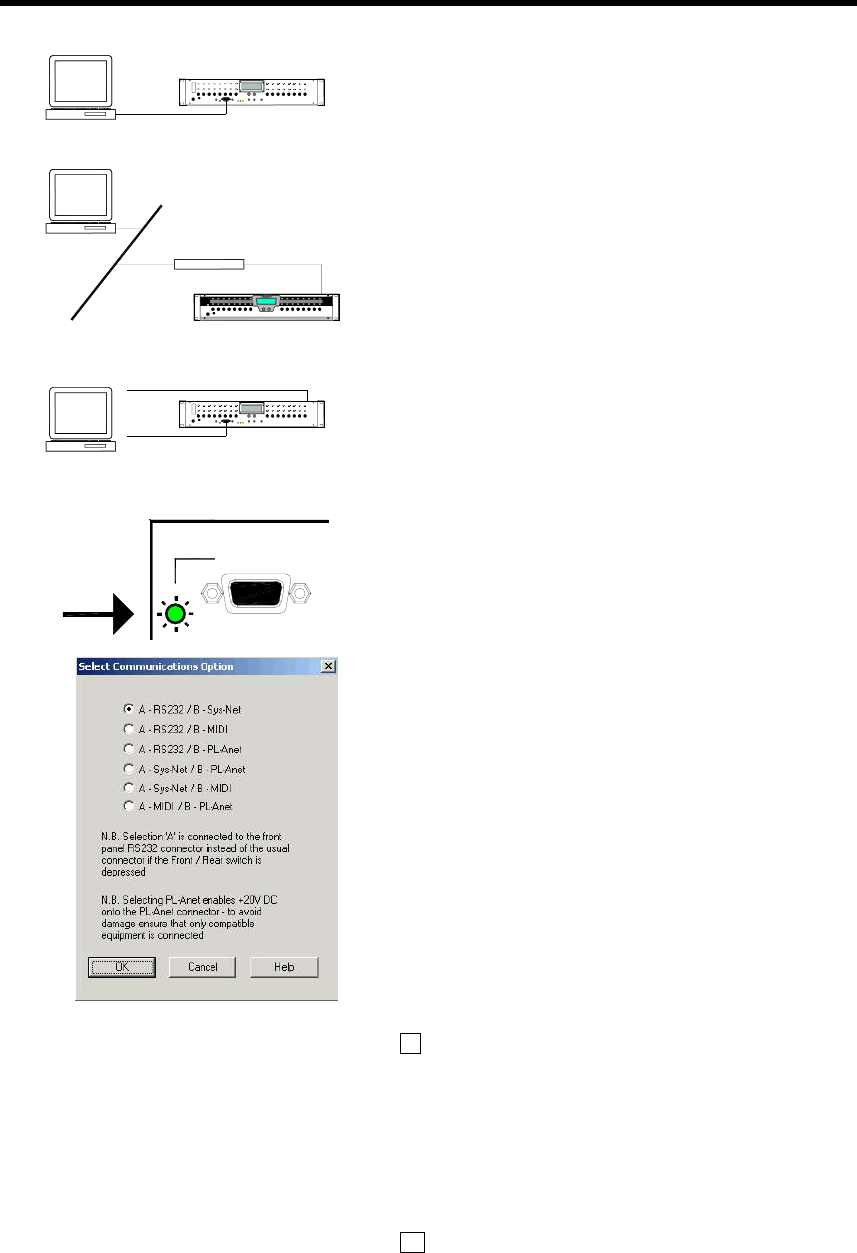
A front and a rear RS232 connection is provided. You choose
which one to use by setting the front panel switch. Only one
can be active at any time, indicated by a green LED. The
RS232 port is selected as one of the communication options in
the iDR System Manager Preferences item.
The front panel connection is for updating the iDR unit
operating code via your PC COM port. You can also use it to
run iDR System Manager with the unit by setting up a PPP dial-
up connection. However, this is much slower than the
recommended TCP/IP connection.
The rear panel RS232 port is for connection to a modem. This
lets you communicate with the iDR-8 remotely over a standard
telephone line. You can also use it for direct connection to a
PC running iDR System Manager but, once again, this is much
slower than using the network port.
To use the RS232 port you need to access the front panel
menu system to set the PPP settings. You also need to have
RS232 selected as one of the communication options. This is
done using the iDR System Manager software.
Selecting RS232 Communication Option
First check that the RS232 port is active. Deselect the front
panel switch so that the rear RS232 port is selected. Now
check that the ‘active’ indicator next to the rear RS232
connector is lit. If it is not then you need to use the iDR System
Manager to make RS232 active. Note that doing this may
disable one of the other ports being used with the system.
Using iDR System Manager Click on the File menu /
Preferences / Communications Options item. This opens up
the Select Communications Option window. You can select
from the displayed combinations which options are associated
with serial ports A and B. To use RS232 make sure one of the
top three is selected. Reboot the iDR-8 for the changes to take
effect.
Setting up a Dial-up Connection
You can simply use the factory default PPP settings. In that
case skip step 1 below. However, you can change these if you
have a reason to do so. Do this using the front panel menus.
1 Changing the iDR-8 PPP settings Go to menu *6 PPP
Settings. Under menu *6.1 set the host IP address. The iDR-8
is the host. Under menu *6.2 set the client IP address. The PC
is the client. The iDR-8 allocates the client address to the PC
during the PPP communication. The host and client addresses
must not be the same. Use menu *6.3 to set the Username,
and menu *6.4 to set the Password. Both can have up to 16
characters and are case sensitive. You need to reboot the unit
for the changes to take effect.
2 Setting up the PC dial-up connection You need
administrative rights to your PC. You must have a MODEM
installed for the COM port you wish to use. Under the Network
and Dial-up Connections menu select the ‘Make New
Connection’ option. Use the same Username and Password as
set up on the iDR-8. Name this connection for future use with
the unit. If you need further information on how to set up the
connection please refer to your Windows™ version Help file.
The default iDR-8 PPP settings are:
Host IP = 192.168.0.1
Client IP = 192.168.0.2
Username = iDR
Password = A&H
PC dial-up connection settings required:
Modem 56000 bps V90
Dial-up server = PPP
Internet Protocol TCP/IP
Same Username as iDR-8
Same Password as iDR-8
Use null-modem cable to connect to PC com port
active
RS232 (MODEM)
CODE UPDATE
RS232
DR-8
AUDIO MIX PROCESSOR
TELEPHONE LINE
MODEM
RS232
PPP
NORMAL RS232 CABLE
NULL MODEM RS232 CABLE
PPP


