


8
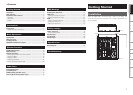
Getting Started Connections Basic Operations Specifi cations TroubleshootingEffector Function Fader Start UtilityUSB
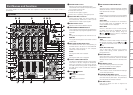
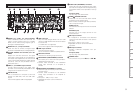
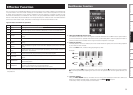
Preparations
1
Set the POWER switch to ON.
2
Use the SOURCE SELECT controls to select the sources
(LN1–LN4, D1–D4, USB) of channels 1 to 4 which are
to be used.
Use the CD/PHONO line input selector buttons of the
lines to set the CD or PHONO as the line input.
3
Check the level meter, and adjust the input levels using
the channel input level controls (LEVEL controls).
4
Adjust the sound quality using the HI, MID, LOW
channel isolator EQ controls.
5
Determine where the channel signals are to be
assigned using the CROSSFADER ASSIGN switches
(A/THRU/B).
Set these switches to the THRU position if the
Crossfader is not going to be used.
6
Adjust the volume level using the Channel Fader and
Crossfader.
7
Adjust the output level using the MASTER LEVEL
control.
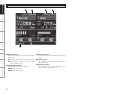
MIC (mic input)
1
When using a microphone, press the MIC1 or MIC2
button to set it to ON.
2
Adjust the MIC1 volume level using the MIC1 TRIM
control, and adjust the MIC2 volume level using the
MIC2 TRIM control.
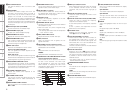
While inputting the audio signals to the unit, monitor
the LEDs on the SIG/PK (signal/peak) meter. If
the LEDs occasionally light up red but there is no
distortion and the LEDs then light up amber, the
suitable level has been reached as a result of the
adjustment process.
3
Adjust the sound quality using the MIC EQ controls
(HI/LOW).
4
When the DUCKING ON/OFF button is set to ON, all
outputs except the mic sound will be attenuated when
the signals from the microphone are supplied.
5
To add the effect functions to the mic input, set the
Mic EFX INS buttons to ON.
MONITOR (headphones output)
1
Select the source to be monitored using the CUE
buttons of the channels. When a source is selected, the
LED in the CUE button lights.
CUE monitoring for channels 1 to 4 as well as EFX 1
and EFX 2 can be selected.
2
Selecting the STEREO or SPLIT CUE mode.
Use the
SPLIT CUE button to select the STEREO or
SPLIT CUE mode. When the mode is selected, the
LED in the SPLIT CUE button lights.
In the SPLIT CUE (monaural) mode, the signals
selected for cue are output to the left channel speaker
of the headphones, and the master signals are output
to the right channel speaker.
In the STEREO mode, the master signals and signals
selected for cue are output in stereo.
3
Use the headphones PAN control to adjust the balance
between the cue signals and master output signals.
When it is turned counterclockwise, only the cue
signals are output from the headphones; conversely,
when it is turned clockwise, only the master output
signals are output.
4
Use the HEADPHONES LEVEL control to adjust the
headphones output to the desired level.
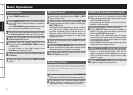
Basic Operations
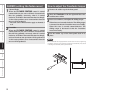
Ducking function
This function detects the mic input and attenuates the level of the
music signals in the master output. It prevents the sound from
the microphone from being drowned out by the music when a
microphone is used.
1
To enable the ducking function, set the DUCKING ON/
OFF button to ON. The LED in the button will light.
2
The attenuation level of the master output while the
ducking function is operating can be set within a
range from –30 dB +/–10 dB in the Utility mode.
Basic Operations