


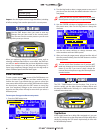

Phrase Delete—Use the Delete menu to erase any phrase
file. Select a file by turning the big knob, then press either of
the DELETE soft-keys.
♫
Memory Lock must be disabled in the Utility Menus to
delete phrase files. See Utility Menus on page 10.
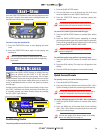
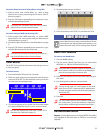
Utility Menus
Use the Utility menus for a variety of amplifier soft-
ware and hardware settings. Press and hold the EXIT
button for 2 seconds to activate the Utility menus.
QA1 / QA2 / QA3—Use the first four Utility menus to assign
Quick Access presets. See Quick Access on page 3.
Memory Lock—Use the Memory Lock menu to prevent
accidental preset modifications. You will still be able to make
temporary changes to presets with Memory Lock ON, but you
won't be able to save those changes until Memory Lock is
switched OFF.
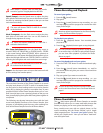
Line Level—(G-DEC 3 THIRTY, ONLY) Use the Line Level
menu to adjust the output level of the rear panel LINE OUT
jacks to accommodate the input sensitivity of external audio
equipment.
Line Out— (G-DEC 3 THIRTY, ONLY) Use the Line Out menu
to select the audio content sent out through the rear panel
LINE OUT jacks. Choose ALL to send all G-DEC 3 audio to the
LINE OUT jacks (normal setting) or choose BAND to send only
the band track to the LINE OUT jacks.
♫
For the most intense one-man band experience possible
with the G-DEC 3 Thirty and a PA system: Connect the
LINE OUT jacks to a PA sound system. Set the Line Out
menu to BAND and the Speaker menu to GUITAR. Now
the band track audio will play in stereo through the PA
speakers and your guitar will play through the G-DEC 3
speaker, creating a realistic band simulation!
Speaker— (G-DEC 3 THIRTY, ONLY) Use the Speaker menu to
select the audio content sent to the G-DEC3 internal speaker.
Choose ALL to send all G-DEC 3 audio to the speaker (normal
setting) or choose GUITAR to send only your guitar audio to
the G-DEC 3 speaker. See the Line Out ♫ note above.
Import One Preset—Use the Import menu to import any
one preset from an SD card inserted into the G-DEC 3.
To import one preset from the SD card to the G-DEC 3:
1. Press and hold the EXIT button to activate the Utility
menus.
2. Use the soft-keys (3–or–4) to access the Import menu.
3. Turn the big knob and select the preset you want to
import.
4. Press SAVE.
5. Turn the big knob to select the preset you want to over-
write.
6. Press SAVE again to confirm and finalize the preset import.
♫
Any band track associated with the imported preset will
only play if an SD card with the band track file (media) is
plugged into the G-DEC 3. See
!
note on page 11.
Export One Preset—Use the Export One menu to export a
single preset to an SD card inserted into the G-DEC 3.
To export one preset from the G-DEC 3 to the SD card:
1. Press and hold the EXIT button to activate the Utility
menus.
2. Use the soft-keys (3–or–4) to access the Export One
menu.
3. Turn the big knob and select the preset you want to
export.
4. Press either one of the EXPORT ONE soft-keys to export
the selected preset.
5. Turn the big knob to select the preset you want to save
over.
6. Press SAVE again to confirm and finalize the preset export.
♫
Exporting a preset will overwrite any preset on the SD
card with the same name! See
!
note on page 11.
Export All Presets—Use the Export All menu to export ALL
presets to an SD card inserted into the G-DEC 3.
To export all presets from the G-DEC 3 to the SD card:
1. Press and hold the EXIT button to activate the Utility
menus.
2. Use the soft-keys (3–or–4) to access the Export All menu.
3. Press either one of the EXPORT ALL soft-keys to export all
presets.
♫
Exporting presets will overwrite any presets on the SD
card with the same names! See
!
note on page 11.
Restore All Presets—Use the Preset Restore menu to restore
all presets on the G-DEC 3 to their original factory settings.
Preset Restore will NOT restore any media (band tracks) if they
have been deleted from the G-DEC 3 hard drive (HD), which
can only be done using the Fender FUSE software interface or
through the USB Drive menu.
10
fen der.co m