


82
Advanced Operations (VF80EX)
<Note: There is no need for selecting recording tracks.>
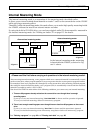
In the internal mastering mode, unlike the normal recording, you do not have to select recording tracks.
When recording a take in the internal mastering mode, the VF80EX automatically arms Tracks 1 and 2.
Therefore, the
[TRACK STATUS/TRACK SEL]
keys for tracks 1 and 2 never light up in red in the internal
mastering mode.
<Note: You cannot undo an internal mastering take.>
You cannot undo an internal mastering take.
If you are not satisfied with the result, try again from the beginning. If you do not need a previously
recorded program, delete the program according to the procedure described in
"Deleting a Program"
on
page 62.
<Note>
Internal mastering cannot be performed if rec-protected.
If the
"Rec Protected"
setting of the setup mode is set to
"ON"
, you cannot perform internal mastering.
If you try to perform it, a warning message (
"Protected!"
) appears on the display. If this message appears,
set the
"Rec Protected"
setting to
"OFF"
before performing internal mastering.
See page
141
for details about the setup mode.
Press the [PLAY] key while holding down the
[RECORD] key. (You cannot perform the auto
punch-in function.)
When mastering starts, a new program is automati-
cally created and the material is recorded onto tracks
1 and 2 of the program. The ABS time at which mas-
tering starts is registered with the "Start point" of the
new program.
When completing mastering, press the [STOP]
key to stop.
"Please wait" appears on the display for a few seconds,
and the internal mastering mode quits, while the
VF80EX locates to the beginning (ABS 0) of the newly
created program. The ABS time at which you press
the [STOP] key is registered with the "End point" of the
new program.
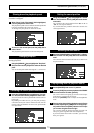
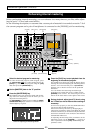
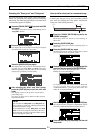
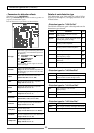
The following screen example shows that a title named
"Song Data-1" is mastered onto a new program named
"P09". As shown in the example below, "Mst<-" is pre-
fixed to a mastered program title, so that you can dis-
tinguish mastered programs from other programs.
The screen can show up to the first 12 characters of a
title name.
Playback the newly created program (P09, in the
example above) to check the result.
You can adjust the playback levels of mastered tracks
using track faders 1 and 2.
Read the following "Hint" carefully before making an
original audio CD from mastered materials.
<Note: The vari-pitch setting is not effective.>
When recording a take in the internal mastering mode, the vari-pitch setting is not effective and the take
is always recorded at the normal speed.
A title example recorded using the internal mastering mode.
1
2
3
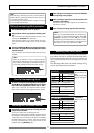
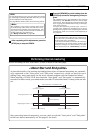
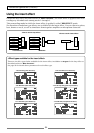
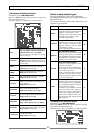
<About silence between songs>
As described on page 81, in the internal mastering
mode, the starting and ending time values of a take
are registered as the "Start point" and "End point"
respectively.
If the song immediately starts at the beginning of
the take and the the take immediately ends when
the song finishes, there may be no silent parts at
the beginning and end of the mastered song.
Therefore, if you make an audio CD containing more
than one song which is mastered as above, there
may be no silent part between two adjacent tracks
on the CD.
Start point
End point
Song 1
Song 2
Start point
End point
Start point
End point
Song 3
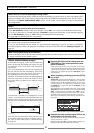
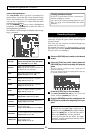
To avoid such a problem, we recommend to record
"silence" by moving down the [MASTER] fader im-
mediately after the song ends and press the [STOP]
key after a few seconds (see the illustration below).
Put the [MASTER] fader
down completely.
Start point
mastered song
End point
recording
Recording end point
Recording start point
silent space
Note that you can also make a silent part later even
if you make mastering without recording "silent".
See "How to add a silent part to a mastered song"
on page 83.