


12
Getting Started
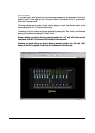
When turning on the power, the M1 start-up procedure will take place. This will take about 30sec..
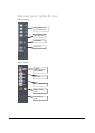
Selected zones will light up green. One of the 4 line sources on ch 7-10 will light up.
You can route an Input to a specific Zone Output simply by pressing the routing button once. By
pressing the button a second time, the routing will be cleared.
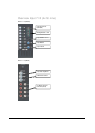
Balance and volume from the Input Channels can be changed on the front panel. Volume, Treble
and Bass level from the Output Zones can also be changed on the front panel. When an input
signal is clipping, the according clipping led on the front panel will light up red. Stereo VU-bars
indicate the signal level on the Output Zones and on channel 7-10 (Pre-fader).
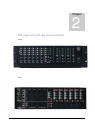
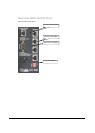
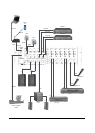
On the rear panel ‘fixed’ settings can be made. The source for the input channels can be set to
either Microphone (XLR) or Line Level (Cinch). Individual phantom power switches are supplied
for each input channel. Channel 1-6 has a 3 band tone control and an input gain adjustment.
Channel 7-10 has a 2 band tone Control and an input gain adjustment.
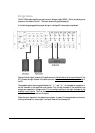
The output section on the rear panel of the M1 Light has 4 balanced stereo output zones (XLR).
The M1 has also two 2 stereo output amplifiers (2x 150W /4Ohms stereo) for Zone outputs 1 and
2 available through Speakon connectors.
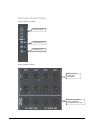
The M1 can be controlled with Wall Mounted Control Panels (RS-485). Each Wall Mounted
Control Panel has to be set to control the right room. This can be done by setting “jumpers” on
the inside of the Wall Mounted Control Panel.
Input Channel 1 and 2 can have the “Priority” setting. This means, when there is a signal on Ch1
or Ch2, all other input channels of the same output zones will be muted. The priority can be
switched on or off with DIP switches on the rear panel.
The amplified outputs for Zone 1 and 2 can be set in bridged mode by setting a jumper in the
inside of the M1. This has to be done by qualified people. (Not available on the M1 Light)
Chapter
3