


13
Owner’s Manual
Owner’s Manual
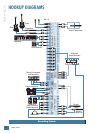
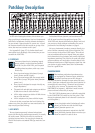
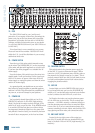
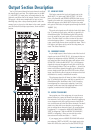
12. TAPE INPUT
These unbalanced RCA jacks are designed to work
with semipro as well as pro recorders. Connect your
2-track tape recorder’s outputs here, using standard hi-fi
RCA cables. To learn how signals are routed from these
inputs, see TAPE IN (LEVEL) [40] on page 20.
Use these jacks for convenient playback of your mixes.
You’ll be able to review a mix, and then rewind and try
another pass without repatching or disturbing the mixer
levels. You can also use these jacks with a portable tape
or CD player to feed music to a PA system between sets.
WARNING: Pushing TAPE TO MAIN MIX [41]
in the output section can create a feedback
path between TAPE INPUT and TAPE OUT-
PUT. Make sure your tape deck is not in record, record-
pause or input monitor mode when you engage this
switch, or make sure the TAPE IN level knob is fully
counterclockwise (off).
13. MAIN INSERT
These 1/4" jacks are for connecting serial effects such
as compressors, equalizers, de-essers, or fi lters. The
insert point is after the mix amps, but before the MAIN
MIX [37] fader. Insert cables must be wired thusly:
Tip = send (output to effects device)
Ring = return (input from effects device)
Sleeve = common ground (connect shield to all
three sleeves)
14. MAIN OUTS
These 1/4" jacks are usually patched to the inputs
of your 2-track mixdown deck (unless you’ve chosen
to use the TAPE OUTPUT [11] RCA jacks), or to the
house amplifi er during live sound sessions. To learn how
signals are routed to these outputs see MAIN MIX [37]
fader details on page 19. To use these outputs to drive
balanced inputs, connect 1/4" TRS (Tip-Ring-Sleeve)
phone plugs like this:
Tip = + (hot)
Ring = – (cold)
Sleeve = ground
To use these outputs to drive unbalanced inputs, con-
nect 1/4" TS (Tip-Sleeve) phone plugs like this:
Tip = signal
Sleeve = ground
15. MONO OUTPUT
It happens to everybody sooner or later: The forces
that govern your world will demand a monaural output
from your painstakingly- created stereo panorama. The
last thing you want to do is start twirling all your care-
fully-placed PAN settings to one side. What to do? Stick
a cord in this 1/4" jack, hand the other end to Mr. Mono,
and you’re done. He’s got his mono mix and you’ve still
got your stereo mix. The MONO output is nothing more
than a mix of the left and right main mix.
16. MONO LEVEL
So, Mr. Mono comes running back, screaming about
the mono mix being so loud that his camcorder is melt-
ing. Just reach for this knob and turn it down a bit. Just
the thing for sending mono signals to mic inputs like
camcorders, telephone interface boxes, even answering
machines. With the pot all the way up (fully clockwise),
you’ll have 6 dB of extra gain, with unity gain halfway
between the one and two o’clock positions.
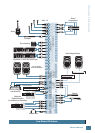
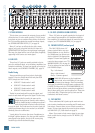
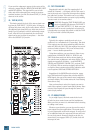
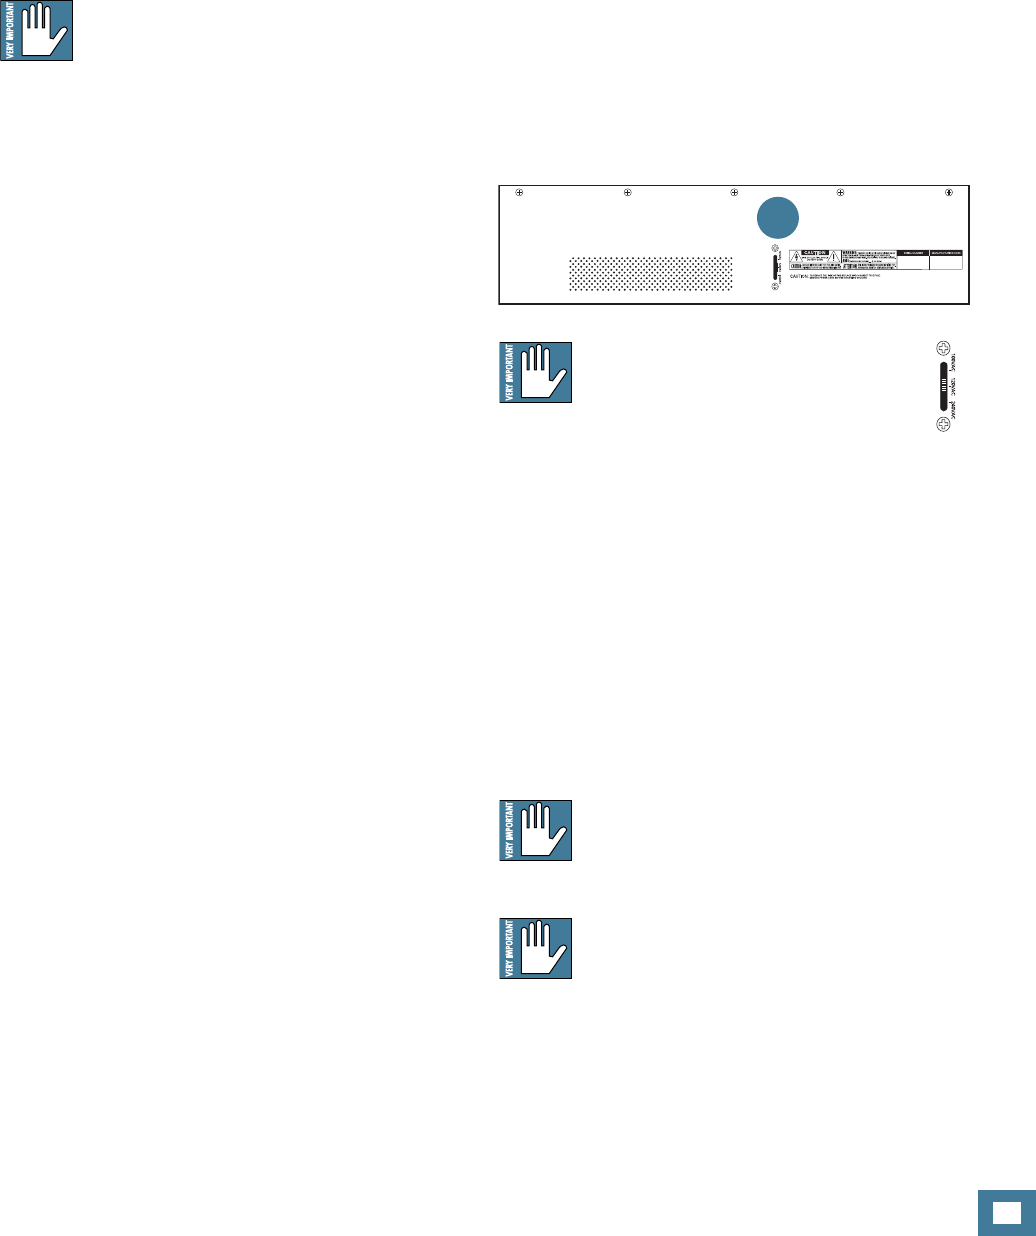
17. VOLTAGE SELECTOR
Located on the bottom panel, is a voltage selector
switch.
WARNING: Before you plug the AC
power cord into the 1604-VLZ3, you
must make sure that this slide switch
is set to the same voltage as your local AC mains
supply. Only slide the voltage switch with the
power cord unplugged.
Use a fl at headed screwdriver to slide the switch if
needed. The switch allows you to use the mixer in dif-
ferent countries and voltages, meet interesting people
from other cultures, and entertain them.
18. POWER CONNECTION
Just in case you lose the cord provided with the 1604-
VLZ3, its power jack accepts a standard 3-prong IEC
cord like those found on most professional recorders,
musical instruments, and computers.
WARNING: Before you plug the AC power cord
into the 1604-VLZ3, you must make sure that
the VOLTAGE SELECTOR [17] slide switch is
set to the same voltage as your local AC mains supply.
WARNING: Disconnecting the plug’s ground
pin can be dangerous. Please don’t do it.
17