


22
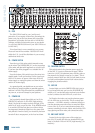
1604-VLZ3
1604-VLZ3
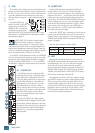
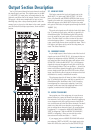
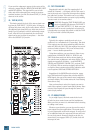
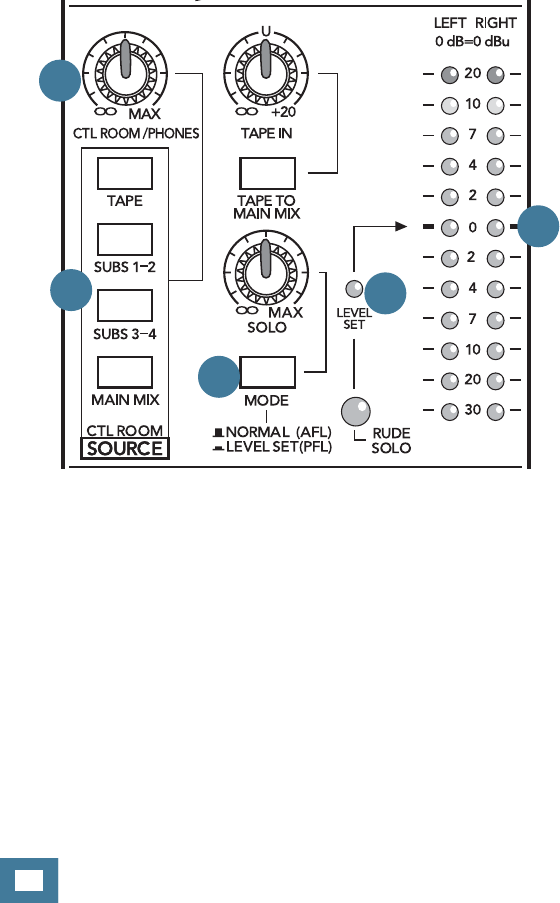
48. METERS
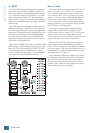
The 1604-VLZ3’s peak metering system is made up of
two columns of twelve LEDs. Deceptively simple, con-
sidering the multitude of signals that can be monitored
by it. If nothing is selected in the SOURCE [42] matrix,
and no channels are in SOLO [27], the meter display
will just sit there. To put them to work, you must make a
selection in the SOURCE matrix (or engage a channel's
SOLO switch).
Why? You want the meter display to refl ect what the
engineer is listening to, and as we’ve covered, the engi-
neer is listening either to the control room output or the
headphones. The only difference is that while the listen-
ing levels are controlled by the CTL ROOM/PHONES
[43] knob, the meter display reads the SOURCE mix
before that control, giving you the real facts at all times,
even if you’re not listening at all.
When the solo MODE [44] switch is set to LEVEL SET
(PFL) (down) , all soloed signals will be sent to the left
meter only. That, combined with the LEVEL SET LED
[45], are along the path of enlightenment known as
the Level-Setting Procedure (page 3). During NORMAL
(AFL) mode, the meters will behave normally.
48
Meters vs. Reality
You may already be an expert at the world of “+4” (+4
dBu=1.23 V) and “–10” (–10 dBV=0.32 V) operating
levels. Basically, what makes a mixer one or the other
is the relative 0 dB VU (or 0 VU) chosen for the meter
display. A “+4” mixer, with a +4 dBu signal pouring out
the back will actually read 0 VU on its meter display.
A “–10” mixer, with a –10 dBV signal trickling out, will
read, you guessed it, 0 VU on its meter display. So when
is 0 VU actually 0 dBu? Right now!
At the risk of creating another standard, Mackie’s
compact mixers address the need of both crowds by
calling things as they are: 0 dBu (0.775 V) at the output
shows as 0 VU on the meter display. What could be
easier? By the way, the most wonderful thing about stan-
dards is that there are so many to choose from.
Thanks to the 1604-VLZ3’s wide dynamic range, you
can get a good mix with peaks fl ashing anywhere be-
tween –20 and +10 dB on the meter display. Most ampli-
fi ers clip at about +10 dB, and some recorders aren’t so
forgiving either. For best real-world results, try to keep
your peaks between “0” and “+7.”
Please remember: Audio meter displays are just tools
to help assure you that your levels are “in the ballpark.”
You don’t have to stare at them (unless you want to).
If you fi nd that staring at the meters sends you into a
hypnotic trance, please do not be alarmed. Just cut my
lawn and polish my car every Tuesday.
42
43
44
45