


18
En
Playing the sampled sound on the DJ player
Use PRO DJ LINK to access this unit from the DJ player.
The sampled sound (audio file) can be loaded and played on the DJ
player.
INST FX
This effect changes in association with the [FILTER] controls for the
individual channels.
1 Press one of the [INST FX] buttons.
This selects the type of effect.
The button that was pressed flashes.
! The same effect is set for [CH1] to [CH4].
2 Turn the [FILTER] control.
The effect is applied to the channel(s) for which the control(s) was (were)
pressed.
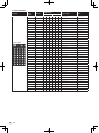
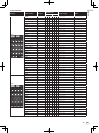
Effect Name Descriptions
FILTER
(parameter 1)
PARAMETER
(parameter 2)
NOISE
White noise gener-
ated inside this unit
is mixed in to the
sound of the chan-
nel via the filter and
output.
Sets the cut-off
frequency for the
filter through which
the white noise
passes.
Sets the volume of
the white noise.
ZIP
Lowers the pitch of
the channel’s sound
for output.
Sets the amount of
pitch shifting for
lowering the pitch.
Sets the balance
between the origi-
nal sound and the
effect sound.
CRUSH
Changes the chan-
nel’s sound to a
crushed sound for
output.
Sets the degree
by which the input
sound is crushed.
The further the
control is turned
clockwise, the
more the effect is
stressed.
JET
Adds a flanger effect
for output.
Sets the flanger
effect.
The further the
control is turned
clockwise, the
more the effect is
stressed.
HPF
Outputs the sound
through the high-
pass filter.
Sets the filter’s cut-
off frequency.
The further the
control is turned
clockwise, the
more the effect is
stressed.
LPF
Outputs the sound
through the low-
pass filter.
Sets the filter’s cut-
off frequency.
The further the
control is turned
clockwise, the
more the effect is
stressed.
Adjusting the effect of the effect sound
Turn the [PARAMETER] control.
The further the control is turned clockwise, the more the effect is
stressed. When turned all the way counterclockwise, the effect is
minimum.
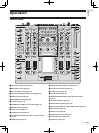
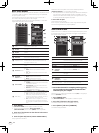
BEAT EFFECT
This function lets you instantaneously set various effects according to
the tempo (BPM = Beats Per Minute) of the currently playing track.
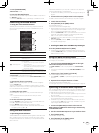
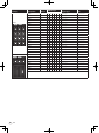
1
4
3
2
1
BPM value display
(3 digits)
When in the auto mode, this displays the automatically
detected BPM value.
When the BPM cannot be detected, the previously
detected BPM value is displayed and flashes.
When in the manual input mode, this displays the BPM
value that was input manually.
2
AUTO (TAP)
[AUTO] lights when the BPM measurement mode is
set to the auto mode.
[TAP] lights when in the manual input mode.
3
BPM
This is always lit.
4
% (ms)
These light according to the units for the different
effects.
1 Press [AUTO/TAP] button.
Select the BPM measurement mode.
— [AUTO]: The BPM is measured automatically from the audio sig-
nal that is being input. The [AUTO] mode is set when this unit’s
power is turned on.
— [TAP]: The BPM is input manually by tapping the [TAP] button
with a finger.
! The [AUTO] BPM measurement range is BPM = 70 to 180. With
some tracks it may not be possible to measure the BPM correctly. If
the BPM cannot be measured, the BPM value on the display flashes.
In such cases, use the [TAP] button to input the BPM manually.
2 Press one of the [CH SELECT] buttons.
This selects the channel to which the effect is applied.
— [1] – [4]: The effect is applied to the sound of the respective
channel.
— [MIC]: The effect is applied to the sound of [MIC] channel.
— [A], [B]: The effect is applied to the sound of the crossfader’s [A]
(left) or [B] (right) side.
— [M]: The effect is applied to the sound of the [MASTER] channel.
3 Press one of the [EFFECT SELECT] buttons.
This selects the type of effect.
! For the types of effects, see Types of BEAT EFFECT on page 25.
! To use [SEND/RETURN], see Using the external effector below.
4 Press one of the beat buttons.
Set the beat fraction for synchronizing the effect sound.
The effect time corresponding to the beat fraction is set automatically.
! The beat fraction can be changed by turning [TIME] while pressing
the beat button.
5 Press the [ON/ OFF] button.
The effect is applied to the sound.
The effect’s time parameter can be adjusted by turning the [TIME]
control.
The effect’s quantitative parameter can be adjusted by turning the
[LEVEL/DEPTH] control.
The [ON/ OFF] button flashes when the effect is on.
! When the [ON/ OFF] button is pressed again, the effect turns off.
Inputting the BPM manually
Tap the [TAP] button at least 2 times in rhythm with the
beat (in quarter notes) of the sound being played.
The average value of the interval at which the [TAP] button was tapped
by finger is set as the BPM.
! When the BPM is set using the [TAP] button, the beat fraction is set
to [1/1] and the time of one beat (quarter note) is set as the effect
time.
! The BPM can be set manually by turning the [TIME] control while
pressing the [TAP] button.
! The BPM can be set manually by pressing the beat button while
pressing [TAP].
! The BPM can be set in units of 0.1 by turning the [TIME] control
while pressing the [TAP] and [AUTO/TAP] buttons.
Adjusting the amount of effect applied for
different frequency bands
Turn the [EFFECT FREQUENCY (HI, MID, LOW)] control.
See Types of BEAT EFFECT on page 25 for the parameters of the effects
that can be adjusted with the different controls.
Using the external effector
1 Connect this unit and external effector.
[SEND/RETURN] lights.
For instructions on connections, see Connecting output terminals on
page 7.
2 Press one of the [CH SELECT] buttons.
This selects the channel to which the effect is applied.