9
Es
Español
Operación
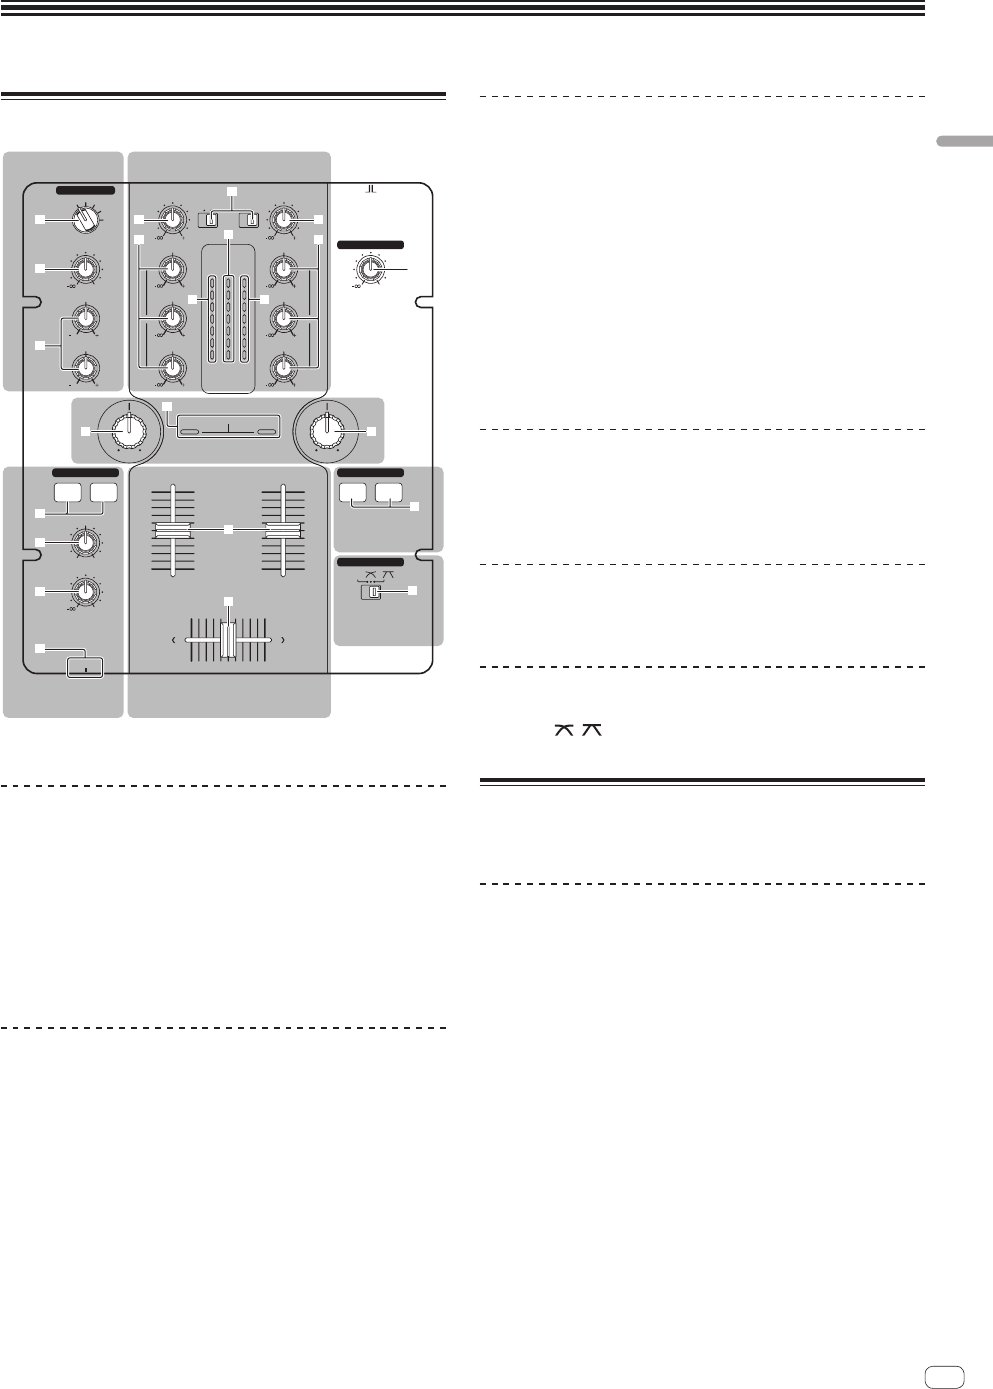
Panel de control
9
TRIM
0
LEVEL
0
LEVEL
MASTERCUE
MIXING
0
9
HI
9
MID
1212
HI
1212
LOW
9
LOW
9
TRIM
9
HI
9
MID
9
LOW
CD
PHONO
/LINE
THRU
CD
PHONO
/LINE
EQ EQ
MIC/AUX
HEADPHONES
CH-1 CH-2
FADER START
CROSS FADER
MASTER LEVEL
DJM-250
2 CHANNEL DJ MIXER
CH-1 CH-2
MIC
OFF
AUX 1
AUX 2
AUX 3
ONOFF
MASTER
LEVEL
CH-1 CH-2
dB
-
18
-
12
-
6
0
+2
+4
OVER
dB
-
18
-
12
-
6
0
+2
+4
OVER
PHONES
CH
-
1 CH
-
2
LPFHPF LPF HPF
SOUND COLOR FILTER
Sección del filtro
Sección MIC/AUX Sección de mezclador
Sección de mezclador
Sección de i
nicio del fader
Sección del
crossfader
Sección de
auriculares
2 a
3
6
7
5
4
1
j
8
9
b
a
b
c
hh
e
g
f
i
d d
1 Control MASTER LEVEL (la página 10)
Sección MIC/AUX
Esta sección maneja el sonido de los micrófonos o aparatos externos
(ordenadores, aparatos de audio portátiles, TV, sintetizadores, etc.) (la
página 12).
2 Conmutador selector de entrada MIC, OFF, AUX 1,
AUX 2, AUX 3
3 Control LEVEL (Sección MIC/AUX)
4 Controles HI, LOW
Sección de auriculares
El sonido introducido en esta unidad se puede comprobar con los auri-
culares (la página 12).
5 Botones CH-1, CH-2 (Sección de auriculares)
6 Control MIXING
7 Control LEVEL (Sección de auriculares)
8 Conector PHONES
Sección de mezclador
Para hacer la mezcla de DJ básica se pueden ajustar por separado dos
juegos de señales de audio (la página 10).
9 Conmutador selector de entrada CD, PHONO/LINE
a Control TRIM
b Control EQ (HI, MID, LOW)
c Indicador de nivel maestro
d Indicador de nivel de canales
e Fader de canal
f Crossfader
Sección del filtro
g Indicador SOUND COLOR FILTER
h Control SOUND COLOR FILTER
Sección de inicio del fader
i Botones CH-1, CH-2 (Sección de inicio del fader)
Sección del crossfader
j THRU, , (conmutador selector de curva de
crossfader)
Acerca del interruptor de
alimentación de esta unidad
Para conectar la alimentación
Ponga el conmutador [ON/OFF] del panel posterior de
esta unidad en [ON].
Conecta la alimentación de esta unidad (la página 5).
