11
En
English
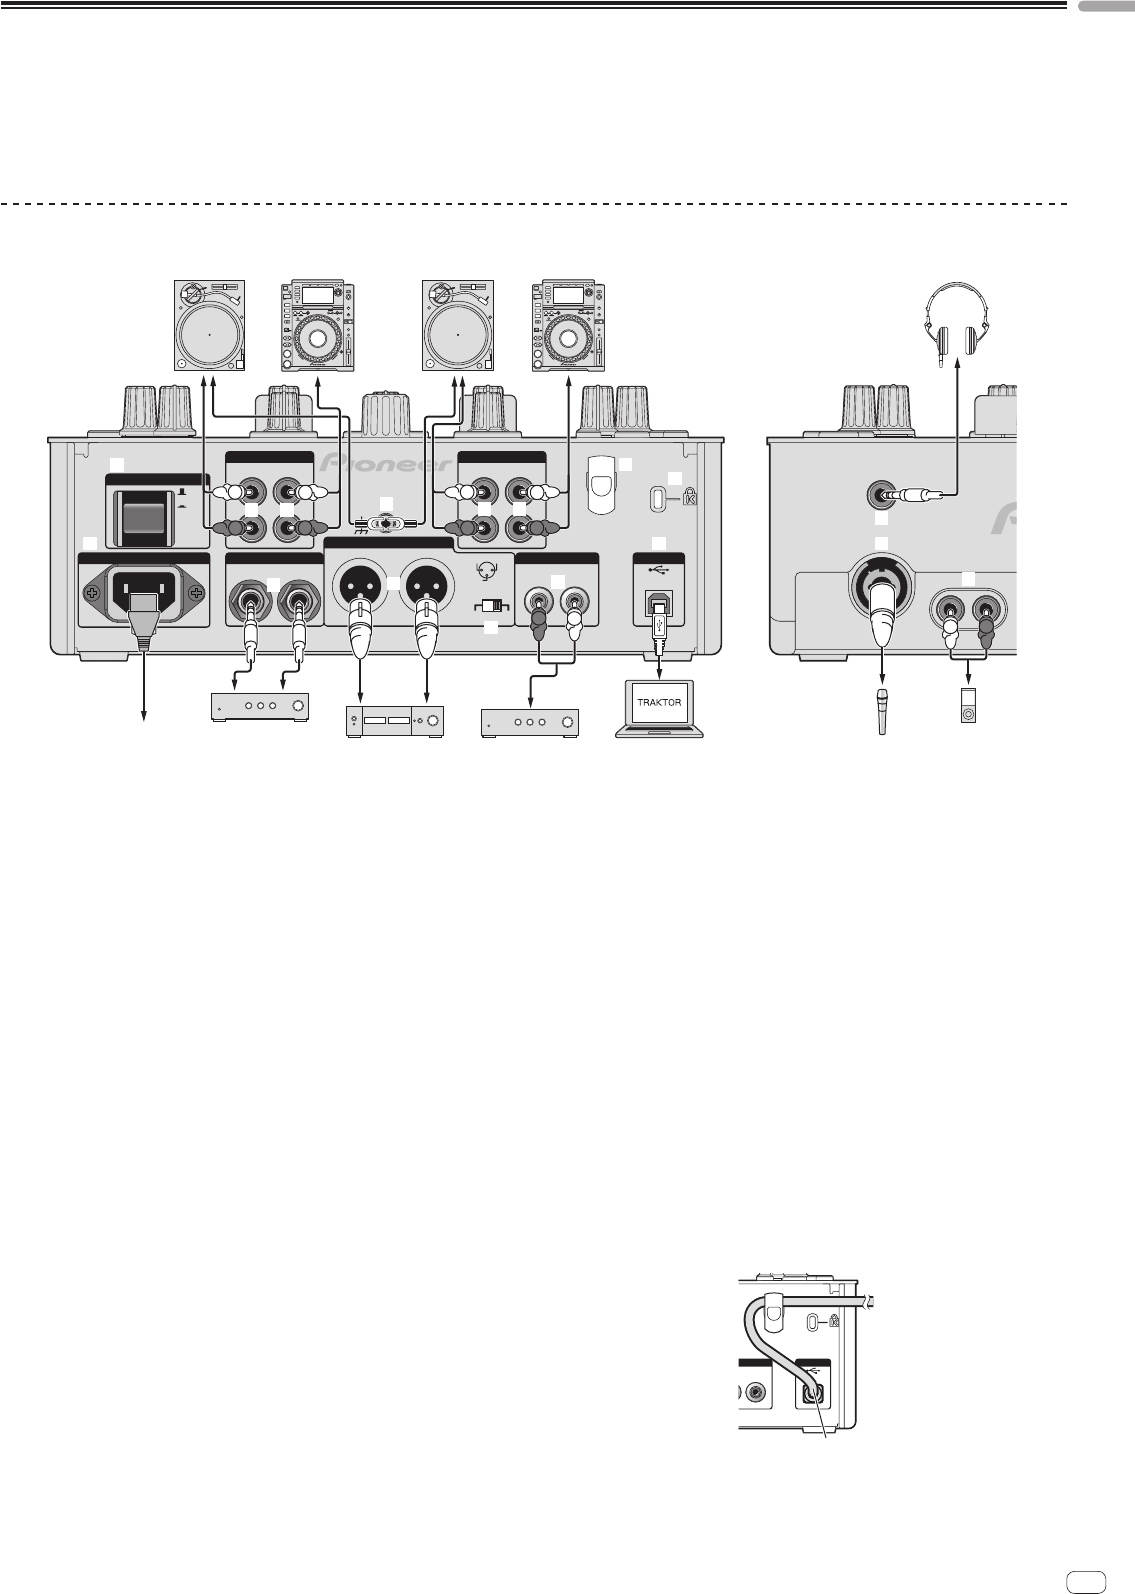
Connecting the input/output terminals
Be sure to turn off the power and unplug the power cord from the power outlet whenever making or changing connections.
Connect the power cord after all the connections between devices have been completed.
Be sure to use the included power cord.
Refer to the operating instructions for the component to be connected.
! When creating a DVS (Digital Vinyl System) combining a computer, audio interface, etc., be careful in connecting the audio interface to this unit’s input terminals and in
the settings of the input selector switches.
Also refer to the operating instructions of the DJ software and audio interface.
Rear panel, front panel
MIC
PHONES
LR
AUX
OFF
PHONO CD
SIGNAL GND
ON
POWER
AC IN
220 - 240V
CH 2
USB
L
R
PHONOCD
CH 1
L
R
LR
RL
LR
1.GND 2.HOT
3.COLD
dB
-
6
0
dB
MASTER
ATT.
TRS
MASTER 1
MASTER 2
BOOTH
R
R
L
L
R
L
R
L
R
L
RL
Power amplifier
(for booth monitor)
Power amplifierPower amplifier
Analog player DJ player Analog player DJ player
Headphones
Computers
Portable
audio device
Microphones
To power outlet
1
2 3
4
2 3
5
6
7
d
e
f
8
9
a
b
c
1 POWER button
Turns this unit’s power on and off.
2 PHONO terminals
Connect to a phono level (MM cartridge) output device. Do not input line level
signals.
To connect a device to the [PHONO] terminals, remove the short-circuit pin plug
inserted in the terminals.
Insert this short-circuit pin plug into the [PHONO] terminals when nothing is
connected to them to cut external noise.
3 CD terminals
Connect to a DJ player or a line level output component.
4 SIGNAL GND terminal
Connect an analog player’s ground wire here. This helps reduce noise when the
analog player is connected.
5 Cord hook
Hook the USB cable here.
! The sound will be interrupted if the USB cable is disconnected during
playback.
6 Kensington security slot
7 USB port
Connect to a computer.
! Connect this unit and the computer directly using the included USB cable.
! A USB hub cannot be used.
8 MASTER2 terminals
Connect to a power amplifier, etc.
9 MASTER ATT.
Sets the attenuation level of the sound output from the [MASTER1] and
[MASTER2] terminals.
When set to [–6 dB], the audio level output from the [MASTER1] and [MASTER2]
terminals is decreased by half.
a MASTER1 terminals
Connect to a power amplifier, etc.
b BOOTH terminals (page 18)
Output terminals for a booth monitor, compatible with balanced or unbalanced
output for a TRS connector.
! The sound will be distorted if the level is raised too high when using unbal-
anced outputs.
c AC IN
Connect to a power outlet using the included power cord. Wait until all connec-
tions between the equipment are completed before connecting the power cord.
Be sure to use the included power cord.
d PHONES terminal (page 18)
Connect headphones here.
e MIC terminal (page 23)
Connect a microphone here.
f AUX IN terminals (page 23)
Connect to the output terminal of an external device (sampler, portable audio
device, etc.)
Cord hook
The USB cable is fastened in place by catching it on the cord hook. This prevents the
USB cable from being pulled accidentally and its plug getting disconnected from
the port.
! The sound will be interrupted if the USB cable is disconnected during playback.
USB
L
S
TER 2
USB cable


