Using the Chord BookUsing the Chord Book
9
56#0&"(+0)'4+0)
The standard fingering method uses
standard formations of three or four notes,
and lets the experienced musician play a
wider variety of accompaniment chords.
±
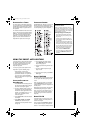
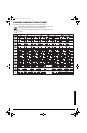
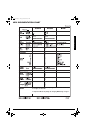
This chart shows the 15 chord types you
can play on your keyboard by using
standard fingering.
1. Set
POWER/MODE
to
FINGERED
.
2. Select and enter an auto-rhythm.
3. To start the auto-rhythm before your
auto accompaniment, press
START/
STOP
.
Or, to synchronize the start of the
selected auto-rhythm with your
accompaniment, press
SYNCHRO/FILL-
IN
.
4. Begin the accompaniment at the
desired interval by pressing at least
three accompaniment keys to play the
desired chord.
To play a melody along with the
accompaniment, press any key(s) to
the right of the accompaniment keys.
5. Adjust the tempo,
MAIN VOLUME
,
and
ACCOMP
VOLUME
to the desired levels.
6. To change chords without interrupting
the rhythm, simply press the auto
accompaniment keys required to form
the new chord.
7. To stop auto accompaniment and the
auto-rhythm, press
START/STOP
.
75+0)"6*'"%*14&"$11-
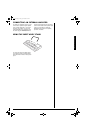
You can use your keyboard’s chord book
display feature to see which keys to press
and which fingers to use to form a chord.
You can also display the name of a chord
you play.
1. Set
POWER/MODE
to
NORMAL
or
CONCERT
CHORD
, then press
CHORD
BOOK
.
2. Press
CLEAR
(
0
) to clear any previous
chord entry.
3. If you want to see information about a
major chord while you play it, skip to
Step 4. Otherwise, enter the chord’s
name using that chord’s keys on the
numeric keypad.
For example, to enter a minor 7
–
5
chord, press
m
(
8
)
7
(
9
)
–5
(
2
). Or, to
enter 7sus4, press
7
(
9
) and
sus4
(
1
).
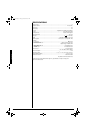
4. Press the root key on the
accompaniment keyboard to play the
chord.
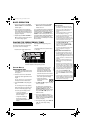
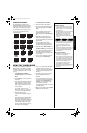
As the chord plays, the display shows
the chord you entered, the keys to
press to form the chord (on the bottom
“keyboard”), the fingers you need to
use to play the chord (on the center
“hands”), and the notes that make up
the chord (on the staff display).
5. Use
–
or
+
to scroll through the chords
associated with the root chord you
entered in Step 3. Or, press a different
root key to see the chords based on
that key.
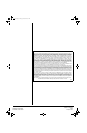
±
6. Using the center “hands” as a guide,
play the displayed chord on the
keyboard.
7. You can also display the name of the
chord you play on the accompaniment
keyboard. Press
CHORD BOOK
then
CLEAR
to erase any previous entry.
Then play the chord on the
accompaniment keyboard. The name of
the chord appears.
8. When you have finished, press
CHORD
BOOK
to turn off chord book.
±
"016'"
±
"
Standard Fingering
• You do not have to press the key marked
with parentheses on the keyboard in the
chart to produce a 7, m7, M7, mM7, add9,
or madd9 chord.
• Although the chart shows only one possible
fingering position for each chord, it is
possible to play a chord using several
different positions. For example, the
following three positions produce the same
C chord.
• When you play an aug, 7
–
5
, or dim7 chord,
the lowest note you play determines the
root of the chord. Be sure that your
fingering correctly defines the root you
want.
• See “Standard Fingering Chord Charts” on
Page 13 for all the chords you can play on
your keyboard using standard fingering
accompaniment.
Using the Chord Book
• If the chord is not recognized by the
keyboard, only a dash appears.
• Since the keyboard automatically changes
some chords so you can play them on the
accompaniment keyboard, the keyboard
might display some chords in inverted form.
• The keyboard does not display some
chords because the chords cannot be
played within the accompaniment
keyboard’s range. See “Standard Fingering
Chord Charts” on Page 13 for more
information.
42-4056.fm Page 9 Friday, April 26, 2002 9:14 AM