


6
Panel Descriptions
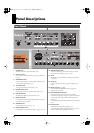
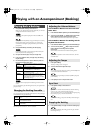
1.
VOLUME knob
This knob controls the volume of the entire GW-7.
2.
D Beam controller
You can use this controller simply by moving your hand above
it. (p. 16)
3.
ASSIGNABLE buttons
You can use these buttons to turn the D Beam controller on/off,
or to select the D Beam function. (p. 16)
4.
TAP TEMPO button
You can use this button to set the tempo. (p. 14)
5.
BACKING TRACK button
Press this button when you want the backing to play. (p. 14)
6.
SYNC START button
This button activates the Sync Start function. (p. 14)
7.
BAND TYPE buttons
Use these buttons to change the backing ensemble, or to use the
minus-one function. (p. 14, p. 23)
8.
SONG REC button
Press this button to record a song. (p. 21)
9.
SONG CONTROL buttons
Use these buttons to play back the backing or song. (p. 14, p. 23)
10.
ANALOG MODIFY section
Turn the C1/C2 knobs to control the functions you select by
pressing the SELECT button. (p. 12, p. 14, p. 25)
11.
Screen
This displays various information according to the operations
you perform.
12.
VALUE dial
Use this to edit the value of the parameters (settings) in the
screen.
13.
SELECT buttons ([ ][ ])
Use these buttons to change between screen pages, tone
categories, or music styles.
14.
EXIT (NO)/ENTER (YES) buttons
Pressed to issue the “Cancel” (EXIT) or “OK” (ENTER)
commands in screens that prompt you to make such a selection.
To listen to the demo songs, hold down [SHIFT] and press
[EXIT]. (p. 9)
To use the metronome, hold down [SHIFT] and press [ENTER].
(p. 10)
15.
EFFECTS button
This button lets you make effect settings. (p. 19)
To lower the pitch of the keyboard tone in steps of one octave,
hold down [SHIFT] and press [EFFECTS]. (p. 11)
Front Panel
2
1
GW-7_e.book 6 ページ 2005年2月16日 水曜日 午前8時48分