


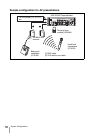
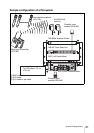
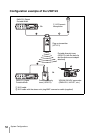

45
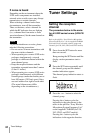
Tuner Settings
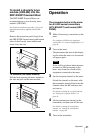
2 Select the channel group on the tuner
module installed into the slot 1 of the
MB-X6.
3 After confirming that the channel
group indication has stopped flashing
(about 10 seconds after you have
selected the channel group), keep
pressing the + button on the tuner
module installed into the slot 1 of the
MB-X6.
All the tuner modules installed into the
MB-X6 are set to the available
channels within the selected channel
group.
After the automatic detection and
selection of available channels finish,
you can change the group and channel
on each tuner module manually.
• Do the automatic detection and selection
of available channels with the channel
group other than channel group 00.
• When there are unavailable channels due
to extraneous radio wave and the channel
could not be selected on some tuner
modules, “NO CH” appears on the
display of those tuner modules. If this
happens, select the channel group with no
interference from extraneous radio wave,
and repeat the procedure above.
Setting the monitor level
The procedure below can be
performed with the portable
diversity tuner (URX-P2) only.
You can set the monitor level for
monitoring the tuner output within the
range of 01 to 24.
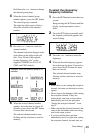
1 While the parameters on the display
section are not flashing, press the + or
– button once.
The monitor level indication appears in
the display section.
2 Press the + button to increase the
monitor level, or press the – button to
decrease the level.
When you leave the tuner for about
two seconds or more or press down the
SET button for more than one second,
current monitor level setting is stored
in memory and the normal display
resumes. Note that monitor level
setting is effective after you turn off
the tuner, then turn it on again.
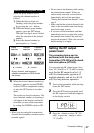
Resetting the accumulated
use time indication
The procedure below can be
performed with the portable
diversity tuner (URX-P2) only.
The accumulated use time is the total time
(in hours and minutes) that the tuner has
been used. It is recorded whenever the tuner
is on.
If you reset the indication to “00:00” when
you replace the batteries, this shows the
accumulated battery use time.
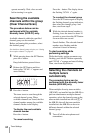
1 Press down the SET button for more
than one second.
Keep pressing the SET button until the
display section parameters start to
flash.
2 Press the SET button repeatedly until
the accumulated time indication
appears in the display section.
Notes