


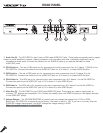


6
ADVANCED OPERATION
When to use Voice Cancel
First off, you must have a multiplexed disc. If you are playing a standard CD+G, CD or VCD that is not multiplexed, nothing
will happen when you press the VOICE CANCEL button. When a multiplex disc is in use the VOICE CANCEL can be a very
versatile feature. Lets’ say you want to practice singing to a particular song, but without the vocal layer, simply press the
VOICE CANCEL button.
Note: If you are playing DVD’s, which are recorded in a “multi-track” format, Please use the audio feature on the DVD
itself to accomplish this task.
When to use Voice Partner
As with Voice Cancel, VOICE PARTNER only works with multiplex discs. This feature acts very similar to the Voice Cancel
feature, but with an added voice activation feature that acts like a vocal “auto-pilot”. When you utilize the VOICE PARTNER
feature, the vocal layer will be removed as long as you are singing into the microphone. When you stop singing into the
microphone, the vocal layer will automatically be added back into the music. This feature is especially handy if you are
performing solo and want to sing a duet. In this case, when you finish singing your verse, the “other singer” will
automatically enter to sing his/her part! This is also very useful for learning new songs.
Note: There may be a 1 second delay time before the vocals are brought back in if the song is in the middle of a verse.
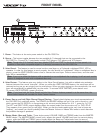
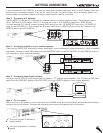
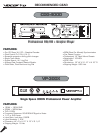
Switching A/V Channels
Since the DA-1000 Pro has 2 A/V inputs, you can switch between them via the SOURCE button. Let’s say you are
performing live, and want to do 2 songs back to back, but they are on different discs! Instead of stopping to switch CD’s
between songs (not very good for live performances), have a disc cued in A/V 2, and simply hit the SOURCE button and
PLAY, You are back in action!
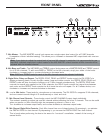
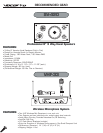
Balancing the Music with the Vocals
Have you ever been to a musical performance where the music was so loud that you could barely hear the singer?
Or maybe to a performance where the singer was so loud that the music was drowned out? Those situations are created
with poor musical balancing. To avoid these situations the DA-1000 Pro has a MASTER, BASS and TREBLE control for
both the music and the Mic levels. If you find that music is too loud, simply adjust the MASTER MUSIC control knob for
the music. Also, keep in mind that BASS and TREBLE levels also affect the overall “sound” and can be adjusted to correct
sound balancing problems.
Balancing Microphone Levels
When adjusting Mic levels, it is recommended to do so in this order:
1) First adjust the MASTER MIC control knob to an appropriate level without background music and test.
2) Then balance the BASS and TREBLE levels for fine tuning.
3) Start background music and adjust each MIC CHANNEL accordingly.
4) Remember to compensate if the background music has striking volume changes.
5) Do a complete song for complete balancing success.
Using Digital Echo
The DA-1000 Pro has a built in, adjustable Digital Echo effects processor that can really add a spacious feeling to the
vocals. You can adjust the ECHO in several ways. First off, you can adjust the overall ECHO applied to the Mic channels
via the DIGITAL ECHO control knob. This limits the echo to all 3 channels together. Once you have your master ECHO
level established, you can start customizing the nature of the echo via the DELAY and REPEAT controls. The DELAY knob
controls the interval time between each echo and the REPEAT knob controls the # of times the echo will repeat. By fine
tuning these controls, you can achieve the “perfect” echo effect. Each Mic channel has it’s own DIGITAL ECHO ON/OFF
switch to add/remove echo individually. To add, press button in. To remove, depress button out.