


7
MOUNTING
Tools required:
• Phillips Screwdriver (not included)
• 7 Mounting Screws (included) (if rack mounting)
• 2 Mounting Brackets (included) (if rack mounting)
• 19” Rack Case (not included)
For mounting versatility, the DA-1000 Pro can be installed as a stand alone component in a home entertainment
system or mounted to a compatible rack case via the included mounting brackets.
To install to a pre-existing entertainment system:
1. Place unit in desired space and make appropriate connections.
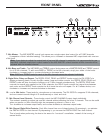
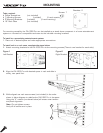
To install unit to a rack case, complete the steps below:
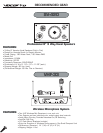
1. Attach mounting brackets to the DA-1000 Pro via the mounting screws.(There is one bracket for each side).
2. Align the DA-1000 Pro with desired space in rack and slide in
slowly, rear panel first.
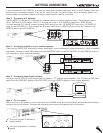
3. While aligned use rack case screws (not included) in the order
shown in below diagram to stabilize the DA-1000 Pro in its space.
Using the “X” rotation (numbered below) will ensure even tension
and plush alignment.
Note: Do not tighten screws
firmly till all screws are in place.
1
2
3
4
Figure:2
Right Bracket
Figure:1
Left Bracket
Screws: 7
Brackets: 2