


PM1D V2 System Software Installation Guide
5
J
[Write] button
..........................initiates firmware writing for
all items checked in the
writing check boxes
6
K [ALL] button.............................check all writing check boxes
6
L [CLEAR] button .......................uncheck all writing check
boxes
6
[Using PM1DLOAD]
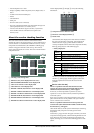
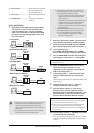
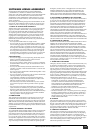
1 Depending on the target that is being updated,
the firmware is sent over the following routes
from the computer (PC). Connect an RS-232C
cable (cross connected) or a D-Sub half-pitch 68-
pin cable to provide the appropriate route, and
turn on the power.
• CS1D update
• DSP1D-EX/DSP1D update
• AI8/AO8 update
• DIO8 update (via DSP1D)
• DIO8 (Direct) update
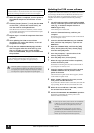
2 Before you perform the update, you must exit all
other software and memory-resident programs.
3 Insert the included CD-ROM into your CD-ROM
drive, and choose the [Start] menu item [Run...].
4 In the input field, type
D:\LOADER\PM1DLOAD.EXE (if the CD-ROM
drive is drive D: on your computer), and click OK.
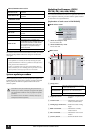
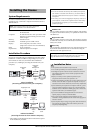
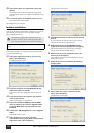
5 Start up PM1DLOAD, and when the mode select
screen appears, select Host I/F
1 and click OK.
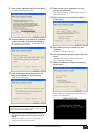
6 When the PM1DLOAD update software starts,
select the serial port (only ports 1–9 are
supported) of your computer in the Serial Port
field of the [Setup] menu
3.
7 In the [Setup] menu 3 Connection Point field,
specify the destination that you connected in
step 1.
This setting is ignored in the case of the DIO8 (Direct), and
need not be set.
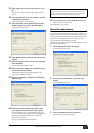
8 From the target select menu 4, select the
components that you want to update.
9 Click the [GetVer.] button 9. The current
firmware version for each component will be
displayed. Compare the ROM version field
7 and
File version field
8 of the list, and add a check
mark for all lines that have different versions.
10 Click the [Write] button J. Updating of the items
you checked in step 9 will begin.
Once you initiate the writing process even once, the screen
of the CS1D will indicate “If loading is completed, Please
re-start.”
• Scene data etc. that you created using this system must be
backed up to a memory card before you perform the
update. Power-off all speaker amps, set all output
volumes to the minimum position, and do not input any
audio signals.
• If any components not shown above and not related to
the update are connected, turn off their power.
PC
CS1D
RS-232C
PC
DSP1D-EX/
DSP1D
RS-232C
12345678
PC
DSP1D-EX/
DSP1D
RS-232C
AI8/AO8
D-Sub 68pin
I/O UNIT ID
PORT B SELECTOR
5-8
1-4
POWER
ON/ OFF
PC
DSP1D-EX/
DSP1D
RS-232C
DIO8
D-Sub 68pin
I/O UNIT ID
PORT B SELECTOR
5-8
1-4
POWER
ON/ OFF
PC
RS-232C
DIO8
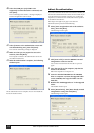
• When updating the AI8/AO8, you must observe the
restrictions listed below. If you fail to observe these, it
may be impossible to perform the update.
– The port connected to the 68-pin cable used for the
update must match the port selected by the select
switch of the unit.
– If the firmware is blank (the 7-segment display of the
AI8/AO8 indicates 88), make sure that the above
condition is met, and then turn on the power.
However, you must do this for each unit immediately
before updating it.
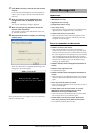
• When updating the DIO8 via the DSP1D, you must
observe the following restriction. If you fail to observe
this, it may be impossible to perform the update.
– Connect OUTPUT A of the DIO8 to one of the
INPUT ports of the DSP1D.
NOTE: The update cannot be performed if you select Card Direct
2
in the Mode Select screen.
NOTE:
• If the firmware has been erased, the version will not be displayed.
You must add a check mark in this case as well.
• In some cases, the version of the AO8 cannot be obtained from
port B, but if you have made connections and settings in
accordance with the restrictions given earlier, you will be able to
write the update.