


PM1D V2 System Software Installation Guide
6
11 When the update is completed, turn the power of
the updated components off and then on once
again.
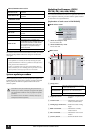
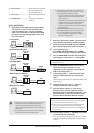
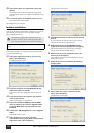
12 Click the [GetVer.] button 9. Verify that the ROM
version field
7 and the File version field 8 are
now the same for each updated item.
If the ROM version cannot be obtained, or if the versions
do not match, the update was not successful. Please repeat
the procedure from step 9.
13 Repeat steps 1–12 until all components have been
updated.
14 After updating the CS1D screen software
described in the section that follows, re-start all
components once again.
15 Verify that the VERSION CHECK popup window
does not appear when the CS1D starts up, and
that you are able to use the system normally.
Then close PM1DLOAD, and you are finished with
the procedure.
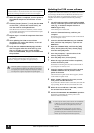
Updating the CS1D screen software
To update the CS1D screen software, you will use one memory
card, and copy the files from CD-ROM via the memory card
into the CS1D. Before you perform this procedure, you must
complete the firmware update described in the preceding
section.
1 You will need to provide a commercially-available
memory card and a system that is able to read this
card (e.g., a notebook computer that has a
PCMCIA Type II slot).
Turn off the power of the CS1D.
2 Insert the formatted memory card into your
computer.
For details on how to format the card, refer to the manual
of your computer or card.
3 Insert the included CD-ROM into your CD-ROM
drive, and from “My Computer,” open the CD-
ROM drive.
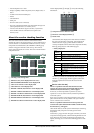
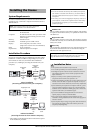
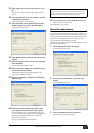
4 Open the CS1DAPP folder, and from the [Edit]
menu, choose [Select all]. Next, choose [Copy]
from the same [Edit] menu.
5 From “My Computer,” open the drive of the
memory card you inserted.
6 From the [Edit] menu, choose [Paste].
7 When the copy operation has been completed,
remove the memory card.
For details on removing the card, refer to the manual of
your computer or memory card.
8 Insert the memory card into the CS1D’s PC ATA
STORAGE CARD slot A or B, and turn on the
power of the CS1D.
The normal start-up title screen will not appear, and the
CS1D will be in update mode.
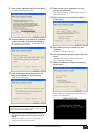
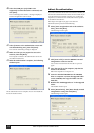
9 When “START?” appears in the screen, use the
track pad to click the OK button.
If you click the CANCEL button at this time, the CS1D will
stop operating. Remove the card, and restart the CS1D.
10 When the screen indicates “COPY OK,” remove
the card and restart the CS1D.
11 Execute the INITIALIZE ALL MEMORIES operation.
For details on initializing the memory, refer to the
Reference Manual (Software).
NOTE: When updating the AI8/AO8 or DIO8 via the DSP1D, the
restrictions listed in 1 may mean that some units cannot be updated.
(In this case, a message will inform you that a unit was skipped.)
NOTE: If the update was unsuccessful, a popup window will inform
you that VERSION CHECK failed. Check the settings and
connections, and perform the update once again from step 1.
While the update is in progress, never power-off the system
or connect/disconnect cables. If the update was interrupted,
turn off the power of each component, wait for five seconds,
turn the power on again, and perform the update again.
• Insert only one memory card in the PC ATA STORAGE
CARD slot. If you simultaneously insert another card
into the other vacant slot, the update may not occur
correctly.
• If you updated the entire system, you must execute
INITIALIZE ALL MEMORIES. Operation cannot be
guaranteed if you fail to initialize the memories. For
details, refer to the Reference Manual (Software).