


164
Appendix/Anhang/Annexe
● ● ● ● ● ● ● ● ● ● ● ● ● ● ● ● ● ● ● ● ● ● ● ● ● ● ● ● ● ● ● ● ● ● ●
Installing Options/Installationsoptionen/Installation des options
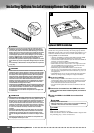
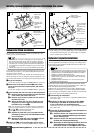
Optional Hard Disk Installation
The hard disk used must be a 2.5 inch IDE compatible type, but
some types may not be installable.
• Hard disk drives of a maximum 8 GB capacity can be formatted; how-
ever, the maximum partition size is 2 GB. For example, an 8 GB hard
disk drive would have to be formatted into four separate 2 GB partitions.
• Hard disk drives of a capacity greater than 8 GB can be installed; how-
ever, the PSR-9000 is capable of formatting only up to a maximum 8 GB
on the drive.
•
Hard disk drives wider than 12.7 mm cannot be installed to the PSR-9000.
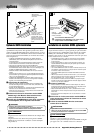
For information on the hard disk recommendations, ask your near-
est Yamaha representative or an authorized distributor listed at the
end of this owner’s manual.
Install a hard disk at your own risk. Yamaha will not be held responsi-
ble for any damage or injury resulting from improper installation or the
use of a hard disk other than one of the types recommended by Yamaha.
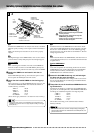
z
Set up for installing.
Use the same operation as in “Optional SIMM Installation” (page 160).
x
Remove the six screws from the SIMM cover in the
center of the instrument’s bottom panel, and remove
the cover.
Use the same operation as in “Optional SIMM Installation” (page 160).
c
Insert the hard disk unit in the slot as described below.
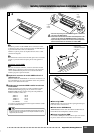
c
-1 Remove the four black screws from the hard disk
cover inside, and remove the cover.
c
-2 Remove the four silver screws from the center of
the hard disk cover.
c
-3 Attach the hard disk unit to the hard disk cover
using the four silver screws removed from the
hard disk cover in step
c
-2.
Make sure the bottom of the hard disk is facing up. Depending
on the type of hard disk drive you plan to install, select holes
(
A
) or holes (
B
) to attach the hard disk drive.
* Holes (
A
) are used in this illustration.
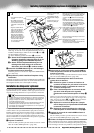
c
-4 Replace the hard disk cover (included with the
hard disk) by fitting it into the PSR-9000 as shown
in the illustration.
c
-5 Replace the hard disk cover, and attach with the
four black screws removed in step
c
-1.
v
Replace the SIMM cover and attach with it the six screws.
Use the same operation as in “Optional SIMM Installation” (page 160).
b
Check that the installed hard disk is functioning properly.
Turn on the power, go to the DISK display, and execute the For-
mat Hard Disk function (page 132). If the format is completed
with no trouble, the hard disk is OK.
Optionale Festplatteninstallation
Die verwendete Festplatte muß ein 2,5-Zoll IDE-kompatibler Typ
mit einer Kapazität von mindestens 2 G Bytes sein. Einige Typen
können jedoch unterschiedliche Einbau-Erfordernisse haben oder
nicht richtig funktionieren.
• Festplattenlaufwerke mit einer Kapazität von maximal 8 GB können for-
matiert werden, die maximale Partitionsgröße beträgt jedoch 2 GB. Ein
Festplattenlaufwerk von 8 GB beispielsweise müßte in vier separaten
Partitionen von jeweils 2 GB formatiert werden.
• Festplattenlaufwerke mit einer Kapazität von über 8 GB können auch
installiert werden, jedoch kann der PSR-9000 nur bis zu 8 GB auf der
Festplatte formatieren.
• Festplattenlaufwerke, die breiter als 12,7 mm sind, können auf dem
PSR-9000 nicht installiert werden.
Informationen über empfohlene Festplatten kann Ihnen Ihr nächster
Yamaha-Vertreter oder einen autorisierter Händler geben, welche am
Ende dieser Bedienungsanleitung aufgelistet sind.
Installieren Sie eine Festplatte auf eigenes Risiko. Yamaha kann für
Schäden oder Verletzungen, die sich aus unsachgemäßer Installation
oder Verwendung von Festplatten ergeben, die nicht von Yamaha emp-
fohlen wurden, nicht verantwortlich gemacht werden.
z
Vorbereitung der Installation.
Gehen Sie genauso vor wie bei der ”Optionalen SIMM-Installa-
tion” (Seite 160).
x
Entfernen Sie die sechs Schrauben aus der SIMM-
Abdeckung in der Mitte der Unterseite des Instru-
ments, und nehmen Sie die Abdeckung ab.
Gehen Sie genauso vor wie bei der ”Optionalen SIMM-Installa-
tion” (Seite 160).
c
Fügen Sie die Festplatteneinheit in den Steckplatz ein,
wie im folgenden beschrieben.
c
-1 Entfernen Sie die vier schwarzen Schrauben aus
der inneren Festplattenabdeckung und nehmen
Sie die Abdeckung ab.
c
-2 Entfernen Sie die vier silbernen Schrauben aus
der Mitte der Festplattenabdeckung.
c
-3 Befestigen Sie die Festplatteneinheit an der Fest-
plattenabdeckung mit Hilfe der vier silbernen
Schrauben, die Sie in Schritt
c
-2 entfernt haben.
3 -1
3 -2
• Black screws
• Schwarze
Schrauben
• Vis noires
• Silver screws
• Silberne Schrauben
• Vis argentées
• Hard disk cover
• Festplattenabde
ckung
• Couvercle du
disque dur
• Hard disk cover
• Festplattenabde
ckung
• Couvercle du disque
dur
3 -3
• You should tighten
these two screws
first.
• Sie sollten zuerst
diese zwei
Schrauben festz-
iehen.
• Serrez ces deux
vis en premier
• Silver screws
• Silberne Schrauben
• Vis argentées
• Bottom side face up
• Unterseite zeigt
nach oben
• Partie inférieure
vers le haut
372