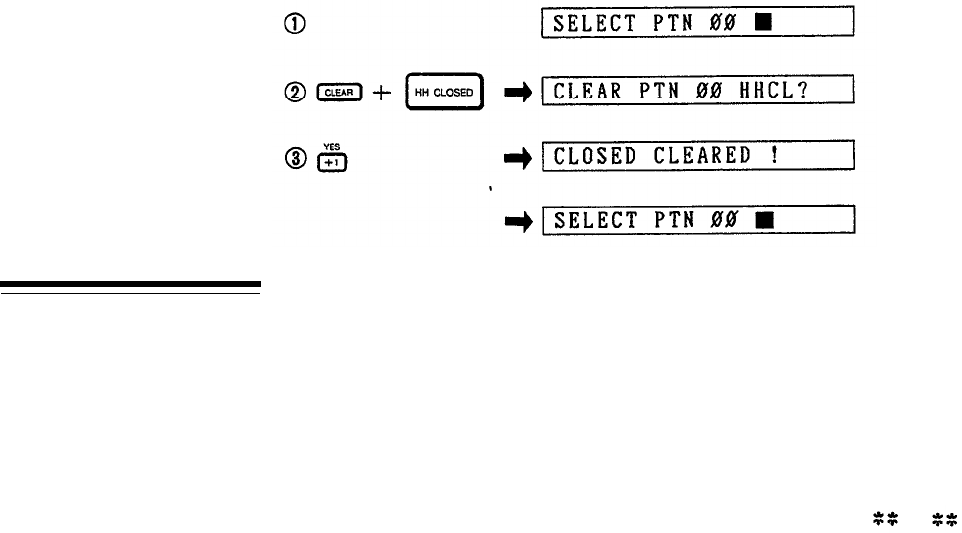
Instrument Clear (Example: clear HH CLOSED from pattern 00)
Pattern Copy
The RX21 allows you to copy any pattern from one pattern number to another pattern
number. This is particularly handy when you want to add more instruments or rhythm
lines, or otherwise alter an existing pattern, and still keep the original pattern. You
can use this function to copy one of the RX21’s preset patterns, then alter it to
create your own personally programmed pattern. You could also use the Copy
function to arrange patterns in a predetermined sequence of patterns which will
change from one pattern to the next when you press the +1/YES key (see the
PATTERN CHANGE DURING PLAYBACK section).
With the RX21 in the select pattern mode, press the STEP WRITE and REAL TIME
WRITE buttons simultaneously. The LCD will switch to “COPY to
”. The
cursor will be flashing to the right of the first pair of asterisks, prompting you to
enter the number of the pattern you wish to copy. Enter the pattern number, using
the numeric keys, and press +1/YES. The cursor will shift to the next pair of asterisks,
prompting you to enter the number of the pattern you wish to copy to. Enter this
number (00–55 ONLY, you cannot copy to a preset pattern number).
You can now copy the pattern by pressing +1/YES. The LCD will show "COPY
EXECUTING”, then revert to "SELECT PTN pp".
Prior to copying, you can alter the pattern numbers if you’ve changed your mind.
Press -1/NO to move the cursor back to the first pair of asterisks, and enter a new
number. Press +1/YES to move the cursor back to the second pair of asterisks,
and either enter a new number or press +1/YES again to copy.
If a pattern is already programmed in the pattern number to which a pattern will
be copied, the RX21 will give you a chance to confirm your intention to copy a
new pattern into that location by displaying the "REWRITE PTN pp?" message,
after you have pressed the +1/YES key. If it’s OK to write over the pattern, press
+1/YES to execute the copy. If not, press
-1/NO to cancel the copy function, and
begin the copy procedure again, selecting a new pattern number on which to copy.
If, by mistake, you have tried to copy onto a preset pattern number, the LCD will
show the "PRESET PTN AREA!" error display, then revert to "SELECT PTN pp .
Start the copy procedure again, selecting a new pattern number on which to copy.
Canceling the COPY function is done by pressing the -1/NO key: once if the
cursor is next to the left hand pair of asterisks, twice if the cursor is next to the right
hand pair of asterisks.
24


