


25
Assigning Functions to the Hold Button
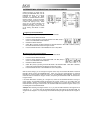
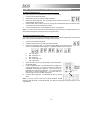
1. Press and hold the SETUP BUTTON.
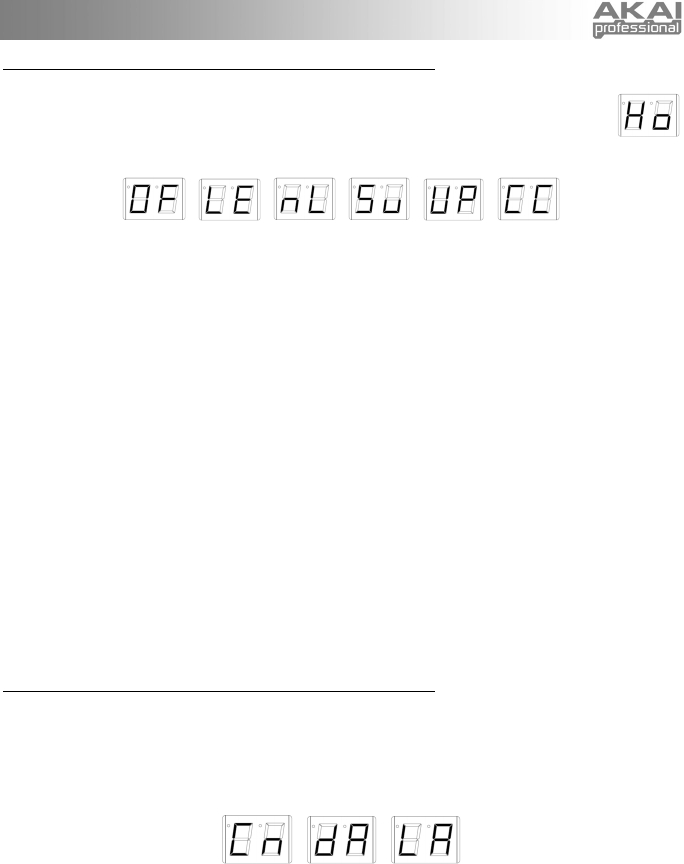
2. Press the HOLD BUTTON or OCTAVE BUTTON to scroll through the options until “Ho” is
shown in the PROGRAM DATA / DISPLAY.
3. Release the SETUP BUTTON. The PROGRAM / DATA DISPLAY will display the current mode. Use
the HOLD BUTTON or OCTAVE BUTTON to select any of the following options:
a. “OF” (Off): The HOLD BUTTON will have no affect if you press it while you are playing.
b. “LE” (Hold Mode, Legato): Pressing the HOLD BUTTON before playing a note will engage Hold
Mode. The first note of a phrase you are playing (after pressing the HOLD BUTTON) will be held
even as you play different notes after that. Starting a new phrase will result in a new held note.
You can disengage Hold Mode by pressing the HOLD BUTTON again.
c. “nL” (Hold Mode, Non-Legato): Pressing the HOLD BUTTON after playing a note will engage
Hold Mode. The first note of a phrase you are playing (after pressing the HOLD BUTTON) will be
held even as you play different notes after that. Starting a new phrase will result in a new held
note. You can disengage Hold Mode by pressing the HOLD BUTTON again.
d. “Su” (Hold Mode, Sustain): Pressing the HOLD BUTTON before playing a note will engage Hold
Mode. The first note of a phrase you are playing (after pressing the HOLD BUTTON) will be held
even as you play different notes after that. Starting a new phrase will result in a new held note.
You can disengage Hold Mode by pressing the HOLD BUTTON again. (Note: This is different
from Legato Hold Mode only in that it transmits MIDI Sustain pedal data – CC #64 – to your
external sound module.)
e. “UP” (Up): The HOLD BUTTON will function as a “Preset Down” button.
f. “CC” (Continuous Controller): The HOLD BUTTON will transmit MIDI Continuous Controller (CC)
data. You can set the CC number, the value it will transmit, and whether the HOLD BUTTON will
function as a toggle or momentary button. (See the “Setting the HOLD BUTTON’s Continuous
Controller Preferences” section.)
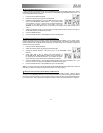
4. Press the SETUP BUTTON. The EWI4000s will return to Play Mode.
5. Press the HOLD BUTTON. The assigned function is on when the HOLD LED is lit. Press the HOLD
BUTTON again. The assigned function is off when the HOLD LED is unlit.
Setting the Hold Button’s Continuous Controller Preferences
When you choose to use the HOLD BUTTON to send Continuous Controller (CC) data, you will need to set
your preferences to determine what data you send.
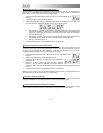
1. When you assign “CC” as the OCTAVE BUTTON’s function, the LEDs under the SETUP BUTTON and
TRANS BUTTON will flash. Press and hold the TRANS BUTTON.
2. While holding down the TRANS BUTTON, use the HOLD BUTTON and OCTAVE BUTTON to toggle
between the following options:
a. “Cn” (Controller Number): The number of the Controller that the OCTAVE BUTTON will use to
send MIDI messages. This number should match the Controller number of the parameter you
want to control.
b. “dA” (Data): The value that will be transmitted via the Controller number when the OCTAVE
BUTTON is pressed while playing. The EWI4000s can transmit standard MIDI values 00-127.
(Values over 99 will be shown as the last two digits with a dot between them on the PROGRAM /
DATA DISPLAY.)
c. “LA” (Latching): If Latching is on, pressing the OCTAVE BUTTON while playing will act as a
toggle button, continuously transmitting the Data value when it is pressed once and ceasing
transmission when it is pressed a second time. If Latching is off, the Data value will be
transmitted only when the OCTAVE BUTTON is held down while playing.