


11 U-CONTROL UMA25S User Manual
UMA25S as USB/MIDI Controller5.
At the highest control level of the U-CONTROL, you play and control the MIDI
data (Play Mode). The UMA25S has an array of control elements with which you
can control your MIDI equipment via the MIDI output (22) or with which you are
able to control your computer applications via USB (using the MIDI standard).
Most Digital Audio Workstations (DAWs) are capable of receiving control data
according to MIDI specications.
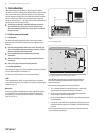
The controls comprise keyboard, Pitch Bend and Modulation wheel, Volume control
slider, 8 rotary knobs, 8 push buttons as well as Sustain and Expression pedals.
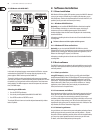
Display:
The current rmware version appears on the screen as soon as the keyboard is
switched on, after which the current preset number is shown. When moving a
control element, the value changes are displayed.
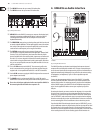
Control elements:
It is possible to use more than one button, knob, slider, etc., at the same time and
that their data are simultaneously sent via MIDI.
In principle, there are two options for assigning control elements:
You are using one of the presets with the default controller conguration •
(see Table 7.3). In this case, you need to specify the assignments on the
receiving device.
You are you using your own controller conguration that you created in Edit •
Mode. Find out how to make assignments on the UMA25S in Chapter 5.4.
The following gives you a detailed description on how to use the UMA25S.
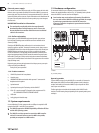
Please note the dierence that is made between push buttons (see control
elements (2) – (7) and (12)) and keys on the keyboard (control element (1))!
Please do not confuse these two control elements!
Presets5.1
The UMA25S has 16 memory locations to store your own presets. You can nd the
settings of the default presets (Table 7.4) in the appendix. The most recently used
preset is loaded when the device is switched on.
Loading presets5.1.1
There are several ways to load a preset:
Selecting presets directly:
Press the PRESET push button for a second and select the preset you want •
to use with the push buttons E1 – E8. The new preset number is shown on
the display.
or:
Press and hold down the Preset push button while pressing the key (1–8) •
with the number of the preset you want to use. The new preset number is
shown on the display.
Selecting presets by manually stepping up or down:
Select a preset with the +/– push buttons (• (7)) found below the display.
The new preset number is shown on the display. Make sure that none of the
push buttons (3) to (6) (MMC, MUTE, Preset, EDIT) are pressed.
or:
Press and hold down the Preset push button while turning one of the rotary •
knobs E9–E16. The preset number is shown on the display. As soon as you
press the Preset push button a second time (LED goes out), the new preset
is activated.
Storing presets5.1.2
Press the EDIT/EXIT push button 1. (6) for a second.
Press the key with the STORE function. “Str” appears on the display, 2.
representing the Store function.
Press one of the 8 push buttons E1–E8 or turn one of the rotary knobs 3.
E9–E16 to select the memory location in which you want to store
your preset.
Press the ENTER key to conrm.4.
You can also select the memory locations 1 to 8 using your keyboard ◊
(keys labeled with the numbers 1–8). The memory locations 9 to 16 can
only be selected using the rotary knobs.
The EDIT LED goes out.
If you want to overwrite the current preset, press the STORE key and then the •
ENTER key (skip step 3).
You can cancel the storing process by pressing the EXIT push button.•
We intentionally did not include an auto-store function. This way you can assign
a dierent MIDI message to a control element without changing the current
preset. If you want to restore a preset, simply load another preset and then
return to the old preset. All data have now been restored, including the default
function of the control element that had been changed for the time being.
Restoring default presets5.1.3
Press the EDIT/EXIT 1. (6) and MUTE (4) push buttons together. The display
shows “GLb” (for Global Mode).
Turn the E14 rotary knob. The display shows “FAC” (for Factory Reset).2.
Press the ENTER key to conrm. 3.
Caution! With Factory Reset, all configured data and user presets ◊
are irreversibly deleted! To avoid an accidental deletion, save your
presets by sending a SysEx dump to your computer beforehand
(see Chapter 5.7).
You can cancel the process by pressing the EXIT push button.•
Real-time control using the 5.2
control elements
The UMA25S’ possibilities of application are extremely versatile. The following
gives a couple of general instructions and examples to help you get started as
quick as possible.
What exactly does the UMA25S do?
Simply put, it’s a remote control for all kinds of MIDI equipment. An entire array
of control messages can be generated by the keyboard, slider, rotary knobs and
push buttons as well as the foot pedals. These control elements allow you to
control various functions of external devices (hardware and software) in real
time. That’s particularly the case with software mixers, sound generators
and eects. The software applications are often copies of “real” gear—their
functionality simulated and displayed on the computer.