


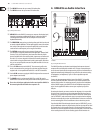


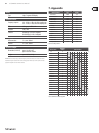
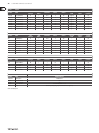
18 U-CONTROL UMA25S User Manual
More functions in edit mode5.6
All of the functions mentioned in this chapter are available in Edit Mode.
Press the EDIT/EXIT push button to switch to Edit Mode.
Show element function5.6.1
Use the Show Element function to view the settings of a control element:
Press and hold down the EDIT push button.1.
Operate the control element whose settings you want to check. This element 2.
is now shown on the display (for example, “E10”).
Release the EDIT push button.3.
Press the SHOW ELEMENT key. The display shows the message type of the 4.
control element that has been selected with the E9 knob.
Press SHOW ELEMENT again to view the MIDI channel number that you 5.
have selected with the E10 rotary knob. The parameter settings of the
selected control element are displayed one after another each time you
press SHOW ELEMENT. The order in which the parameters are displayed
corresponds to the parameter assignment of the rotary knobs E9 to E16 in
Edit Mode.
Press the EDIT/EXIT push button to exit Edit Mode. The EDIT LED goes out.6.
It is also possible to check the settings by pressing the push button ◊
found below the rotary knob whose function you want to examine
(E1–E8). As soon as the push button is pressed, the setting appears on
the display for a short time.
Channel array function5.6.2
Array function:
This practical function can be used to let several control elements send the same
MIDI message on dierent MIDI channels. It is available for the control element
groups E1–E8 and E9–E16.
Assign the rst control element (E1 or E9) as already described 1.
(see Chapter 5.4).
Press the EDIT push button.2.
Press the ARRAY key. “C_A” (which stands for Channel Array) appears on the 3.
display for a short time, after which “E1” is shown. Each time you press the
ARRAY key “E1” or “E9” is displayed.
Press the ARRAY key until the display shows the name of the control element 4.
that you assigned in Step 1.
Press the ENTER key to conrm.5.
The array of control elements has now the same function assigned to them,
but each element is consecutively assigned to incremental MIDI channel
numbers. Since the MIDI specication only provides 16 channels, the following
takes place: For example, if the rst element uses Channel 12, the following
elements use the channel numbers 13, 14, 15, 16, 1, 2 and 3.
Swap function:
The Swap function allows you to switch the MIDI channel assignment of an
array grouped in eight: swap the assignment of channels 9–16 when channels
1–8 were selected beforehand. This means that, for the previous example,
the assignment of channels 12–3 would change to 4–11.
Press the EDIT push button.1.
Press the SWAP key. “C_S” (which stands for Channel Swap) appears on the 2.
display for a short time, after which “E1” is shown. Each time you press the
SWAP key “E1” or “E9” is displayed.
Press the SWAP key until the display shows the name of the control element 3.
(E1 or E9) you want.
Press the ENTER key to conrm. As a result, the MIDI channels of the eight 4.
control elements are switched around.
Channel assign function5.6.3
The Channel Assign function lets you assign the SINGLE SEND CHANNEL for a
single control element or the superior GLOBAL SEND CHANNEL. Please consider
the dierent ways to proceed.
Assigning individual channels to a particular control element (SINGLE)
is an alternative to the method already described in Chapter 5.4:
Press and hold down the EDIT/EXIT push button. The device switches to 1.
Edit Mode. “Edt” appears on the display.
Operate the control element that you want to edit. The name of the control 2.
element appears on the display (for example, “E10”).
Release the EDIT/EXIT push button. Its LED lights up.3.
Press the SINGLE key (in the CH ASSIGN section). “SnG” appears on the display 4.
for a short time.
Use the keyboard to enter two digits for the channel you want to use with 5.
the control element (for example, “0” and “6” for MIDI channel 06).
6a. Press the ENTER key to conrm. The EDIT LED goes out.
6b. Alternatively, press the EDIT/EXIT push button to discard any changes made
and to exit Edit Mode. The EDIT LED goes out.
Example of the Channel Array function:
You want to control the volume level of 8 tracks in your sequencer with
all rotary knobs. Assign the rst control knob as follows:
Press and hold down EDIT/EXIT.1.
Turn the E9 rotary knob.2.
Release EDIT/EXIT.3.
Using the rotary knobs, make the following assignments: E9 = CC; 4.
E10 = Channel 1; E11 = Controller 7 (Volume); E12 = 0 (min. Value);
E13 = 127 (max. Value).
Press ENTER to conrm.5.
Assigning the other rotary knobs with the Array function:
Press EDIT/EXIT.6.
Press the ARRAY key. “C_A” appears on the display for a short time.7.
Press the ARRAY key until E9 appears on the display.8.
Press ENTER to conrm.9.