


12 U-CONTROL UMA25S User Manual
What can I control with the UMA25S?
Basically, you can control any device that is MIDI compatible. Both hardware and
software MIDI devices are controlled in exactly the same way. The only dierence
between them is the wiring.
Below are a couple of suggestions on how you can use your UMA25S:
Playing external sound generators (for example, MIDI sound modules, •
rack synthesizers and virtual instruments)
Editing sound parameters of (virtual) synthesizers, sound samplers and •
GM/GS/XG sound generators
Controlling parameters on eects equipment and software plug-ins, such as •
eects processors, compressors and digital equalizers
Remotely controlling software mixers (functions for volume, panorama, •
mute, etc.)
Remotely controlling transport functions (Play, Fast Forward, Stop, etc.) •
on sequencers, hard-disk recorders, drum machines, etc.
Live control of volume and sound parameters of sound modules on stage•
Remotely controlling groove boxes, step sequencers, MIDI generators and •
other “live” software
Controlling program changes and volume level on sound generators•
Suitable for band keyboardists, DJs, sound engineers, home and project •
studio owners, theater technicians, etc.
And how does it work?
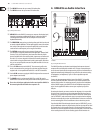
Each control element of the UMA25S can be assigned to particular MIDI
parameters. Assignments are carried out in Edit Mode (see Chapters 5.3 and
5.4). Whenever one of these control elements is used, the UMA25S generates
the control data assigned to this control element which are then transferred
to external devices over a data link. For this reason, the VOLUME slider is set by
default to send data that controls the volume level of a channel, for example.
The control data generated by the individual control elements are also referred
to as MIDI messages. Generally, MIDI messages can be divided into three
major groups:
Channel Messages:• These messages are used to transmit channel-specic
control information. An example of a channel message is the Note On
message. As soon as a key is played on the UMA25S’ keyboard, the device
generates a message which holds the information for pitch, channel number
and velocity. This way the receiving sound generator recognizes which tone
has to be played.
System Messages:• These messages are not channel- specic, but aect
the entire system to which they are sent. They are divided into three
subcategories: System Exclusive Messages (for operating system backup,
updates and management of memory contents); System Real-Time
Messages (for remote control of other devices, etc.); System Common
Messages (for synchronizing several devices, etc.).
Control Messages:• These are also known as Control Changes or
Controllers, abbreviated to “CC”. There are 128 controllers in total,
numbered from 0 to 127 (refer to the table of controllers in the appendix).
The controllers are channel-specic.
MIDI information consists of control data and contains no audible audio ◊
data! The data trans mission takes place over 16 channels.
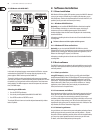
Changing the velocity curve5.2.1
You can adjust the UMA25S’ sensitivity which has an eect on the velocity with
which the keys are pressed and therefore also on the volume level.
Press the EDIT/EXIT push button.1.
Turn the E9 rotary knob completely to the right. “crV” (which stands for 2.
Velocity Curve) appears on the display.
Select the desired velocity curve with the E11 rotary knob. You can select one 3.
of the following options:
FIXED: The velocity curve is switched o (as is the case with an organ).
The keyboard always sends the same velocity value. This value can be
adjusted with the E12 rotary knob.
SOFT: The keyboard responds to the nest nuances. Applying dierent
pressures to the keys can make a big dierence in volume.
MEDIUM: The velocity curve is linear.
HARD: The velocity curve is non-sensitive. You have to hit the keys very hard
in order to play loud.
4a. Press the ENTER key to conrm.
4b. Alternatively, press the EXIT push button to cancel any changes made.
These settings need not be saved.
The octave and transpose functions5.2.2
The OCT </> push buttons can be used to shift the pitch in octave intervals.
This is useful because the UMA25S consists only of 25 keys, whereas the MIDI
specication includes 128 notes. In case you want to play a bass line, it can be
useful to move the keyboard range downward.
Alternatively, the OCT </> push buttons can be used to tranpose notes in
semitones so that you can play a piece in a key that works for you. In order to do
so, you need to adjust the settings in Edit Mode.
When the power is turned on, the Octave function is active by default.◊
Octave function:
Use the OCTAVE </> push buttons to shift the keyboard’s playing range up to
4 octaves.
Press OCT> to play the keyboard an octave higher. The OCT> LED lights up.•
Press OCT< to play the keyboard an octave lower. The OCT< LED lights up.•
Press OCT< and OCT> at the same time to return to the default octave range.•
The status of the Octave function is indicated by the glowing (1 octave) ◊
and flashing (2 and more octaves) of the respective push button’s LED.
When the power is turned on, the default octave range is restored.◊
Activating the Octave function (OCT ASSIGN):
When the Transpose function is active, you activate the Octave function
as follows:
Press the EDIT/EXIT push button. The device switches to Edit Mode. •
The EDIT LED lights up.
Press the OCT +/– key to select the Octave function.•
Press the ENTER key to conrm. The device switches back to Play Mode •
(EDIT LED goes out).