


E-16
420A-E-020A
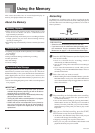
Using the Memory
This section describes how to record keyboard play to
memory and playback data from memory.
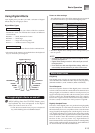
About the Memory
Memory Capacity
• There are two song memory tracks named Track A and
Track B. The two tracks can store a combined total of
approximately 5,200 notes.
• The indicator lamp of the track you are recording to flashes
at high speed to let you know that remaining memory
capacity is running low.
• Recording stops automatically whenever memory becomes
full.
Recorded Data
• Anything you played on the keyboard (received MIDI data
not recorded)
• Tone settings
• Tempo and beat settings used during recording
• Pedal operations
• Reverb settings
• Chorus settings
Recorded Data Storage
This digital piano has a lithium battery to supply power to
retain memory contents even while power is off.* The life of
the lithium battery is five years after the date of manufacture
of the digital piano. Be sure to contact your CASIO service
provider about having the lithium battery replaced every five
years.
* Never turn off digital piano power while a record operation
is in progress.
IMPORTANT!
• If the data recorded in a single track uses up all the
available Song Memory capacity, you will not be able to
record anything in the other track.
• Recording new data to a track automatically deletes any
data previously stored in that track.
• Turning off power while a record operation is in progress
deletes anything recorded up to that point.
• CASIO shall not be held responsible for any losses by
you or any third party due to loss of data caused by
malfunction or repair of this digital piano, or by battery
replacement.
Recording
In addition to recording notes as they are played on the
keyboard, you can also record to one track while playing back
from the other track. The following procedures cover each of
these operations.
To record notes from the keyboard
PREPARATION
• Select the tone and effects you want to start with.
• If you want to use the metronome during recording, start
the metronome. Use the procedure under “Using the
Metronome” on page E-14 to set the beat and the tempo.
1
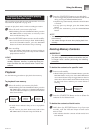
Press the RECORD button to put the digital piano
into record standby.
• Track A is selected first for recording, which is
indicated by its indicator flashing.
• You can also change the metronome’s beat setting at
this time.
• If you want the metronome to sound while you are
recording, press the METRONOME button here to
start the metronome.
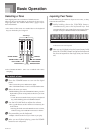
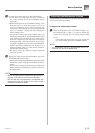
2
Select the track you want to record.
• While holding down the CONTROL button, press the
RECORD button. Each press of the RECORD button
causes the indicator lamps to toggle between the two
states shown below.
3
Play something on the keyboard to start recording.
• What you play sounds from the speakers and is
recorded into memory.
• You can also start recording by pressing the START/
STOP button. In this case, blank space is inserted in
memory from the point that you press the START/
STOP button up to the point you start to play on the
keyboard.
4
After you are finished recording, press the START/
STOP button to stop the record operation.
• At this time, the indicator lamp of the track you just
recorded will change from flashing to lit.
• Stopping recording also stops the metronome.
• Here you can press the START/STOP button and
playback the data you just recorded.
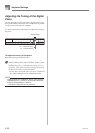
TRACK A TRACK B
RECORD
Track A
Indicator Lamp
Flashing
Track B
Indicator Lamp
Flashing