Music Presets
E-63
1.
Perform steps 1 through 4 of the procedure
under “Chord Progression Editing Flow” on
page E-62.
2.
Use the R-17 (t, y) buttons to move the
cursor to the chord you want to edit.
• You can use the L-14 (dFF) and L-13 (sREW)
buttons to move the cursor by measure-by-measure.
3.
Use the R-17 (u, i) buttons to move the
cursor, and then use the dial or R-14 (–, +)
buttons to change the value at the cursor
position.
• The cursor flashes during a value change operation.
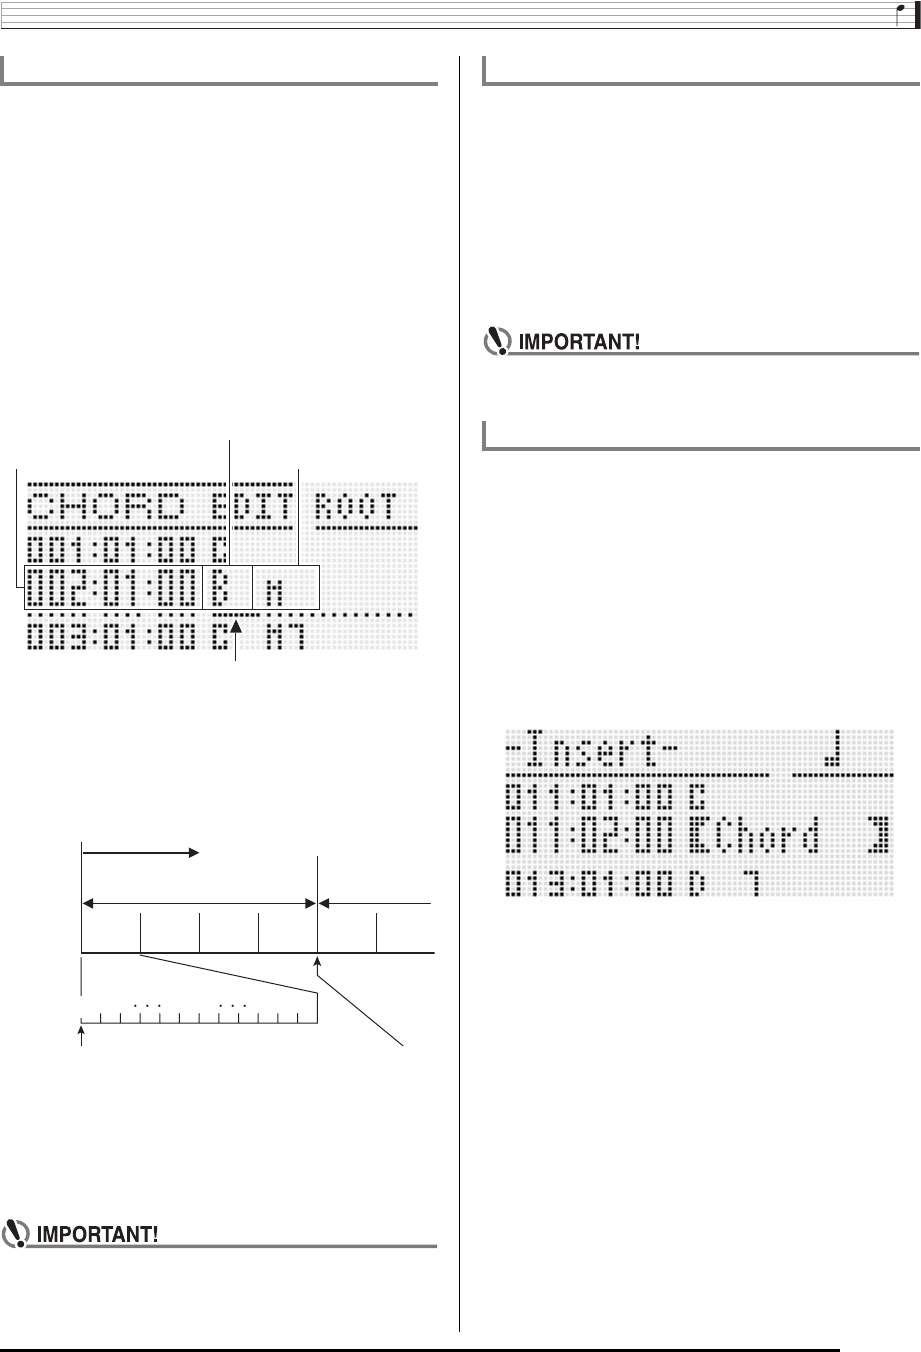
• A “tick” is a time unit that is shorter than one beat. With
music preset data, 12 ticks equal one beat. This means
that you can specify a tick value in the range of 00 to
11. A tick value of 12 advances to the next beat. In the
case of 4/4 time, a quarter note (2) is 12 ticks and an
eighth note (6) is 6 ticks.
4.
To apply the changed value, press the R-16
(ENTER) button.
• This causes the cursor to stop flashing.
• You cannot change the timing (Measure:Beat:Tick) of
the first chord of the user preset data.
1.
Perform steps 1 through 4 of the procedure
under “Chord Progression Editing Flow” on
page E-62.
2.
Use the R-17 (t, y) buttons to move the
cursor to the chord you want to delete.
3.
Press the C-10 (DELETE) button.
• The chord at the current cursor position will be deleted
as soon as you press the C-10 (DELETE) button.
• You cannot delete the first chord of the user preset
data.
1.
Perform steps 1 through 4 of the procedure
under “Chord Progression Editing Flow” on
page E-62.
2.
Use the R-17 (t, y) buttons to move the
cursor to the chord that comes immediately
before the position where you want to insert a
chord.
3.
Press the C-11 (INSERT) button.
• This displays a screen like the one shown below.
To modify recorded chord data
Measure:Beat:Tick
Chord root
Chord type
Cursor
01 02 09 10 1100
Chord progression
Measure 1 Measure 2
Beat 1 Beat 2 Beat 3 Beat 4 Beat 1 Beat 2
Tick
001:1:00
002:1:00
For the sample display above, the chord
change from C to Bm occurs here.
To delete recorded chord data
To insert a new chord


