


p. 58
HPW
TM
owner’s manual
specifications
£
Frequency Response
THD+Noise
Noise
Crosstalk
Phase Shift
XLR Inputs
Main Outputs
Insert Points
Internal Power Supply
Ext DC Power Requirements
(Max for 56-chan model)
Dimensions: HPW 20+4
Weight: HPW 20+4
Dimensions: HPW 28+4
Weight: HPW 28+4
Dimensions: HPW 36+4
Weight: HPW 36+4
Dimensions: HPW 44+4
Weight: HPW 44+4
Dimensions: HPW 52+4
Weight: HPW 52+4
20Hz–20kHz • +0/-0.5dB Any input to any output (Ref 1kHz @ +15dBu output level)
Chan Input to Group or Main Output (Left/Right/Mono)
<0.01% THD 20Hz to 20kHz at +15dBu out
(20Hz to 20kHz)
Mic EIN: <-127 dBu (Measured @+60dB gain, 150Ω source)
Bus Noise: Better than –85dBu (w/32 Channels Routed)
(Measured 20Hz-20kHz, Ref to +15dBu output)
Channel Mute >90dB
Channel Routing >85dB
Channel fader attenuation >85dB
Aux Send attenuation >80dB
<+/-30 degrees 20Hz to 20kHz mic in to main out
2k5 ohms Balanced
Max Voltage Gain: Mic-In To Group To Left/Right Balanced Out= 90dB
L/R/Mono Out: 100Ω Balanced Male XLR • Max Output= +26dBu
Aux/Group Out: 50Ω Ground-Compensated/Impedance-Balanced TRS • Max Out= +21dBu
Channel Direct Out: 100Ω Impedance-Balanced TRS • Max Out= +21dBu
TRS Jack • Tip= Send, 100Ω Output Impedance • Max Out= +21dBu
Ring= Return, 5kΩ Input Impedance
Channel Insert Level= +4dBu
Bus Insert Level= -2dBu
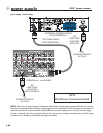
AC Input: 100-240 VAC, 50/60 Hz via 15A IEC Mains connector
7-Pin DC Connector provided for external (redundant) PSU
Maximum power consumption (56-chan): 200 watts
+/- 18 volts @ 3 amps (Main analog rails)
+12 volts @ 3 amps (LED and aux circuits)
+48 volts @ .6 amps (Phantom voltage)
NOTE: Use ONLY Crest Approved power supplies for the HPW
Inches: 46.5 X 28 X 9 MM: 1175 X 702 X 229
72 lbs 33 kG
Inches: 56.5 X 28 X 9 MM: 1424 X 702 X 229
90 lbs 41 kG
Inches: 66 X 28 X 9 MM: 1673 X 702 X 229
110 lbs 50 kG
Inches: 76 X 28 X 9 MM: 1922 X 702 X 229
125 lbs 57 kG
Inches: 86 X 28 X 9 MM: 2171 X 702 X 229
145 lbs 66 kG
Dimensions are Width X Depth (Front-to-Back) X Height
NOTE: Call for detailed chassis drawings before attempting to build a roadcase.
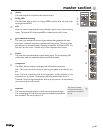
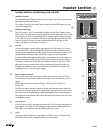
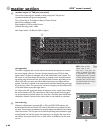
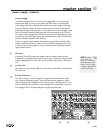
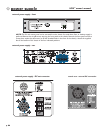
write-in label - The white area at the bottom of each channel may be written on with a grease-marker, and later wiped clean
with a cloth moistened with isopropyl/rubbing alcohol. Artist (Board) tape may also be applied to this surface, and the tape marked
with a permanent marker. NOTE: Do not write directly on the Console’s surface with a permanent marker. Avoid using standard
masking tape; it dries out and leaves a hard-to-remove glue residue.