


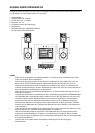


INPUT MONO
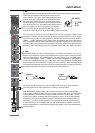
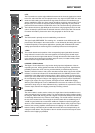
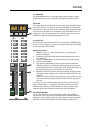
3. GAIN
Rotary control to adjust the MIC or LINE inputs’ sensitivity. These controls let you optimally
adjust the incoming signals to the mixer’s internal operation level. Cautious adjusting of-
fers the benefi ts of an improved S/N-ration and provides you with the full bandwidth of the
PowerMate’s outstanding sound capabilities. On the XLR-type connectors an amplifi cation of
+10dB is achieved when the control is set all the way to the left and +60dB when the control
is set to its maximum position to the right. Especially when dealing with very low input levels,
like they occur during vocal recordings or when the sound source is located in a distance, the
high gain is extremely profi table. Using the LINE-input, the signal is generally attenuated by
-20 dB, while the total adjustment range of 50dB is maintained. The LINE-input’s unity gain -
no amplifi cation (0 dB) - is achieved at the 20dB mark.The following is meant as a short note
for your assistance on how to determine the correct input level:
Note on how to adjust the input level:
1. Set the gain control and the corresponding channel fader to their lowest setting.
2. Connect the desired sound source (microphone, musical instrument, etc.) to the
corresponding MIC or LINE input.
3. Play the sound source at its highest volume setting - respectively, sing or speak as
loud as possible directly into the microphone.
4. While you are playing the sound source or singing into the microphone, adjust the
input level using the gain control, so that during the loudest passages the PEAK
LED is just not lit, but the SIGNAL-present LED lights constantly. This is the basic
channel setting, leaving you with at least 6dB of headroom. Which means, you have
at least a range of 6dB before signal clipping.
In case you intend to make further adjustments to the channel’s EQ setting, you should per-
form steps 3. and 4. again afterwards, since changes in the sound shaping section also infl u-
ence the channel’s overall level.
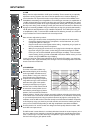
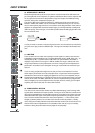
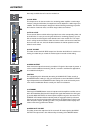
4. EQ SECTION
The mixer’s EQ section allows very
differentiated shaping of the incoming
audio signal within miscellaneous fre-
quency bands. Turning one of the EQ
level controls to the right enhances/
amplifi es the corresponding frequency
range while turning it to the left lowers/
attenuates the signal of the specifi c
frequency band. Before you begin to
alter the sound, all EQ controls should
be set to their neutral position; that is:
their markers point straight up (detent
position). Do not set the EQ controls to
extreme positions. Usually, minor changes are totally suffi cient and produce the best results
in the overall sound. You should use the natural reproduction as an orientation mark and rely
on your musically trained ear, being the perfect instrument to judge the sound quality. The
moderate use of the MID control is the best remedy to avoid acoustical feedback. Especially
in this frequency range you should try to avoid excessive enhancement. Lowering the level
more or less in this band will provide you with high amplifi cation rates without feedback.
The EQ section’s LO- and HI-controls are designed to work equally effective on both - MIC
and LINE -level input sources.
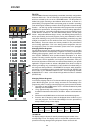
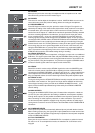
The MID-control is most effective in a relatively wide band around the center frequency of 2.4
kHz. As a matter of fact, especially in microphone applications this specifi c band turned out
to be a critical range. Thus, with almost any microphone it is good advice to slightly reduce
the level in this range to gain optimal results.
-20
+20
-15
-10
-5
+0
+5
+10
+15
20 20k50 100 200 500 1k 2k 5k 10k
Hz
26