


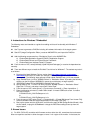

touch zone.
• The user can drag this second box to any touch screen and adjust its size and position.
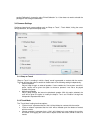
• It may be specified in the “EloTouchZones” dialog box whether touch will be enabled “inside”
or “outside” the zone. If the user chooses to have touch enabled “inside zone”, touch will
only work within each defined touch zone. Touch will be disabled outside of all touch zones.
• To save the zone, click “Save Zone” from the “EloTouchZones” dialog box.
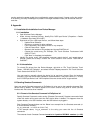
To test the touch zone(s):
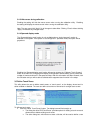
• Click the “Test All Zones” button in the “EloTouchZones” dialog box. This will test all defined
zones with the current changes.
• Test mode will last 15 seconds. During the 15 second period, the “EloTouchZones” dialog
box will be disabled and will not respond to any user input.
• After the 15 seconds, test mode will exit and the user can continue to define new zones or
remove existing zones.
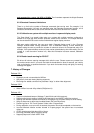
To define additional zones:
• Drag the box with no title bar to a new position and adjust it to a desired size.
• Click “Save Zone” on the “EloTouchZones” dialog box.
• Any previously defined touch zone will be shown as a flashing, dashed rectangle.
To delete an existing zone:
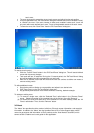
(1) To remove a single zone, click the “Selected Zone” radio button in the “Remove Zones”
group. Select the number of the unwanted zone in the list box, then click “Remove”.
(2) To remove all zones and allow touch to be enabled on the entire desktop, select the “All
Zones” radio button. Then, click the “Remove” button.
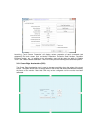
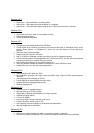
3.6 About
The “About” box provides the driver version, build time, Elo touch screen information, and copyright
information. In addition, the “About” box also provides links to Elo’s Online Support page, where
users can get support and information on Elo’s products, and a “User Manual” document, which
serves as both a readme and a user guide for this application.