


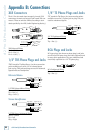
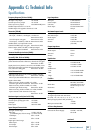

d. Pro DJ Production Console
d.2 Pro DJ Production Console
Appendix D: Transform Switch Rotation and
Fader Replacement
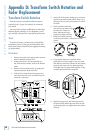
Transform Switch Rotation
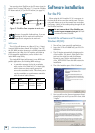
From the factory, the transform switches operate
vertically, that is (to get all technical for a moment)
fore and aft.
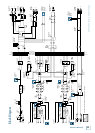
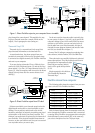
You can perform a simple modification to make these
switches operate sideways, or even diagonally, to suit
your carefully cultivated set of operational preferences.
Tools
To do this procedure, you will need a small phillips
screwdriver, nerves of steel, grit, determination, and a
steady hand. People should find you ruggedly charming,
yet approachable.
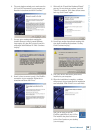
Procedure
1. Remove the power cord, and any other cords or
cables connected to the d.2 Pro.
2. Gently place the d.2 Pro face upwards on a
flat, clean and dry surface, such as the kitchen
table.
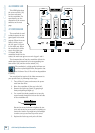
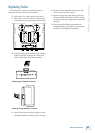
3. Remove the three slider knobs, by gently pull
-
ing them upwards. Keep them safe.
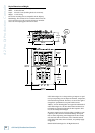
4. Undo the five screws from the top panel and
two screws from the front, as shown. Keep the
screws in a safe place.
L R
MAIN
BA
OL
10
7
4
2
0
2
4
7
10
20
30
OL
10
7
4
2
0
2
4
7
10
20
30
OL
10
7
4
2
0
2
4
7
10
20
30
TRANSFORM
PGM
2
TRANSFORM
REVERSE
PGM
1
LOW
MID
HIGH
PHONES
BOOTH
MAIN
SOURCE
EQ
FX
PAN BAL
LOW
MID
HIGH
LINE/
PHONO
CD
EQ
SIG
OL
MIC CONTROL
2PGM
LEVEL
PGM
MAIN
STEREO
MONO
+50+3
OO
RL
U
+15-15
U
+15-15
U
+15-15
SOURCE
EQ
BAL
LOW
MID
HIGH
LINE/
PHONO
CD
1
PGM
RL RL
KILL +10
KILL +10
KILL +10
KILL +10
KILL +10
KILL +10
OFF
ON
LEVEL
U
OO
MAX
LEVEL
U
OO
MAX
RETURN
+15
OO
SEND
+15
OO
LEVEL
MAX
LEVEL
U
OO
MAX
LEVEL
U
OO
MAX
PGM SOURCE
111
2
REVERSE REVERSE
48V
FX
ON
FX
PGM 2 FADER
REVERSE
CROSS FADER
REVERSE
PGM 1 FADER
REVERSE
CONTOURCONTOURCONTOUR
SLOW FASTSLOW FAST SLOW FAST
5. Gently lift off the panel, taking care not to dam-
age the front panel contour knobs. Keep it in a
safe place were it won’t get scratched, or fall off
the table.
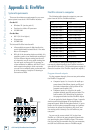
6. Each transform switch has
four screws, but remove only
the outer two. These are
black, whereas the inner
screws are bright and shiny.
7. Rotate the switch assembly
to suit your preference, and replace the two
screws.
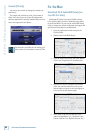
8. If you need to replace a transform switch,
gently pull it out just enough so you can reach
and undo its connector. Connect the new switch
securely, and screw it in the desired position.
You might want to replace both switches, if they
are both aged and/or had a rough life.
9. Replace the top cover, and make sure that all
the meter LEDs and the Reverse LEDs are pok-
ing through before you tighten down the screws
securely.
LOW
MID
HIGH
PHONES
BOOTH
MAIN
SOURCE
EQ
FX
PAN BAL
LOW
MID
HIGH
LINE/
PHONO
CD
EQ
SIG
OL
MIC CONTROL
2PGM
LEVEL
PGM
MAIN
STEREO
MONO
+50+3
OO
RL
U
+15-15
U
+15-15
U
+15-15
SOURCE
EQ
BAL
LOW
MID
HIGH
LINE/
PHONO
CD
1
PGM
RL RL
KILL +10
KILL +10
KILL +10
KILL +10
KILL +10
KILL +10
OFF
ON
LEVEL
U
OO
MAX
LEVEL
U
OO
MAX
RETURN
+15
OO
SEND
+15
OO
LEVEL
MAX
LEVEL
U
OO
MAX
LEVEL
U
OO
MAX
PGM SOURCE
111
2
48V
FX
ON
FX
LOW
MID
HIGH
PHONES
BOOTH
MAIN
SOURCE
EQ
FX
PAN BAL
LOW
MID
HIGH
LINE/
PHONO
CD
EQ
SIG
OL
MIC CONTROL
2PGM
LEVEL
PGM
MAIN
STEREO
MONO
+50+3
OO
RL
U
+15-15
U
+15-15
U
+15-15
SOURCE
EQ
BAL
LOW
MID
HIGH
LINE/
PHONO
CD
1
PGM
RL RL
KILL +10
KILL +10
KILL +10
KILL +10
KILL +10
KILL +10
OFF
ON
LEVEL
U
OO
MAX
LEVEL
U
OO
MAX
RETURN
+15
OO
SEND
+15
OO
LEVEL
MAX
LEVEL
U
OO
MAX
LEVEL
U
OO
MAX
PGM SOURCE
111
2
48V
FX
ON
FX
Sideways
Diagonally