


13
Owner’s Manual
Owner’s Manual
When doing live sound or mixdown, it’s often handy
to control the level of several channels with one knob.
That’s called subgrouping. Simply assign these channels
to the ALT 3-4 mix, engage ALT 3-4 in the CONTROL
ROOM/PHONES SOURCE matrix (20), and the signals
will appear at the CONTROL ROOM (48) and PHONES
(42) outputs. If you want the ALT 3-4 signals to go back
into the MAIN MIX, engage the ASSIGN TO MAIN MIX
switch (21) and the CONTROL ROOM knob (22) controls
the levels of all the channels assigned to ALT 3-4.
Another way to do the same thing is to assign the
channels to the ALT 3-4 mix, then patch out of the ALT
3-4 OUT (LEFT/3 and RIGHT/4) back into an unused
stereo channel (5-6, 7-8, 9-10, or 11-12). If that’s your
choice, don’t ever engage the MUTE/ALT 3-4 switch
on that stereo channel, or you’ll have every dog in the
neighborhood howling at your feedback loop.
Another benefi t of the ALT 3-4 feature is that it can act
as an “AFL” (After Fader Listen). Just engage a channel’s
MUTE/ALT 3-4 switch and the ALT 3-4 switch in the
SOURCE matrix (20) and you’ll get that channel, all by
itself, in the CONTROL ROOM (48) and PHONES (42).
MUTE/ALT 3-4 is one of those features that can
bewilder newcomers, so take your time and play around
with it. Once you’ve got it down, you’ll probably think of
a hundred uses for it!
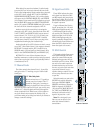
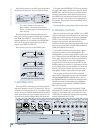
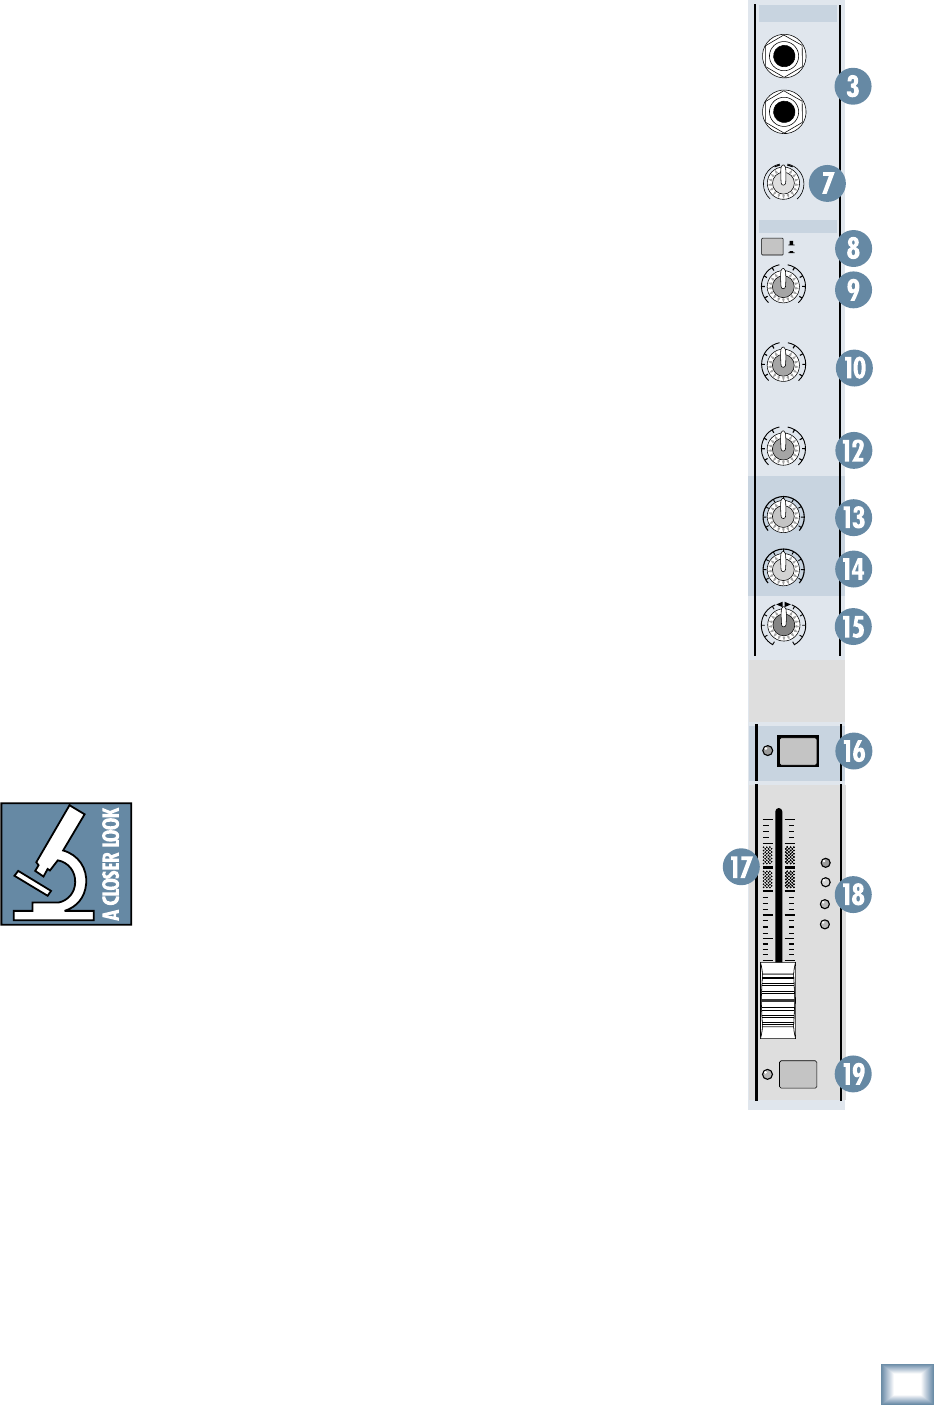
17. Channel Fader
The fader controls the channel’s level…from off to
unity gain at the “U” marking, on up to 10 dB of addi-
tional gain.
“U” Like Unity Gain
Mackie mixers have a “U” symbol on
almost every level control. This “U”
stands for “unity gain,” meaning no
change in signal level. Once you have
adjusted the input signal to line-level, you can set every
control at “U” and your signals will travel through the
mixer at optimal levels. What’s more, all the labels on
our level controls are measured in decibels (dB), so
you’ll know what you’re doing level-wise if you choose to
change a control’s settings.
18. Signal Level LEDs
These LEDs indicate the chan-
nel’s signal level after the GAIN
and EQ controls, but just prior to
the channel’s fader. So even if the
fader is turned down, you can see
if a signal is present.
If you’ve followed the “Set the
Levels” procedure, the –20 and 0
LEDs should light frequently, the
+10 LED should light occasion-
ally, and the OL (Overload) LED
should not light at all. If the OL
LED is blinking frequently, the
signal is probably distorted from
overdriving the input. Either turn
down the GAIN control or turn
down the signal at its source.
19. SOLO Switch
This handy switch allows you to
hear signals through your head-
phones or control room outputs
without having to route them to
the MAIN or ALT 3-4 mixes. Folks
use solo in live work to preview
channels before they are let into
the mix, or just to check out what
a particular channel is up to
anytime during a session. You can
solo as many channels at a time
as you like.
Soloed channels are sent to the
SOURCE mix, which ultimately
feeds your CONTROL ROOM,
PHONES, and Meters. Whenever
SOLO is engaged, all SOURCE
(20) selections (MAIN MIX, ALT
3-4, TAPE, and FIREWIRE) are
defeated, to allow the soloed
signal to do just that—solo!
Note: The solo signal is pre-
fader, so you can hear it even
when the channel’s fader is
turned down.
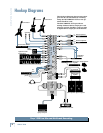
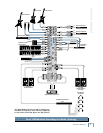
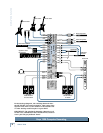
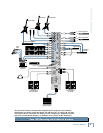
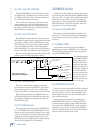
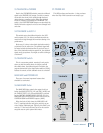
ALT 3/4
AUX
2
1
OO
MAX
OO
MAX
EQ
OUT
IN
LR
PAN
L
(MONO)
R
BAL/
UNBAL
LINE IN 5
-
6
GAIN
+20dB-20dB
MID
2.5kHz
U
+15-15
U
+15-15
LOW
80Hz
U
+15-15
HIGH
12kHz
U
OL
+
10
0
-
20
dB
30
20
10
40
50
5
5
U
60
10
OO
5
6
MUTE
SOLO
Stereo Channel