


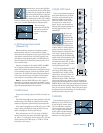
19
Owner’s Manual
Owner’s Manual
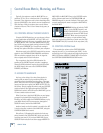
47. MAIN OUTPUT LEVEL
When this switch is out (+4 dB), the XLR MAIN
OUTPUTS provide a +4 dBu line-level signal. When the
switch is pushed in (MIC), the signal is attenuated by
40 dB to a microphone level. You can connect the XLR
MAIN OUTPUTS to the microphone inputs of another
mixer, providing a submix for keyboards or drums, for
example, in a live sound application.
Note: You can safely plug this output into a micro-
phone input that provides 48 V phantom power.
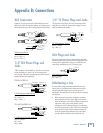
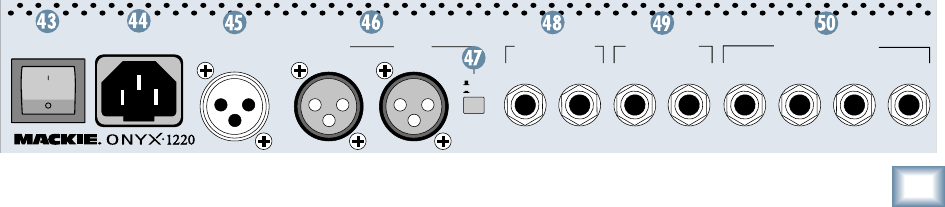
48. CONTROL RM Outputs
These 1/4" TRS jacks provide a balanced line-level
signal
that can be used to provide another main mix
output
(with MAIN MIX selected in the CONTROL
ROOM/
PHONES SOURCE) (20), or to monitor the ALT
3-4 outputs,
TAPE inputs, or a 2-track feed from your
computer (with the optional FireWire card installed).
Connect these outputs to the inputs of an amplifi er,
powered speaker, or recording device.
49. ALT 3-4 OUT
These 1/4" TRS jacks provide a balanced line-level sig-
nal that can provide an alternate stereo mix for record-
ing or subgrouping. Connect these outputs to the inputs
of an amplifi er, powered speaker, or recording device.
Note: The ALT 3-4 OUT doesn’t have a master level
control. All the channels assigned to the ALT 3-4 bus are
summed together (post-fader and pan) and sent directly
to the ALT 3-4 OUT.
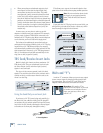
50. CHANNEL INSERT
These 1/4" TRS jacks provide a send and return point
for channels 1-4. Use the CHANNEL INSERT jacks to
connect serial effects devices such as compressors,
equalizers, de-essers, or fi lters to each individual channel.
The INSERT points are after the GAIN and Low Cut
controls, but before the EQ and Fader controls. The
send (tip) is low-impedance, capable of driving any
device. The return (ring) is high-impedance and can be
driven by almost any device.
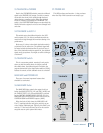
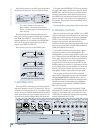
Rear Panel
There are just a few more connectors and switches to
talk about and you’ll have completed your tour of the
Onyx 1220. Hang in there!
43. POWER Switch
This one is self-explanatory. When the POWER switch
is turned ON, power is supplied to the Onyx 1220 and
the POWER LED on the front panel lights up.
44. Power Receptacle
This is a standard 3-prong IEC power connector. Con-
nect the detachable linecord (included in the box with
your Onyx 1220) to the power receptacle, and plug the
other end of the linecord into an AC outlet. The Onyx
1220 has a universal power supply that can accept
any
AC voltage ranging from 100 VAC to 240 VAC. No need for
voltage select switches. It will work virtually anywhere
in the world. That’s why we call it a “Planet-Earth” power
supply! This also means that it is less susceptible to
voltage sags or spikes, providing greater electromagnetic
isolation and better protection against AC line noise.
45. TALKBACK MIC
This is where you plug in your external talkback
microphone if you need to have one. This female XLR
connector has +48 VDC phantom power always applied,
so you can use dynamic or condenser microphones.
Note: Almost all dynamic microphones can be used with
phantom power, but you might want to check the docu-
mentation that came with your microphone to be sure.
46. RIGHT/LEFT MAIN OUTPUTS
These male XLR connectors provide a balanced line-
level signal that represent the end of the mixer chain,
where your fully mixed stereo signal enters the real
world. Connect these to the inputs of your main power
amplifi ers, powered speakers, or serial effects proces-
sor (like a graphic equalizer or compressor/limiter). It
provides a fully balanced signal that is 6 dB higher than
the 1/4" TRS MAIN OUT jacks on the front panel.
LEFT
MAIN
OUTPUT
LEVEL
RIGHT
43R/4 L/3
CHANNEL INSERT
BAL/UNBAL
BALANCEDBALANCED
+
48V
TALKBACK
MIC
BAL/UNBAL
ALT 3-4 OUT
RL
CONTROL RM
21
(
PRE-FADER / PRE EQ TIP SEND / RING RETURN
)
POWER
ON
MIC
+
4
~
100-240VAC
50-60Hz 40W