


16
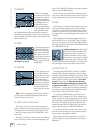
ONYX 1220
ONYX 1220
26. AUX 1 and AUX 2 MASTER
The AUX MASTERS provide overall control over the
AUX SEND levels, just before they are delivered to the
AUX SEND outputs (38). These knobs go from off (∞)
to +15 dB when turned all the way up.
This is usually the knob you turn up when the lead
singer glares at you, points at his stage monitor, and
sticks his thumb up in the air. (It would follow that if
the singer stuck his thumb down, you’d turn the knob
down, but that never happens.)
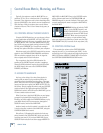
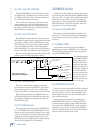
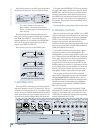
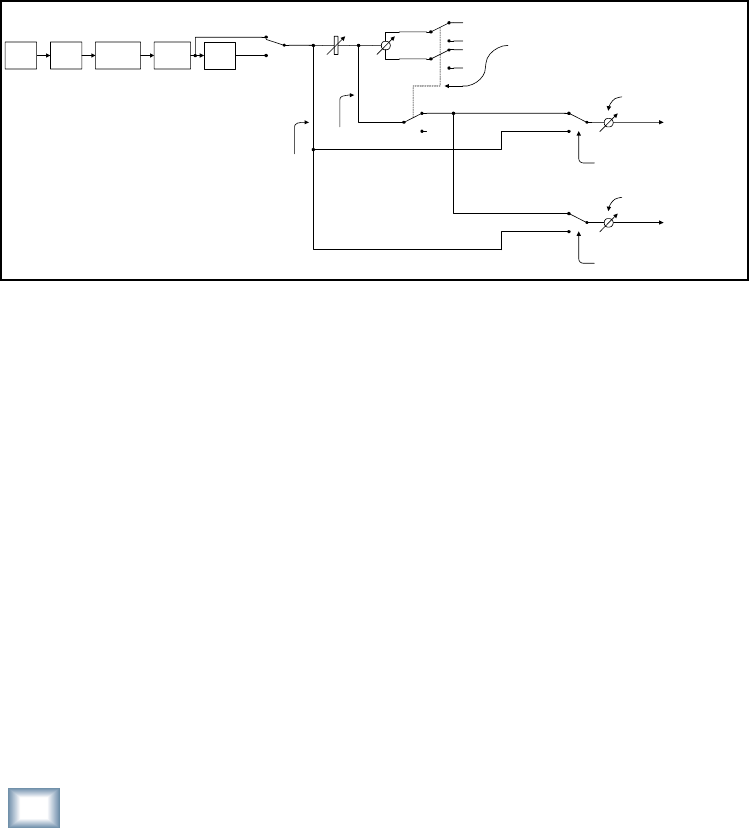
27. AUX 1 and 2 PRE/POST
The PRE/POST switches determine whether the AUX
SEND signal is tapped from the channel before the fader
(pre-fader) or after the fader and MUTE button (post-
fader). Typically, you use a pre-fader send for monitors
so you can control the monitor levels independently
from the MAIN MIX. Use a post-fader send for effects, so
that the “wet” signal level follows the “dry” signal level.
Both pre- and post-fader sends are affected by the EQ
controls (unless the EQ is bypassed, of course).
TALKBACK Section
The talkback feature allows the engineer to communi-
cate with the talent either through the PHONES outputs
(42) or the AUX 1-2 outputs (38). A talkback microphone
is built into the Onyx 1220, or you have the option of
connecting an external microphone at the TALKBACK
MIC XLR connector (45) on the rear panel, which may
be preferable in live or noisy situations.
30. Internal TALKBACK MIC
This is where the built-in talkback microphone is lo-
cated. This is an omni-directional dynamic microphone,
so it will pick up your voice from anywhere in front of
the mixer.
31. TALKBACK LEVEL
Use this knob to control the level of the talkback
signal being routed to the PHONES or AUX 1-2 outputs.
This controls the talkback level for either the internal
or external TALKBACK MICs.
You should start with
the TALKBACK LEVEL
control turned down,
and then slowly turn it
up until you get confi r-
mation from whoever is
listening to
headphones
or monitors
that they
can hear you. Once you
have set the level, you
can leave it there for
the duration of the ses-
sion (or the gig).
32. EXTERNAL MIC Switch
If you are in a noisy environment, the built-in talkback
mic may not work as well because it picks up the ambi-
ent noise as well as your voice. You will probably have
better results if you use an external microphone that
you can talk directly into.
If you are using an external mic, you must push in
the EXTERNAL MIC switch. The indicating LED lets
you know when the switch is pushed. When the switch
is out, the built-in TALKBACK MIC is used, regardless
of whether or not you have an external mic plugged in.
When the switch is pushed in, the built-in mic is discon-
nected and only the external mic is used.
28. AUX 1 and 2 RETURN
These two controls set the overall level of effects
received from the stereo AUX RETURN 1 and 2 inputs.
These controls range from off (∞) to +10 dB of gain
when fully clockwise, to compensate for low-level effects.
Signals passing through the AUX RETURN level con-
trols proceed directly to the MAIN MIX bus where they
are combined with the other channels just before the
MAIN MIX fader (36).
29. FX TO MON Switch
This switch routes the signal from AUX RETURN 2 to
the AUX 1 SEND instead of the MAIN MIX bus. This al-
lows you to use an external effects device, like a reverb
or delay, exclusively for the monitors. When this switch
is pushed in, the effects signals coming into the AUX
RETURN 2 jacks are combined with the signals coming
from all of the channel AUX 1 send controls.
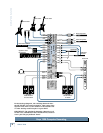
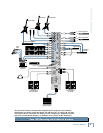
GAIN INSERTLOW CUT EQ
EQ
IN/OUT
FADER
PAN
MUTE / ALT
AUX SEND 1 KNOB
"POST" SIGNAL
"PRE" SIGNAL
AUX SEND 2 KNOB
"POST" SIGNAL OBEYS
MUTE STATUS
INPUT
AUX SEND 2 PRE/POST SWITCH
(IN MASTER SECTION)
AUX SEND 1 PRE/POST SWITCH
(IN MASTER SECTION)
TO AUX SEND 1
OUTPUT
TO AUX SEND 2
OUTPUT
Aux “Pre vs. Post”
Signal Flow Diagram