


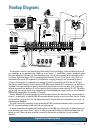

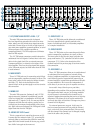


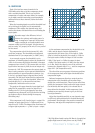
14 VLZ3 4•Bus
2404
USB
L
R
TAPE
OUTIN
MONO
MAIN OUT
INSERT LINE
TIP=SEND
RING=RETURN
(BAL/UNBAL)
RIGHT
MAIN OUT
INSERT LINE
LEFT
MAIN OUT
INSERT LINE
TIP=SEND
RING=RETURN
TIP=SEND
RING=RETURN
(BAL/UNBAL) (BAL/UNBAL)
TALKBACK
MIC
POWER
ON
PHANTOM
ON
2 1 2 16 5 4
2 16 5 4
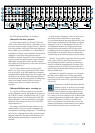
AUX INSERTS
(TIP=SEND, RING=RETURN)
AUX SENDS
(BAL/UNBAL)
L
R
(MONO)
STEREO RETURNS
(BAL/UNBAL)
3
3
INSERT INSERT INSERT INSERT INSERT INSERT INSERT INSERT INSERT INSERT INSERT INSERT INSERT INSERT INSERT INSERT INSERT INSERT INSERT INSERT
LINE IN
(BAL/UNBAL)
LINE IN
(BAL/UNBAL)
LINE IN
(BAL/UNBAL)
LINE IN
(BAL/UNBAL)
LINE IN
(BAL/UNBAL)
LINE IN
(BAL/UNBAL)
LINE IN
(BAL/UNBAL)
LINE IN
(BAL/UNBAL)
LINE IN
(BAL/UNBAL)
LINE IN
(BAL/UNBAL)
LINE IN
(BAL/UNBAL)
LINE IN
(BAL/UNBAL)
LINE IN
(BAL/UNBAL)
LINE IN
(BAL/UNBAL)
LINE IN
(BAL/UNBAL)
LINE IN
(BAL/UNBAL)
LINE IN
(BAL/UNBAL)
LINE IN
(BAL/UNBAL)
LINE IN
(BAL/UNBAL)
LINE IN
(BAL/UNBAL)
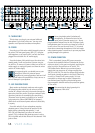
20 19 18 17 16 15 14 13 12 11 9 8 7 6 5 4 3 2 110
MIC 20 MIC 19 MIC 18 MIC 17 MIC 16 MIC 15 MIC 14 MIC 13 MIC 12 MIC 11 MIC 10 MIC 9 MIC 8 MIC 7 MIC 6 MIC 5 MIC 4 MIC 3 MIC 2 MIC 1
X
D
R
2
M
I
C
P
R
E
X
D
R
2
M
I
C
P
R
E
X
D
R
2
M
I
C
P
R
E
X
D
R
2
M
I
C
P
R
E
X
D
R
2
M
I
C
P
R
E
X
D
R
2
M
I
C
P
R
E
X
D
R
2
M
I
C
P
R
E
X
D
R
2
M
I
C
P
R
E
X
D
R
2
M
I
C
P
R
E
X
D
R
2
M
I
C
P
R
E
X
D
R
2
M
I
C
P
R
E
X
D
R
2
M
I
C
P
R
E
X
D
R
2
M
I
C
P
R
E
X
D
R
2
M
I
C
P
R
E
X
D
R
2
M
I
C
P
R
E
X
D
R
2
M
I
C
P
R
E
X
D
R
2
M
I
C
P
R
E
X
D
R
2
M
I
C
P
R
E
X
D
R
2
M
I
C
P
R
E
X
D
R
2
M
I
C
P
R
E
3 2 14
GROUP OUTS
(BAL/UNBAL)
GROUP INSERTS
(TIP=SEND, RING=RETURN)
3 2 14
MONITOR
(MONO)
PHONES
MONITOR
L
R
L
R
23/24 21/22
(MONO)
(BAL/UNBAL) (BAL/UNBAL)
REVISION
SERIAL NUMBER
WARNING:
TO REDUCE THE RISK OF FIRE OR ELECTRIC
SHOCK, DO NOT EXPOSE THIS EQUIPMENT TO RAIN OR
MOISTURE. DO NOT REMOVE COVER. NO USER SERVICEABLE
PARTS INSIDE. REFER SERVICING TO QUALIFIED PERSONNEL.
AVIS: RISQUE DE CHOC ELECTRIQUE — NE PAS OUVRIR
LEVEL
OUTPUT
OO
+6
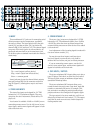
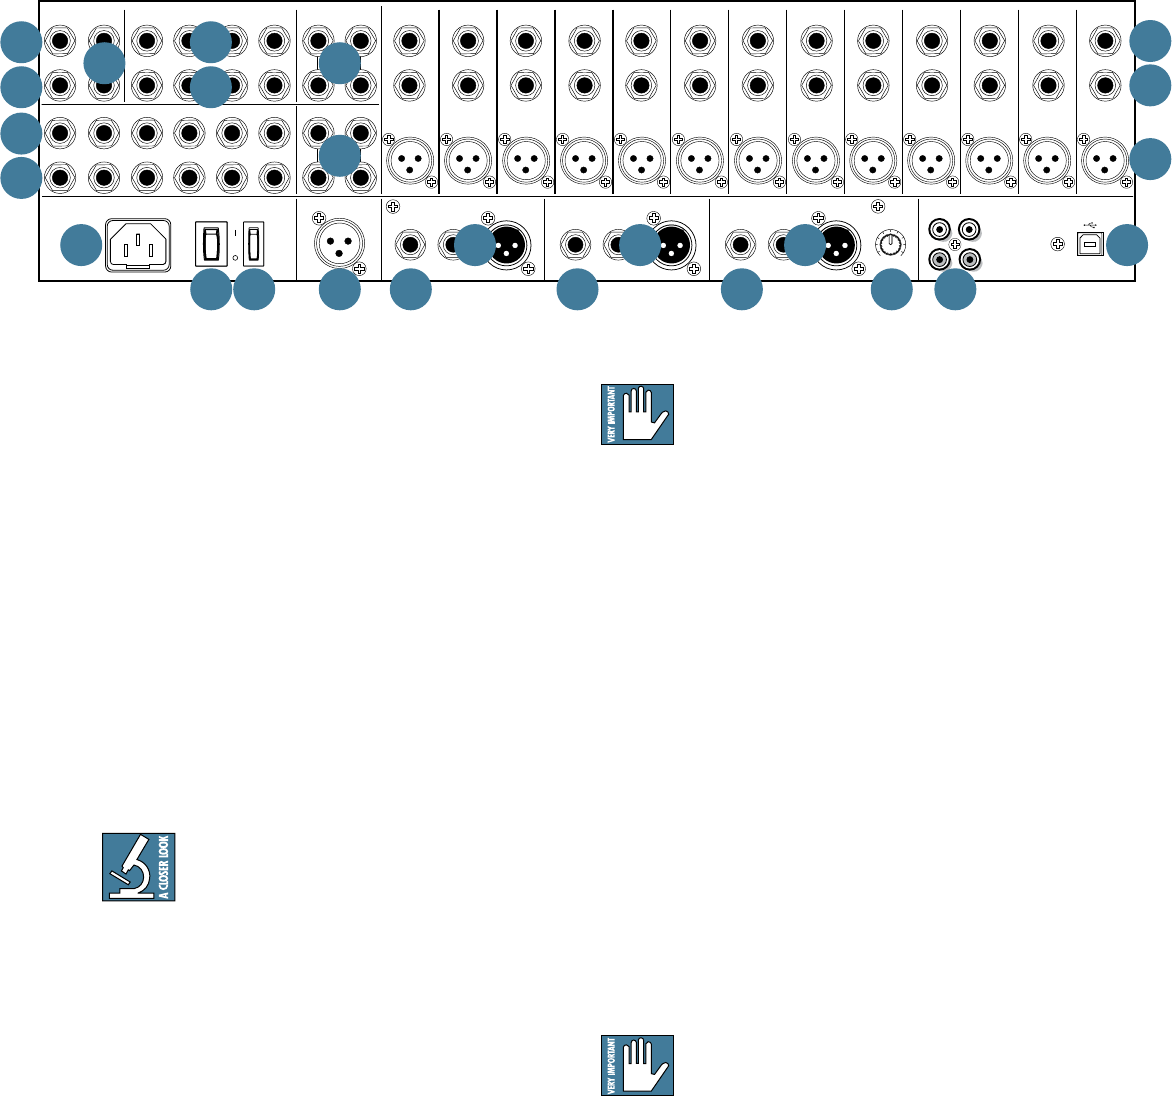
19. TALKBACK MIC
This is where you plug in your external talkback
microphone if you need to have one. You may use a
dynamic or self-powered condenser microphone.
20. POWER
Press the top of this rocker switch inwards to turn on
the mixer. The front panel power LED [57] will glow
with happiness, or at least it will if you have the mixer
plugged into a suitable live AC mains supply.
Press the bottom of this switch to put the mixer into
standby mode. It will not function, but some circuits
are still live. To remove AC power, either turn off the AC
mains supply, or unplug the power cord from the mixer
and the AC mains supply.
As a general guide, you should turn on your
mixer first, before any external power
amplifiers or powered speakers, and turn it off
last. This will reduce the possibilities of any turn-on, or
turn-off thumps in your speakers.
21. 48V PHANTOM POWER
Most modern professional condenser mics require
48V phantom power, which lets the mixer send low-
current DC voltage to the mic’s electronics through the
same wires that carry audio. (Semi-pro condenser mics
often have batteries to accomplish the same thing.)
“Phantom” owes its name to an ability to be “unseen”
by dynamic mics (Shure SM57/SM58, for instance),
which don’t need external power and aren’t affected by
it anyway.
Press this switch in if your microphone requires
phantom power. (Always check the position of this
switch before connecting microphones.) A red
LED [56] will illuminate just above the main mix
meters [58] to indicate that phantom power is active.
This is a global switch that affects all mic channels' XLR
jacks at once.
Never plug single-ended (unbalanced)
micro phones, or ribbon mics into the mic
input jacks if phantom power is on. Do not
plug instrument outputs into the mic XLR input jacks
with phantom power on, unless you know for certain it
is safe to do so. Be sure the main level [75] is turned
down when connecting microphones to the mic inputs
when phantom power is turned on, to prevent pops from
getting through to the speakers.
22. POWER CONNECTION
This is a standard 3-prong IEC power connector.
Connect the detachable linecord (included in the box
with your mixer) to the power receptacle, and plug the
other end of the linecord into an AC outlet. The
VLZ34•BusSeriesMixershaveauniversalpower
supply that can accept
any AC voltage ranging from
100 VAC to 240 VAC. No need for voltage select switches.
It will work virtually anywhere in the world. That’s why
wecallita“Planet-Earth”powersupply!Itisless
susceptible to voltage sags or spikes, compared to
conventional power supplies, and provides greater
electromagnetic isolation and better protection against
AC line noise.
Disconnecting the plug’s ground pin is
dangerous. Don’t do it.
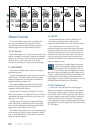
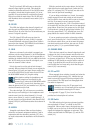
3
14
20
2
13
1
16 11
17 12
22 7 7 9 18
21 19
415
5
10888 6