


Owner's Manual 23
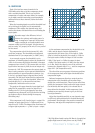
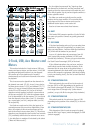
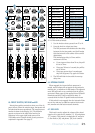
58. LEFT/RIGHT Level Meters
These peak meters are made up of two columns of
twelve LEDs, with three colors to indicate different
ranges of signal level, traffic light style. They range from
–30 at the bottom, to 0 in the middle, to +20 (CLIP) at
the top.
When a channel is soloed in PFL, the right meter
shows no reading, and the left meter shows the level of
that channel’s signal level, pre-fader.
In AFL, both left and right meters illuminate to
indicate the 'After Fader Level' of the signal and stereo
imaging. AFL is always used for outputs, regardless
of the position of the PFL/AFL master switch, as you
always want to view the output level after the fader.
The left meter's 0 dB LED is labeled "level set" to
show where the level should be when adjusting a
channel’s gain [23] in the solo mode (as described in
“Set the Levels” on page 3).
When 0 dBu (0.775 V) is at the main left and right
TRS outputs [7], it shows as 0 dB on the meters.
You can get a good mix with peaks flashing anywhere
between –20 and +10 dB on the meters. Most amplifiers
clip at about +10 dBu, and some recorders aren’t so
forgiving either. For best real-world results, try to keep
your peaks between “0” and “+6.” Remember, audio
meters are just tools to help assure you that your levels
are “in the ballpark.” You don’t have to stare at them
(unless you want to).
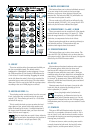
59. RUDE SOLO Light
This large red LED flashes when one or more solo
switches are engaged [41, 49, 53, 55, 73]. This acts as
a reminder that what you hear in the control room and
headphones is the soloed channel(s), 2-track return,
stereo return, aux(es), and/or group(s). If you forget
that you are in solo mode, you can easily be tricked
into thinking that something is wrong with your mixer.
Hence, the rude solo light. Please forgive its rudeness, it
is only trying to help, and wants to be your friend.
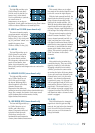
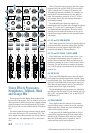
60. SOLO MODE
Engaging a channel's solo switch [41] will cause this
dramatic turn of events: Any existing source selection
is immediately replaced by the solo signal, appearing
at the monitor outputs [15, 16], phones [17] and at
the left meter [58] (left and right meters when in AFL
solo mode). The audible solo levels are then controlled
by the solo knob [67]. The discrete level controls for
headphones and monitor outputs are dependent on
what is plugged in.
With the solo mode switch in the up position, you are
in PFL mode, meaning Pre-Fader Listen. This mode is
required for the "Set the Levels" procedure and is handy
for quick spot-checks of channels, especially ones that
have their faders turned down. PFL mode is only
available to input signals. While in PFL mode, if an
output is soloed, its signal will show up, but it will be an
AFL signal.
With the solo mode switch down, you are in AFL
mode, meaning After-Fader Listen. You will be able to
hear the stereo output of the soloed channel - it will
follow the channel's fader [43] and pan [37] settings.
It is similar to muting all of the other channels, but
without the hassle. AFL mode is the only soloing mode
for subgroups and aux masters. Subgroups 1-2 or 3-4
may be soloed simultaneously for a true stereo image.
AFL is a new feature available to channel inputs and
provides a mixdown solution that allows soloing the mix
as it is on the faders.
In PFL mode, solo will not be affected by a channel's
mute switch [38] position.
Remember, PFL mode taps the channel signal
before the fader. If you have a channel's fader
set way below "U" (unity gain), solo will not
know that and will send a unity gain signal to the
monitor outputs [15, 16], phones output [17], and
meter display [58]. That may result in a startling level
boost at these outputs when switching from AFL to PFL
mode, depending on the position of the solo level
knob [67].