


33
Basic Operation
Procedures of switching or combining video are described
below.
Selecting Source Video and Sound
This section describes the procedure of selecting source
video and sound to be provided with effects or mixed on
this unit.
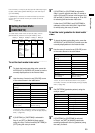
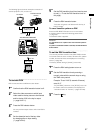
To select input sources
1
Allocate video and sound to eight channels of
input sources in the [AUDIO VIDEO] submenu
of the [SETUP] menu ( page 24).
2
Set [TYPE] to [AB] or [PRG/PRE] in the [BUS]
submenu of the [SETUP] menu ( page 27).
3
Press one of the A/PROG (or B/PRESET)
SOURCE 1/5, 2/6, 3/7, 4/8 buttons according to
the input source you want to select.
To select one of the input sources 5 to 8, press
the corresponding SOURCE button while
holding down the SHIFT key.
The pressed button is lighted.
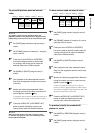
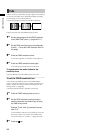
To select internal video
1
Display any of the following internal videos
using the [INT VIDEO] menu:
Back matte video: Select [BACK MATTE]
(
page 29).
Color bar output: Select [COLOR BAR]
( page 30).
Still picture or movie: Select [MEMORY]
( page 30).
2
Press the A/PROG (or B/PRESET) INT button.
The A/PROG SOURCE (or B/PRESET SOURCE) INT
button is lighted and the currently selected one of
the A/PROG SOURCE (or B/PRESET SOURCE) 1/5,
2/6, 3/7, and 4/8 buttons is blinked.
The internal video selected in Step 1 is called and
played back.
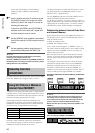
Checking (Previewing) Video and
Sound
A preview monitor can be connected to the SDI PVW OUT
connector to check video. If the monitor can output an
audio source input as an SDI signal, sound can also be
checked.
In addition, headphones can be connected to the PHONES
connector to check sound.
The output from the SDI PVW OUT connector can be
changed with the following PREVIEW buttons.
ME PVW button: Used to check switching and combined
effects. Allows you to check the switched image and
the image currently being switched (
page 34) or the
image to be combined and the image currently being
combined (
page 35).
A/PROG selector button: Allows you to check the input
(program input) source of bus A.
B/PRESET selector button: Allows you to check the input
(preset input) source of bus B.
DSK selector button: Allows you to check the image with
DSK combined when using DSK (downstream key).
Adjusting the Audio Level
The audio input level is adjusted with the SOURCE 1/5, 2/6,
3/7, 4/8 faders (audio faders).
When adjusting the audio level of input sources 5 to 8,
operate the corresponding fader while holding down the
SHIFT key.
Operate the AUX fader to adjust the AUX input level and
the MIC fader to adjust the MIC input level.
Settings for audio input sources are made from the [AUDIO
VIDEO], [AUDIO CH], and [AUDIO FADER] submenus of
the [SETUP] menu (
pages 24 and 27).
The audio level of the program output is adjusted with the
MASTER fader.
The audio output level can be checked with the audio level
meter on the setting screen (
page 20).
The [AUDIO EFFECTS] menu is used to apply effects to
audio (
page Vol.2-17).
The output level of the sound to be monitored with
headphones can be adjusted with the PHONES control.
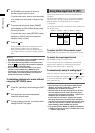
To link sound with video effects
When adjusting the audio input level by linking to video
during execution of transition (
page 33) or fade
( page 38), press the AUDIO FOLLOW VIDEO button to
turn on. When the transition lever is operated, the audio
faders are moved accordingly.
Switching or Combining of Video