


25
En
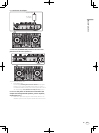
Advanced Operation
Functions that can be controlled in the
dual deck mode
The functions below can be controlled on the two decks simultaneously
in the dual deck mode.
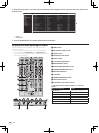
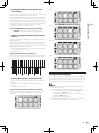
Button or control
that is operated
Function
Jog dial Scratch, pitch bend, skip mode, slip scratch
VINYL button Vinyl mode
KEY LOCK button Key lock, tempo reset
AUTO LOOP button Auto loop, active loop, auto slip loop
LOOP 1/2X button Auto loop beat selection, half loop, loop shift
LOOP 2X button Auto loop beat selection, double loop, loop shift
LOOP IN button
Loop in, loop in adjust, loop slot selection, manual slip
loop
LOOP OUT button Loop out, loop out adjust, reloop/eject, manual slip loop
HOT CUE mode button Hot cue mode
ROLL mode button Roll mode
SLICER mode button Slicer mode
SAMPLER mode
button
Sampler mode
Performance pads
Hot cue trigger, hot cue delete, slip hot cue, loop roll
trigger, slicer trigger
PARAMETERc button,
PARAMETERd button
Loop roll beat selection, slicer quantization selection,
slicer domain selection
PLAY/PAUSE f
button
Play, pause, slip braking
CUE button Cue setting, back cue, cue sampler
SYNC button Sync, sync off
SLIP button Slip mode
CENSOR button Censor, reverse
NEEDLE SEARCH pad Needle search
Functions that are limited in the dual deck mode
For the following functions, only the deck that is displayed can be oper-
ated when in the dual deck mode.
Button or control
that is operated
Function
TEMPO slider Tempo adjustment
KEY LOCK button Tempo range
Deck status mirroring function
When the statuses below differ on the respective decks, they are auto-
matically set to the same statuses as on the deck whose [DECK] button
is lit.
! Vinyl mode status, pad mode status, slip mode status
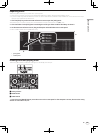
Using the channel fader start
function
1 Set the cue.
Pause at the position from which you want to start playback, then press
the [CUE] button for the corresponding deck.
! Cues can also be set by moving the channel fader from the back
to the position nearest you while pressing the [SHIFT] button in
the pause mode.
2 While pressing the [SHIFT] button, move the channel
fader from the position nearest you towards the back.
Playback of the track starts from the set cue point.
!
When the channel fader is moved back to the position nearest you
while pressing the [SHIFT] button during playback, the track moves
instantaneously back to the set cue point and the pause mode is set.
(Back Cue)
!
If no cue is set, playback starts from the beginning of the track.
! It is also possible to change the setting in the utility settings so that
the sync mode is set simultaneously when playback is started with
the channel fader start function.
! When the channel fader is moved from the back to the position near-
est you while pressing the [SHIFT] button when standing by at a cue,
track playback starts from the set cue.
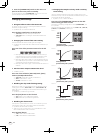
Using the sampler velocity mode
When the [SAMPLER] mode button is pressed for over one second, the
sampler velocity mode turns on and off.
When the sampler velocity mode is on, the sample volume level changes
according to the strength with which the performance pads are tapped.
The volume level increases when the performance pads are tapped
strongly, decreases when they are tapped weakly.
When the sampler velocity mode is off, the sound is triggered at the
volume level set with the Serato DJ software, regardless of the strength
with which the performance pads are tapped.
! The sampler velocity mode’s on/off setting is reset each time the
power is turned on; this unit starts up with the sampler velocity mode
turned off.
!
The velocity curve can be set in the utility settings.
Analyzing tracks
When one of this unit’s [LOAD] buttons is pressed and tracks are loaded
onto the decks, the tracks are analyzed, but some time may be required
until analysis is completed and the BPM and waveform are displayed.
When the Serato DJ software is used as an offline player, tracks can be
analyzed ahead of time. For tracks whose analysis has been completed,
the BPM and waveform are displayed immediately when the tracks are
loaded onto the decks.
For details on using the Serato DJ software as an offline player and
instructions on analyzing tracks, see the Serato DJ software manual.
! Depending on the number of tracks, some time may be required for
analysis.
Utility settings
The following settings can be changed:
! Setting for using DJ software other than Serato DJ
! Channel fader start setting
! Changing the master attenuation setting
! Slip mode flashing setting
! Demo mode setting
! Setting of the velocity curve in the sampler velocity mode
! MIDI settings in the sampler velocity mode
! Jog dial illumination mode setting
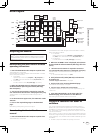
Launching the utility settings mode
When the utility settings mode is started up while this unit and a com-
puter are connected by USB cable, the set status may not be displayed
properly.
1 Disconnect the USB cable from your computer.
2 Press the [STANDBY/ON] switch on this unit’s rear
panel to set this unit’s power to standby.
Set this unit’s power to the standby mode.
3 While pressing both the [SHIFT] and [PLAY/PAUSE
f] buttons on the left deck, press the [STANDBY/ON]
switch on this unit’s rear panel.
The utility settings mode is launched.
4 After setting this unit to the utility settings mode,
operate the controller for the item whose settings you
want to change.
See the explanations below for the settings that can be changed.