26
En
5 Press the [STANDBY/ON] switch on this unit’s rear
panel to set this unit’s power to standby.
To save the settings, set the [STANDBY/ON] switch on this unit’s rear
panel to standby and quit the utility settings mode.
Changing the settings
Using DJ software other than Serato DJ
To use this unit as a controller for operating DJ software other than
Serato DJ, change this setting.
! By default, the unit is set to use Serato DJ.
Press the [KEY LOCK] button on the left deck.
! [KEY LOCK] button off: Setting to use Serato DJ
! [KEY LOCK] button lit: Setting to use DJ software other than
Serato DJ
Changing the channel fader start setting
The channel fader start function’s setting can be changed.
! By default, the channel fader start mode functions without the sync
mode set.
Press one of the effect parameter buttons for the left
deck.
! Effect parameter button (left) lit: Channel fader start with sync
mode set (The sync function is activated simultaneously when
playback is started with the channel fader start function.)
! Effect parameter button (center) lit: Channel fader start without
sync mode set (The sync function is not activated when playback
is started with the channel fader start function.)
! Effect parameter button (right) lit: Channel fader start function is
disabled
Set the master output’s attenuation level.
! The default is 0 dB.
Press one of the left deck’s [HOT CUE] mode, [ROLL]
mode or [SLICER] mode buttons.
! [HOT CUE] mode button lit: 0 dB (no attenuation)
! [ROLL] mode button lit: –3 dB
! [SLICER] mode button lit: –6 dB
Disabling the slip mode flashing setting
When the slip mode is on, the buttons that can be operated in the slip
mode (jog dial indicator, [AUTO LOOP] button, [PLAY/PAUSE f]
button, etc.) flash. This setting can be used to disable the flashing of
these buttons.
! By default, slip mode flashing is enabled.
Press the [SLIP] button on the left deck.
! [SLIP] button lit: Slip mode flashing enabled
! [SLIP] button off: Slip mode flashing disabled
Disabling the demo mode
If no operation is performed on this unit for 10 minutes during normal
use, the demo mode is set, but this demo mode can be disabled.
! By default, the demo mode is enabled.
! When any control or button on this unit is operated while in the
demo mode, the demo mode is canceled.
Press the [TAP] button.
! [TAP] button lit: Demo mode enabled
! [TAP] button off: Demo mode disabled
Changing the sampler velocity mode’s velocity
curve setting
Use this procedure to set the sampler velocity mode’s velocity curve.
One of four velocity curves can be selected, and different velocity curves
can be set for the left and right decks.
! By default, curve 1 is set for both decks.
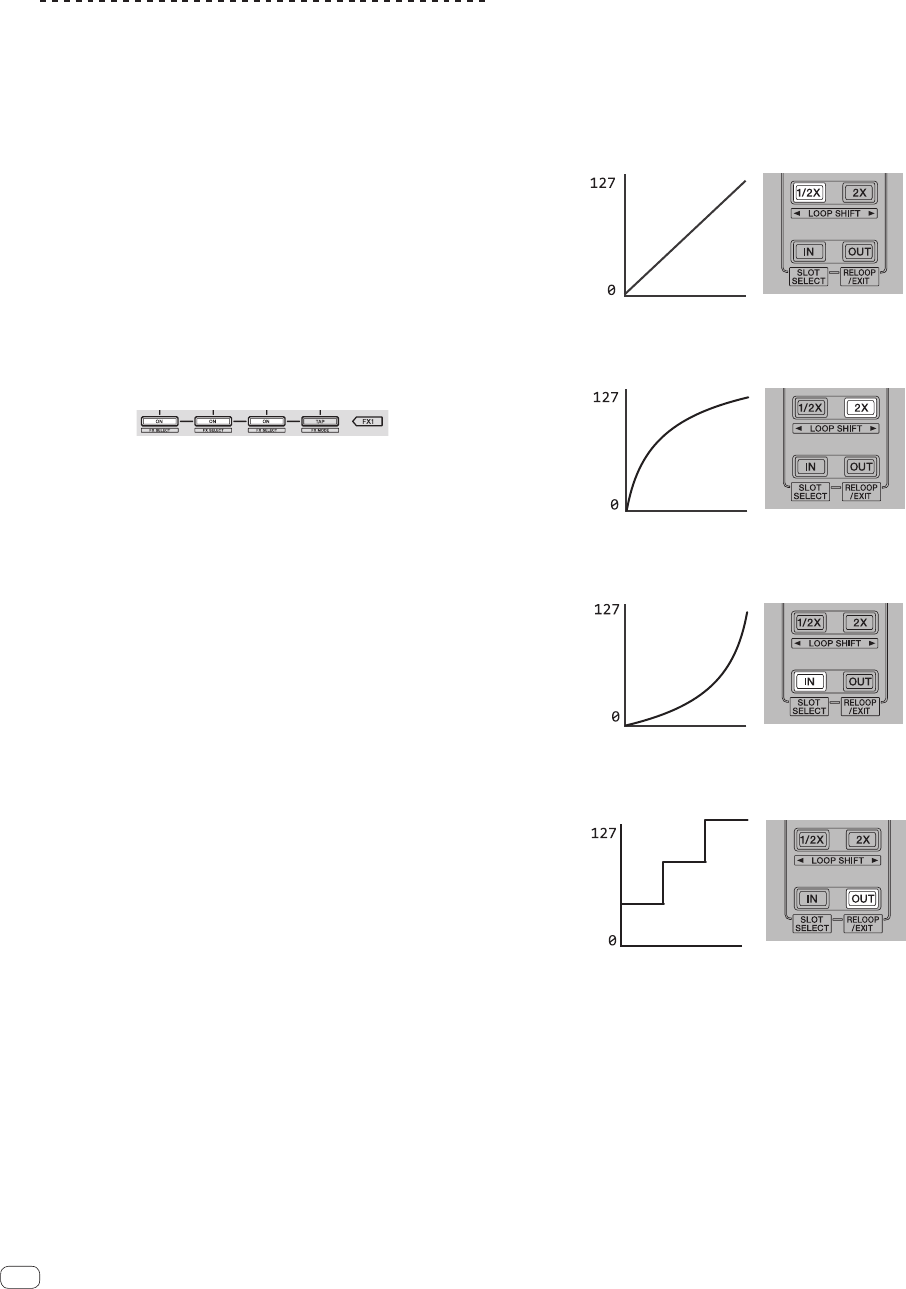
Press one of the [PARAMETERd] buttons on the deck
whose setting you want to make.
The velocity curve setting changes each time the [PARAMETERd] but-
ton is pressed.
The currently set value is indicated by how the [LOOP 1/2X], [LOOP 2X],
[LOOP IN] and [LOOP OUT] buttons light.
Curve 1
MIDI
code
Strength which
performance pad is pressed
Min.
Max.
Curve 2
MIDI
code
Strength which
performance pad is pressed
Min.
Max.
Curve 3
MIDI
code
Strength which
performance pad is pressed
Min.
Max.
Curve 4
MIDI
code
Strength which
performance pad is pressed
Min.
Max.


