


52
Convenient Functions
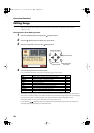
Correcting Notes One by One (
Note
Edit)
You can make corrections in a recorded performance one note at
a time. This process of making changes in individual notes is
called “note editing.”
• You can make these corrections by using note editing:
• Deleting misplayed notes
• Changing the scale of a single note
• Changing the force used in playing a single key
(velocity)
• Change the fingering.
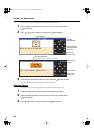
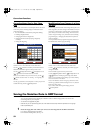
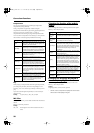
fig.e-note
The note-location display uses “Measure: Beat: Tick” as the
format. A tick is a unit of time that’s shorter than a beat.
Use the [ ] [ ] buttons to select the part with the note to be
edited. The Part number appears at the top of the screen.
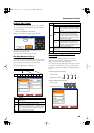
Use the [ (Bwd)] button and the [ (Fwd)] button or use
[ ] [ ] buttons to find the note to be corrected.
When you’ve found the note you want to correct, use the [ ]
[ ] buttons to select “Pitch” or “Velocity,” or “Fingering” for
the note.
Use the [-] [+] buttons to correct the pitch or velocity. If you want
to delete the note, press the [ (Delete)] button.
Modifying the Tone Changes in a Song
(PC Edit)
In some songs, the instrument sound changes during the course
of the song (that is, the Tone changes in the middle of a Part). In
such songs, an instruction to switch the Tone is inserted at the
place where you want the sound to change. This instruction is
called a “Program Change” (PC), and actions such as deleting
program changes, or changing the selected Tone by them are
called “PC editing.”
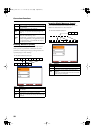
It is not possible to insert a program change into a measure or
beat that does not contain a program change.
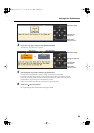
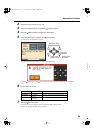
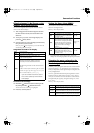
fig.d-e-pc
The PC-location display uses “Measure: Beat: Tick” as the
format. A tick is a unit of time that’s shorter than a beat.
Use the [ ] [ ] buttons to select the part with the program
change to be edited.
The Part number appears at the top of the screen.
Use the [ (Bwd)] button and the [ (Fwd)] button or use
[ ] [ ] buttons to find the program change to be edited.
When you’ve found the Program Change you want to modify,
select “Tone Name” on the screen.
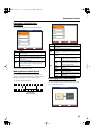
Press a Tone button to select a Tone group, then select a Tone
with the [-] [+] buttons. When selecting Part 10 or 11, select the
drum set or effect sound.
If you want to delete the Program Change, press the
[ (Delete)] button.
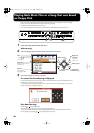
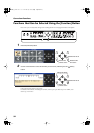
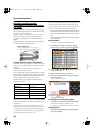
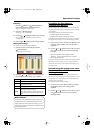
Saving the Notation Data in BMP Format
You can take notations that are displayed on the HPi-7 and save them to floppy disks. You can also use
saved image data to your computer.
* You cannot save copyrighted song data.
* Other than for your own personal enjoyment, use of the notations that are output without the permission of the copyright
holder is prohibited by law.
1
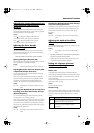
Insert the floppy disk onto which you want to save the image data in the HPi-7’s disk drive.
Use a floppy disk formatted on the HPi-7.
For more on formatting disks, refer to p. 41.
HPi-7_e.book 52 ページ 2005年1月18日 火曜日 午後4時39分